Woo! The Book I’ve Been Waiting For!

I’m a fan of Cindy Grisdela’s work and have gone through the exercises in her previous book, so I was thrilled when C&T sent me Cindy’s new book for review. Adventures in Improv Quilts covers the basics of design and color, but includes some more complex quilts than her previous book. Some of them remind me of Maria Shell, whose book I also love.

Photo courtesy of C&T

Cindy’s colors are bright and interesting. She often combines colors I wouldn’t have thought to use together, which causes me to look twice at the design. That’s a plus!

Photo courtesy of C&T

The book includes plenty of detail on technique. I was especially amused (and gratified) to learn that part of Cindy’s design process is to outline the size for the quilt with blue tape on her design wall. I’ve done that for years and find it a very effective way to think about filling the space as I design. Validation is always nice!

Photo courtesy of C&T

The book includes a chapter on color choices, which will be welcomed by numerous quilters who worry endlessly about the “right” colors. I choose my palettes intuitively, with better results some times than others, so maybe I should pay more attention? I love the color examples in the book, starting with basic palettes and progressing to the addition of other colors or values to give the project variety.

Photo courtesy of C&T

Cindy then goes on to cover the basic principles of design. These won’t be news to most quilters, but her examples shine. I think I will go back to the “bits” left from working through her previous book and see if I can enhance them by using some of her examples from this book.

Photo courtesy of C&T

My favorite advice in the book: “Don’t fear wasting fabric”! That’s a liberating thought!

My second favorite is one of her tips for free-motion quilting, but I think it could apply to most any part of the process: “If you feel like you’ve made a mistake, keep going. Either ignore it or do it again so it becomes a design element.” I love that! I love this book!

The book is available here, but this is not an affiliate link. C&T sends me books for review, and I tell you about my very favorites among them.


A Terrific Resource for Quilt Finishing

The Ultimate Quilt Finishing Guide is not exaggerating in its name. I was not immediately enthusiastic because it isn’t a “modern” quilt book, but it really is “ultimate” in being very comprehensive. Pretty much everything you’ve ever learned or wanted to know about borders, batting, backing, and binding is in this book, whether you’re a modern or traditional quilter.

Photo courtesy of C&T

It’s a single resource for all the stuff I keep forgetting, like how to make bias binding from a square of fabric.

I also like the book because the authors often agree with me 😀  For example, they suggest choosing border fabric after completing the center of the quilt. This has been my method for years unless I have a specific reason for buying the border fabric at the same time as the fabrics for the center.

There is a section on squaring up the quilt top when it’s finished, and another section on squaring the quilt up after it has been quilted. This is a major hassle for many quilters, so it’s nice to have it all clearly explained and well illustrated.

There is a discussion of how to measure for borders and then attach them without distorting the edges of the quilt. I should have read that years ago, before I learned the hard way!

Other helpful topics include:

  • Choosing batting
  • Joining batting pieces
  • Binding for both plain and fancy edges

The only thing I disagreed with in the entire book is the method for joining binding ends. I’m sure the way described in the book works just fine, but I love Susan Cleveland’s “Kiss, Twist, and Wiggle” method.

An extensive section covers just about every type of border imaginable, which I particularly like. I certainly could draft any of these using EQ (Electric Quilt design software), but here they are with an explanation of how to do the math to make them fit! That last is the most important, and there are practical work-arounds when needed. For example, when a border is one that makes turning corners difficult, the authors suggest using corner squares. I like it.

This is a comprehensive guide that I’m happy to add to my quilt library. Although most of the samples in the book are more traditional looking, the authors do include many borders that would work for modern quilts, especially as the modern quilt movement seems to be diversifying a bit.

Here’s one last picture from the book:

Photo courtesy of C&T

If you’ve read this far, leave me a comment and I’ll draw a name to receive a free copy of this book. Sorry to say I can only ship to U.S. addresses. I’ll draw the winner on Sunday, July 4, a week after this post goes up. I think I can find your email if you’re a subscriber to these posts, but if you want to be sure please leave an email in your comment. And thanks for reading!

Please note: C&T provides books and products for me to review. I choose those that I like the very best to tell about in my blog.

Perfect! A Book Review

If you have something but can’t find it, do you really have it?                              –Lilo Bowman

Love Your Creative Space, by Lino Bowman, turned out to be the perfect book at the perfect time for me.. When I read the sentence quoted above, it struck a nerve!

Photo courtesy of C&T

Here’s my stash of backing fabric before:

The fabric was folded and stacked, which made it hard to see.

I’m pretty sure some of that fabric hadn’t been touched in several years because I couldn’t see it and therefore didn’t know it was there.

And here’s the after:Fabrics are rolled so I can see and pull them out easily, and they are tagged with the size!  Woo!

Lilo’s book is about both studio design and organization.  I loved every part of it, but here are some favorites:

There are ideas on organization and storage for many types of creative supplies, not just quilting things.  She has many photos from real studios to give the reader ideas.

Photo courtesy of C&T

Some of the studio photos look to me like they were done by a decorator, which I am not!  And some were very realistic-looking in my opinion!

Photo courtesy of C&T

The book also addresses ergonomic studio design, including sewing machine set-up, which I found especially helpful.

Photo courtesy of C&T

.In addition to studio ideas for “most people”, Lilo discusses adaptations that many of us will need as we age, or simply as a result of our physical limitations.  There is one especially nice chapter on how one woman adapted to being partially paralyzed after a stroke.  

This is not just a book for quilters, though I found it very helpful in my quilting studio.  There is an emphasis on making the creative space attractive “without breaking the bank”, as the subtitle says.  You can learn more about the book here.

Note:  C&T sends me lots of books and I review my favorites so you don’t have to hunt around to find the best books.  Of course, “best” is my personal opinion 😀

Guest Blogger: Linda Reviews Rulerwork Quilting!

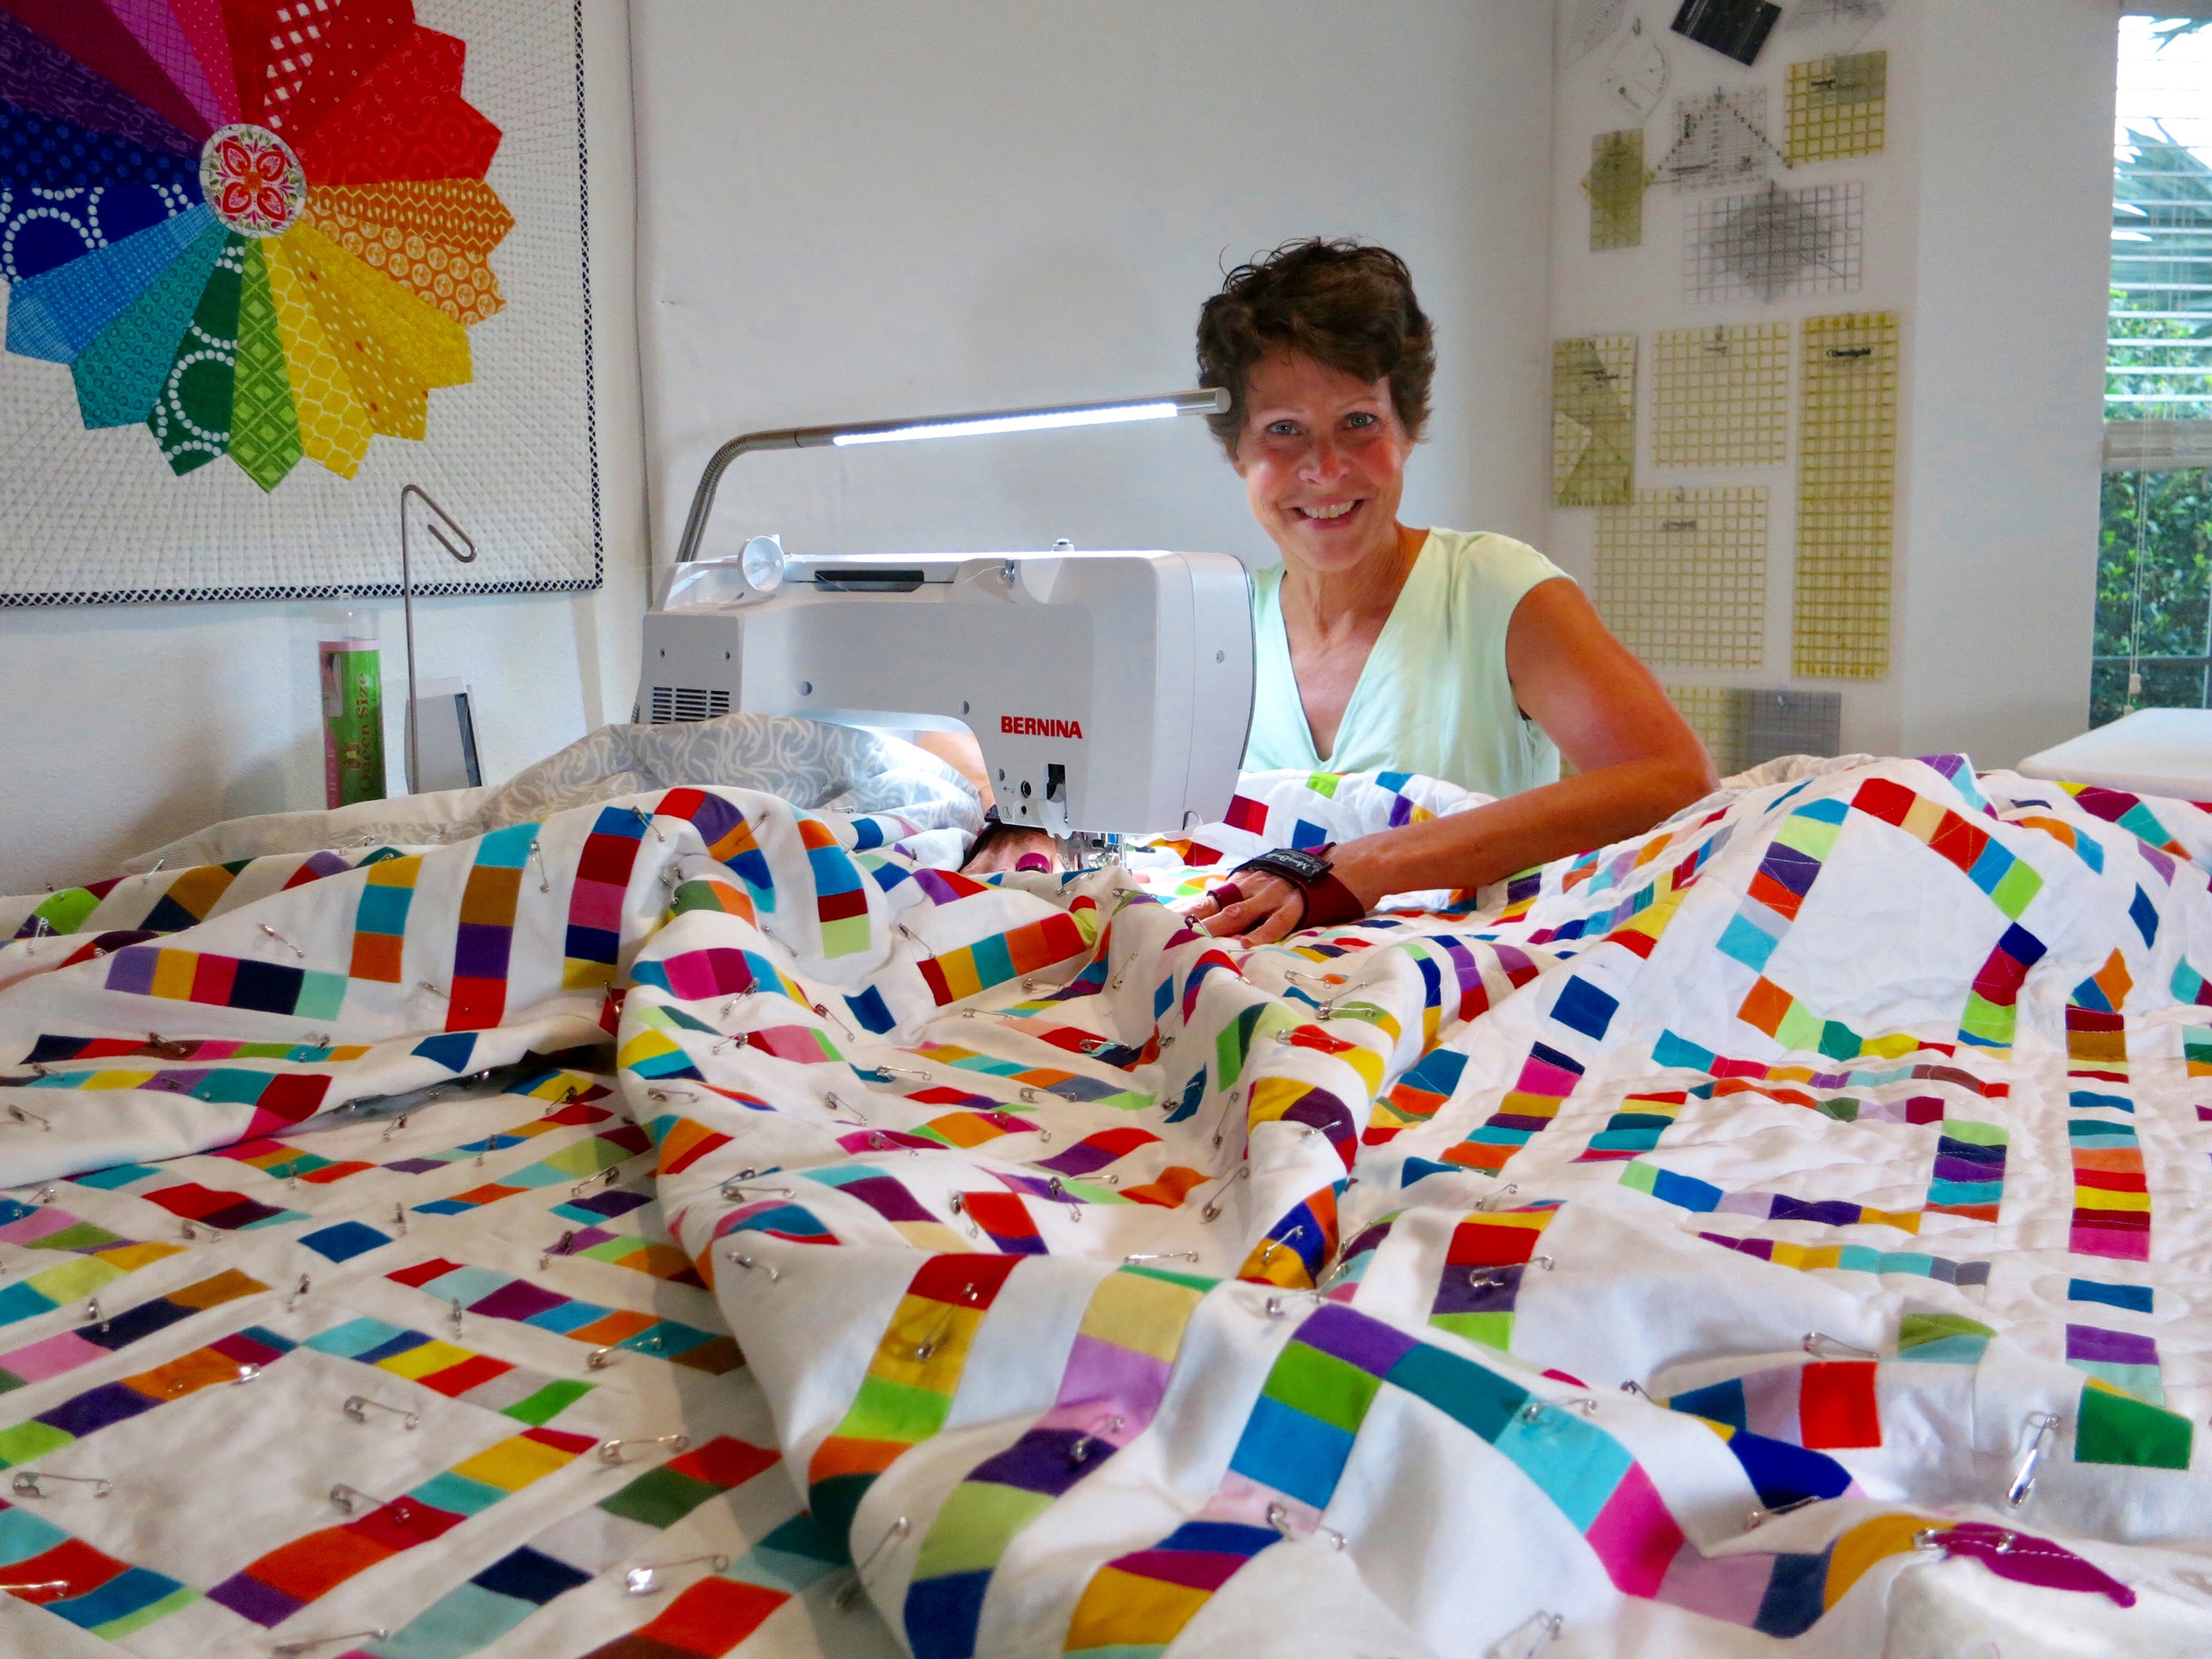
This is a guest post by my blogging friend Linda Hungerford (flourishingpalms.blogspot.com).Linda at her machine; photo courtesy of Linda Hungerford


This post is to review a new book published by C&T: The Ultimate Guide to Rulerwork Quilting by Amanda Murphy.

Photo courtesy of C&T

Mary invited me to review the book knowing I’m an avid domestic machine quilter who began quilting in 2000, and started quilting with rulers in 2011.

Here’s one of my first rulerwork attempts – doing a no-no by using a regular free motion quilting foot against a Fine Line brand quilting ruler.

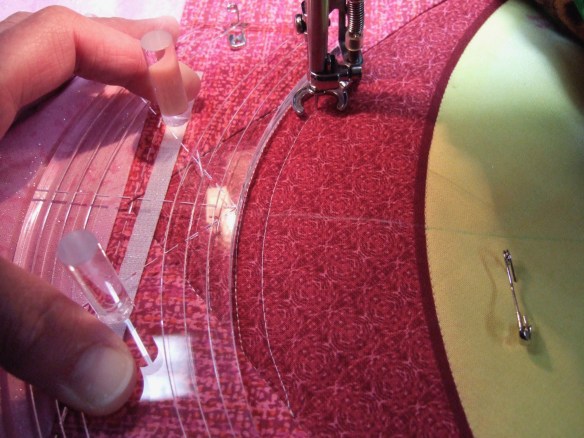
Ruler work quilting with the WRONG machine foot!

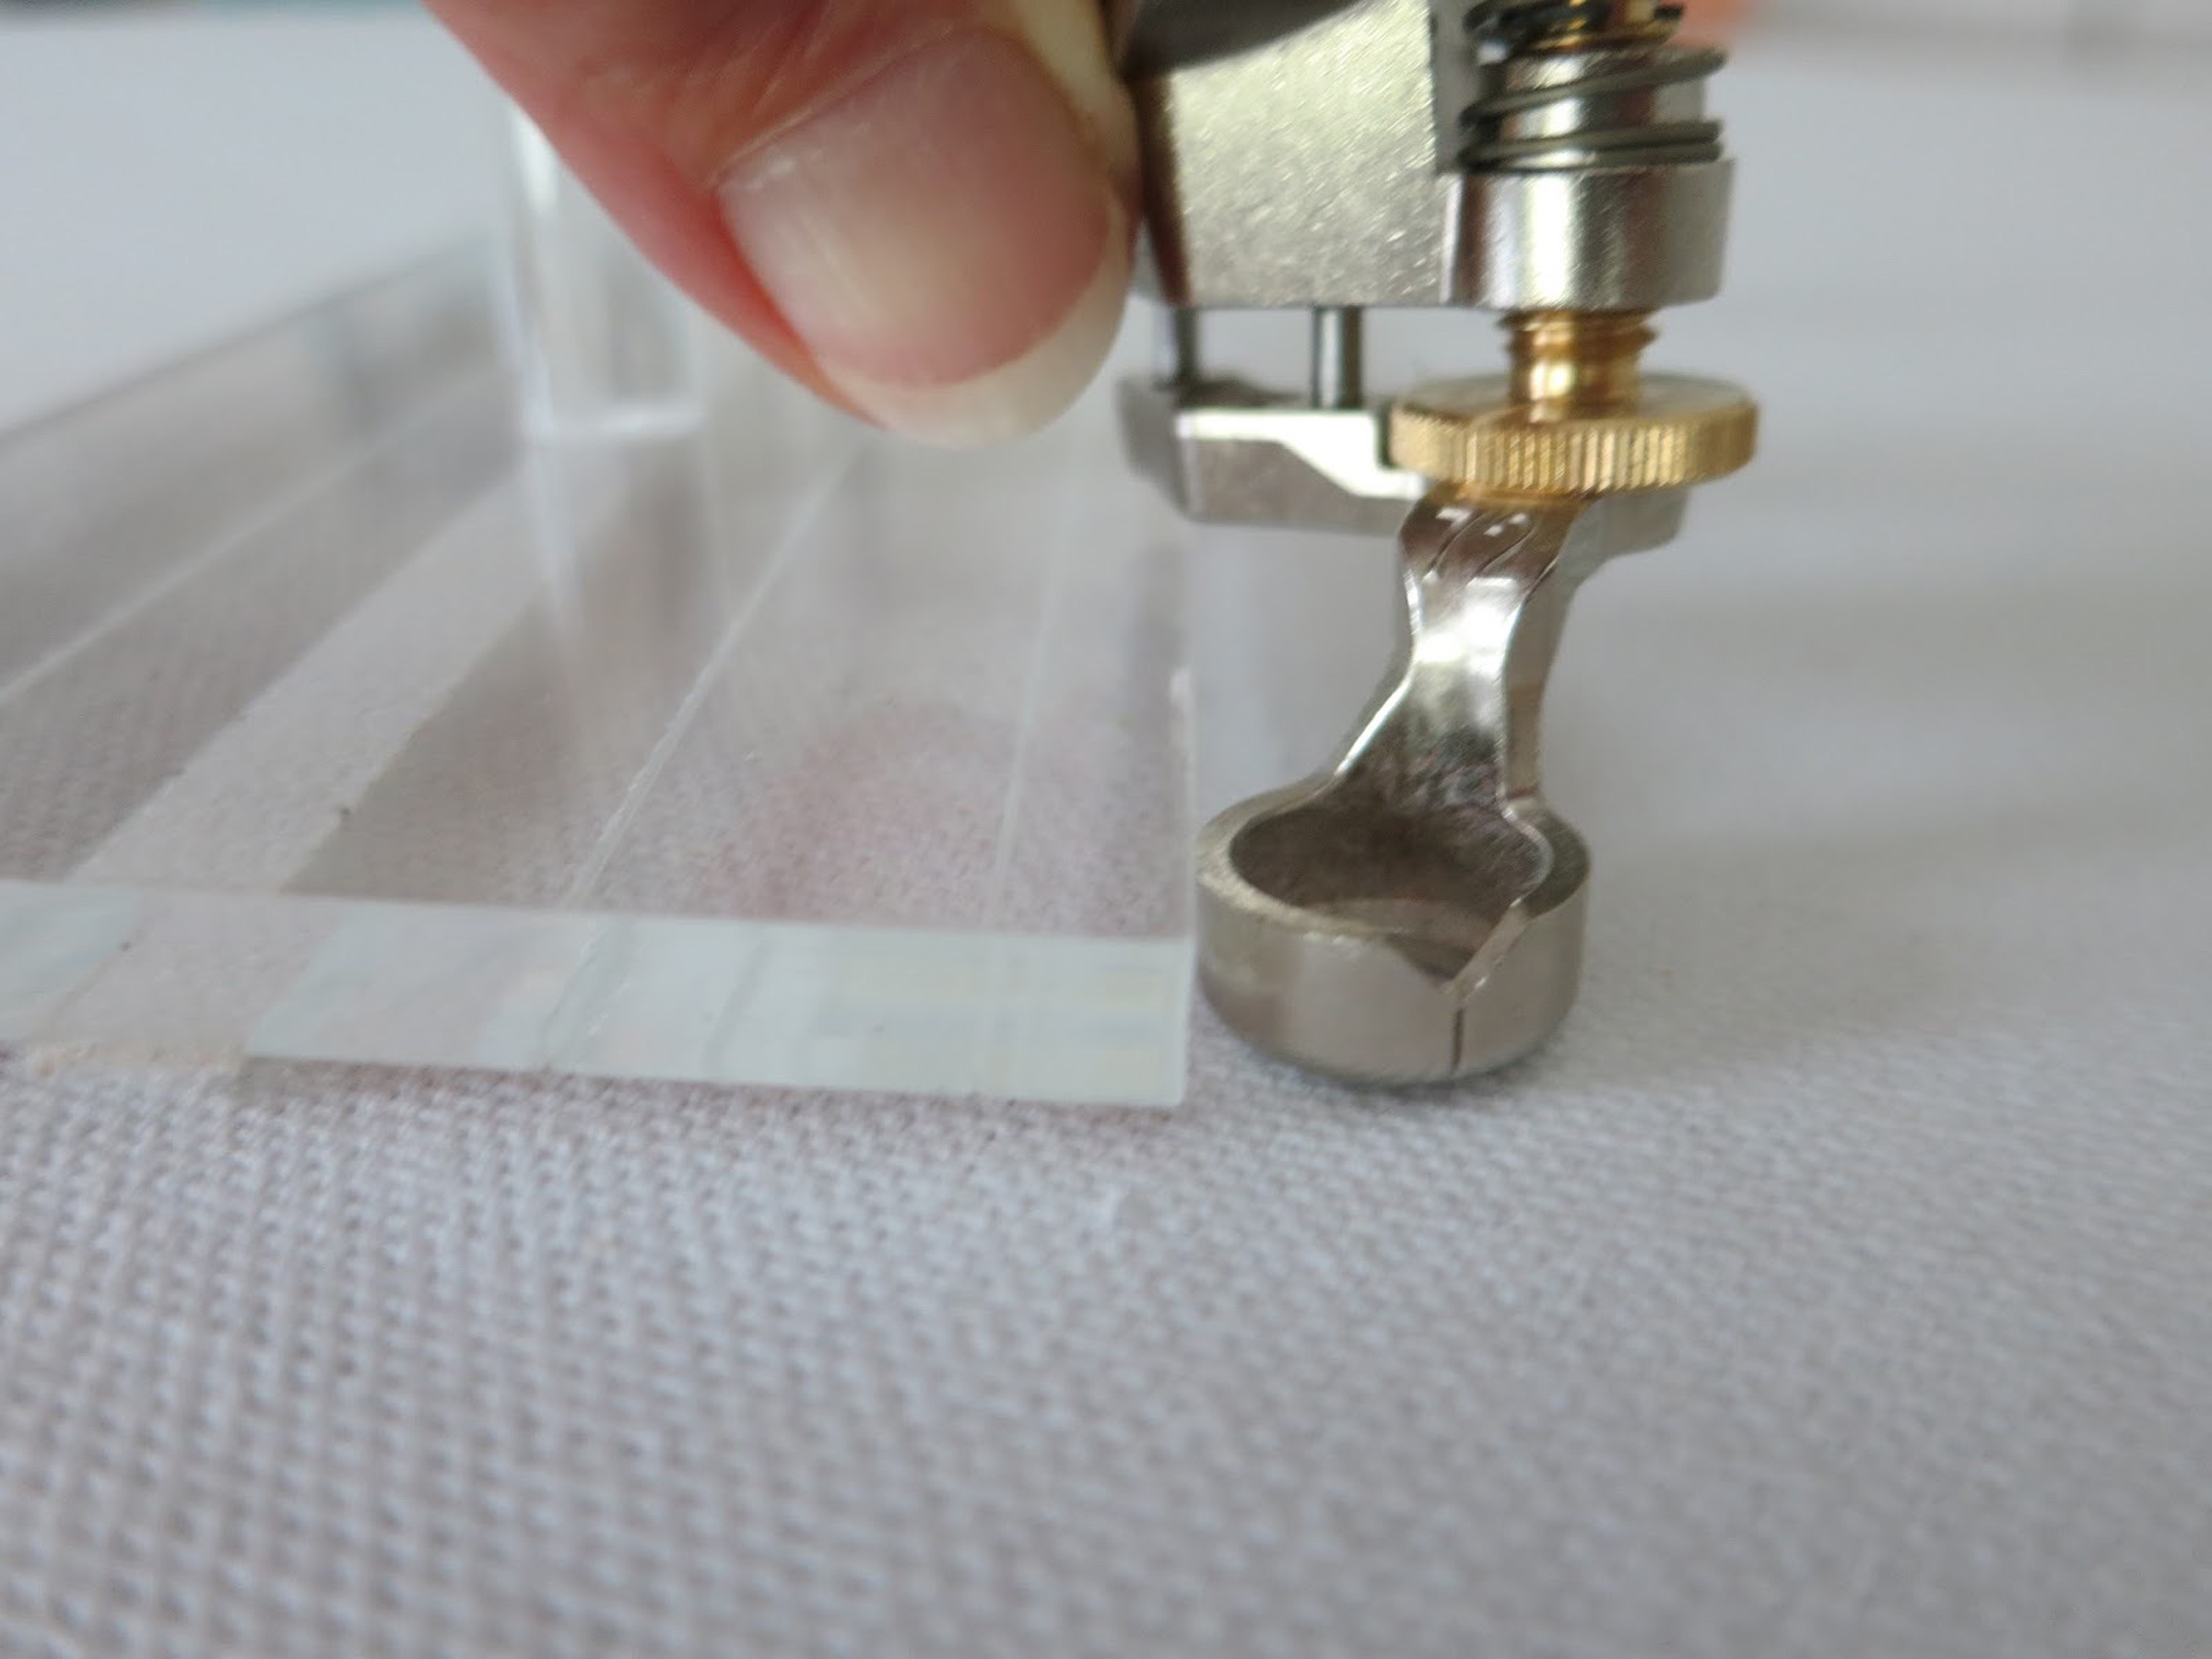
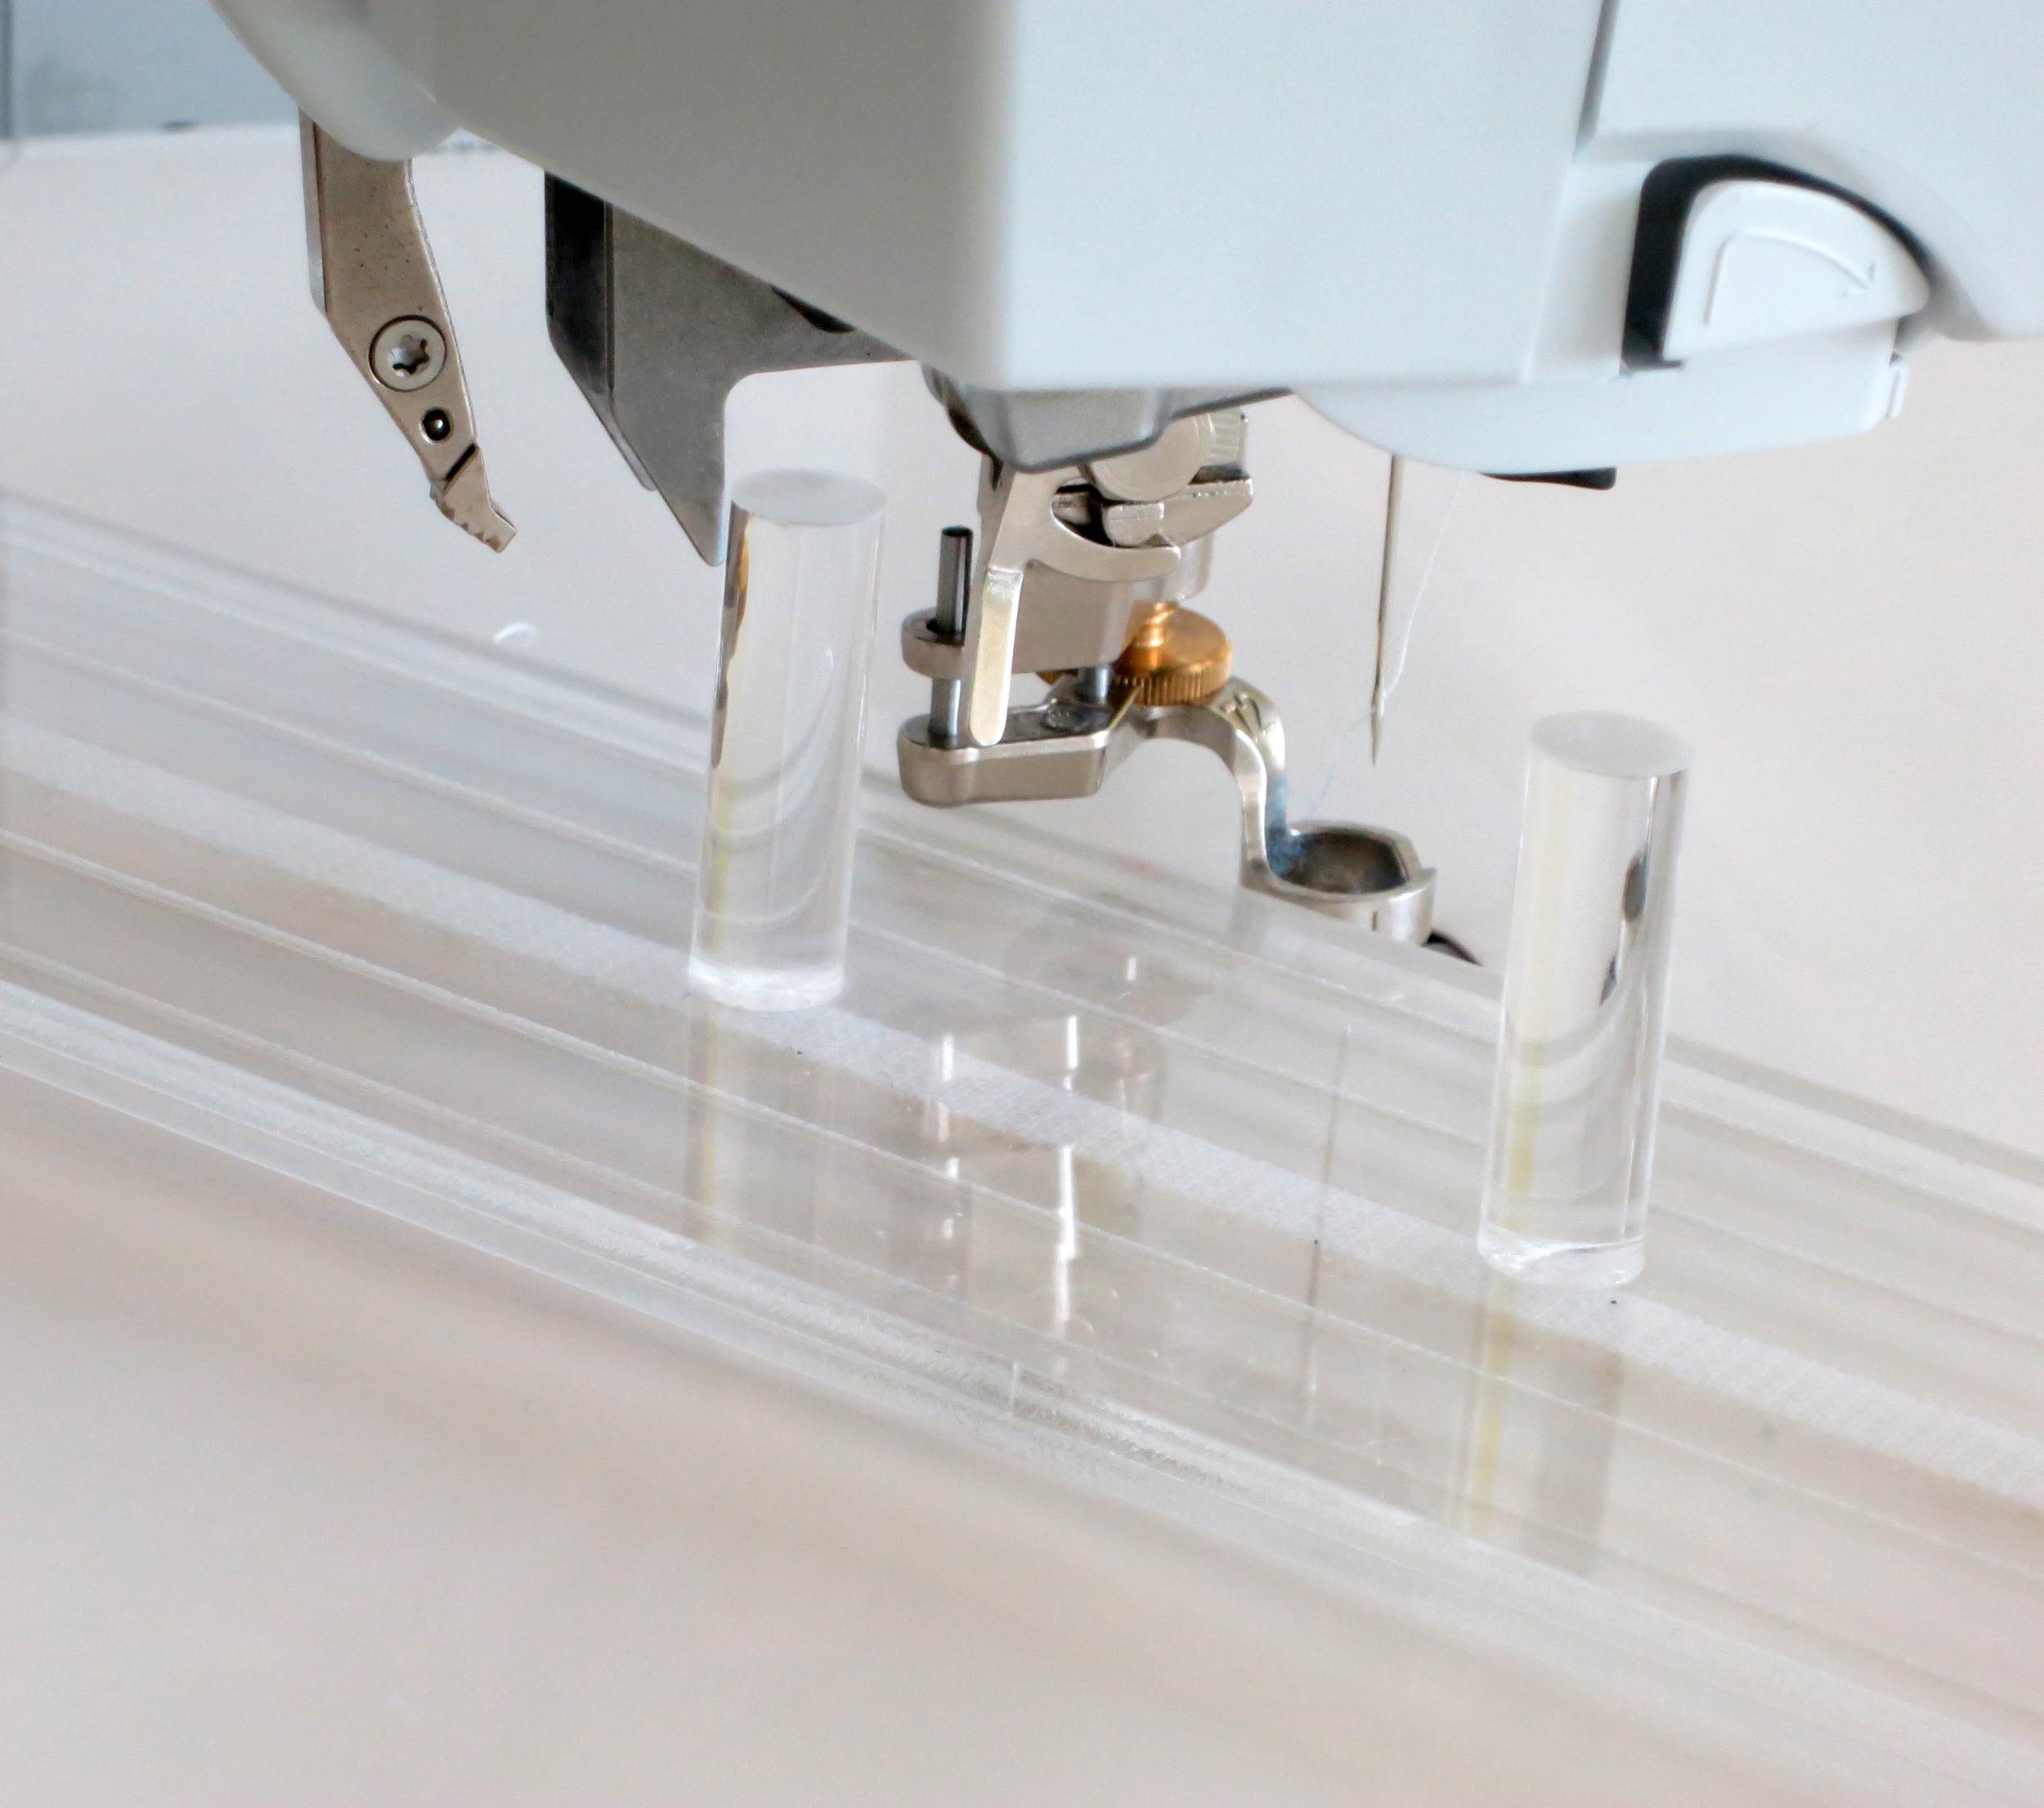
And here’s a picture showing how it should be done 🙂

This is the Bernina #72 foot.

For ruler work quilting, a quilter should use a ruler work quilting foot with a quarter-inch heel.

Two overall observations about the book:

  • Because Amanda quilts on a Bernina (both a domestic machine and a longarm machine) the book focuses on how to rulerwork quilt on a Bernina. One page is devoted to: “What if you don’t own a Bernina?”
  • Pages 29 to 102 of the 127 pages having photos of rulers being used on a Bernina longarm.

Amanda states: 

“As a Bernina expert I am very familiar with the machines in the Bernina line, so that is what is shown here.  There are obviously a lot of other machines on the market, too.  If you have questions about any of them and their suitability for ruler work, please consult your local dealer.”

For me, currently using a Bernina 770QE for quilting, (I do not own a longarm), I was able to apply much of the information to my own Bernina experiences. She references using a stitch regulator, but those of us who quilt on a domestic machine with a stitch regulator, are unable to use the stitch regulator and a ruler work foot at the same time.

Interestingly, she mentions that rulerwork quilting is better for distributing quilting evenly across the surface because of being able to quilt in all directions:

“When you quilt with a ruler, you naturally change directions more easily than you would with a walking foot, and quilting in many directions generally ensures a squarer top than quilting in just one.”

This made me smile because Jacqui Gering, a renowned walking foot quilter with two quilting books under her belt, says precisely the opposite! According to Jacqui, there’s no need to change directions when quilting. Is it any surprise that two quilters have differing views? And doesn’t that make you feel better about how you quilt?

Amanda covers these important topics:

  • thicknesses and shapes of rulers
  • ruler work quilting table set-up
  • sewing machine settings
  • needles

I concur with these points covered in the book:

Ruler thickness is important, and which thickness ruler to buy depends on whether your machine’s ruler foot is high shank or low shank

Each sewing machine brand needs its appropriate high shank or low shank ruler work foot.

Buy a ruler you will use most often

Though Amanda mentions that different ruler brands are available, she definitely focuses on and uses her own line of Good Measure rulers made by Bernina.

Photo from the book showing one of Amanda’s rulers. Photo courtesy of C&T

Just as a quiltmaker invests in one or two most-used rotary cutting rulers, a rulerwork quilter need only invest in one or two rulers. Begin rulerwork quilting with a straight edge and/or gentle curve ruler and you’re good to go – like the Good Measure straight edge/curved edge ruler (shown in the book), or Westalee straight edge/curved edge ruler (shown below).

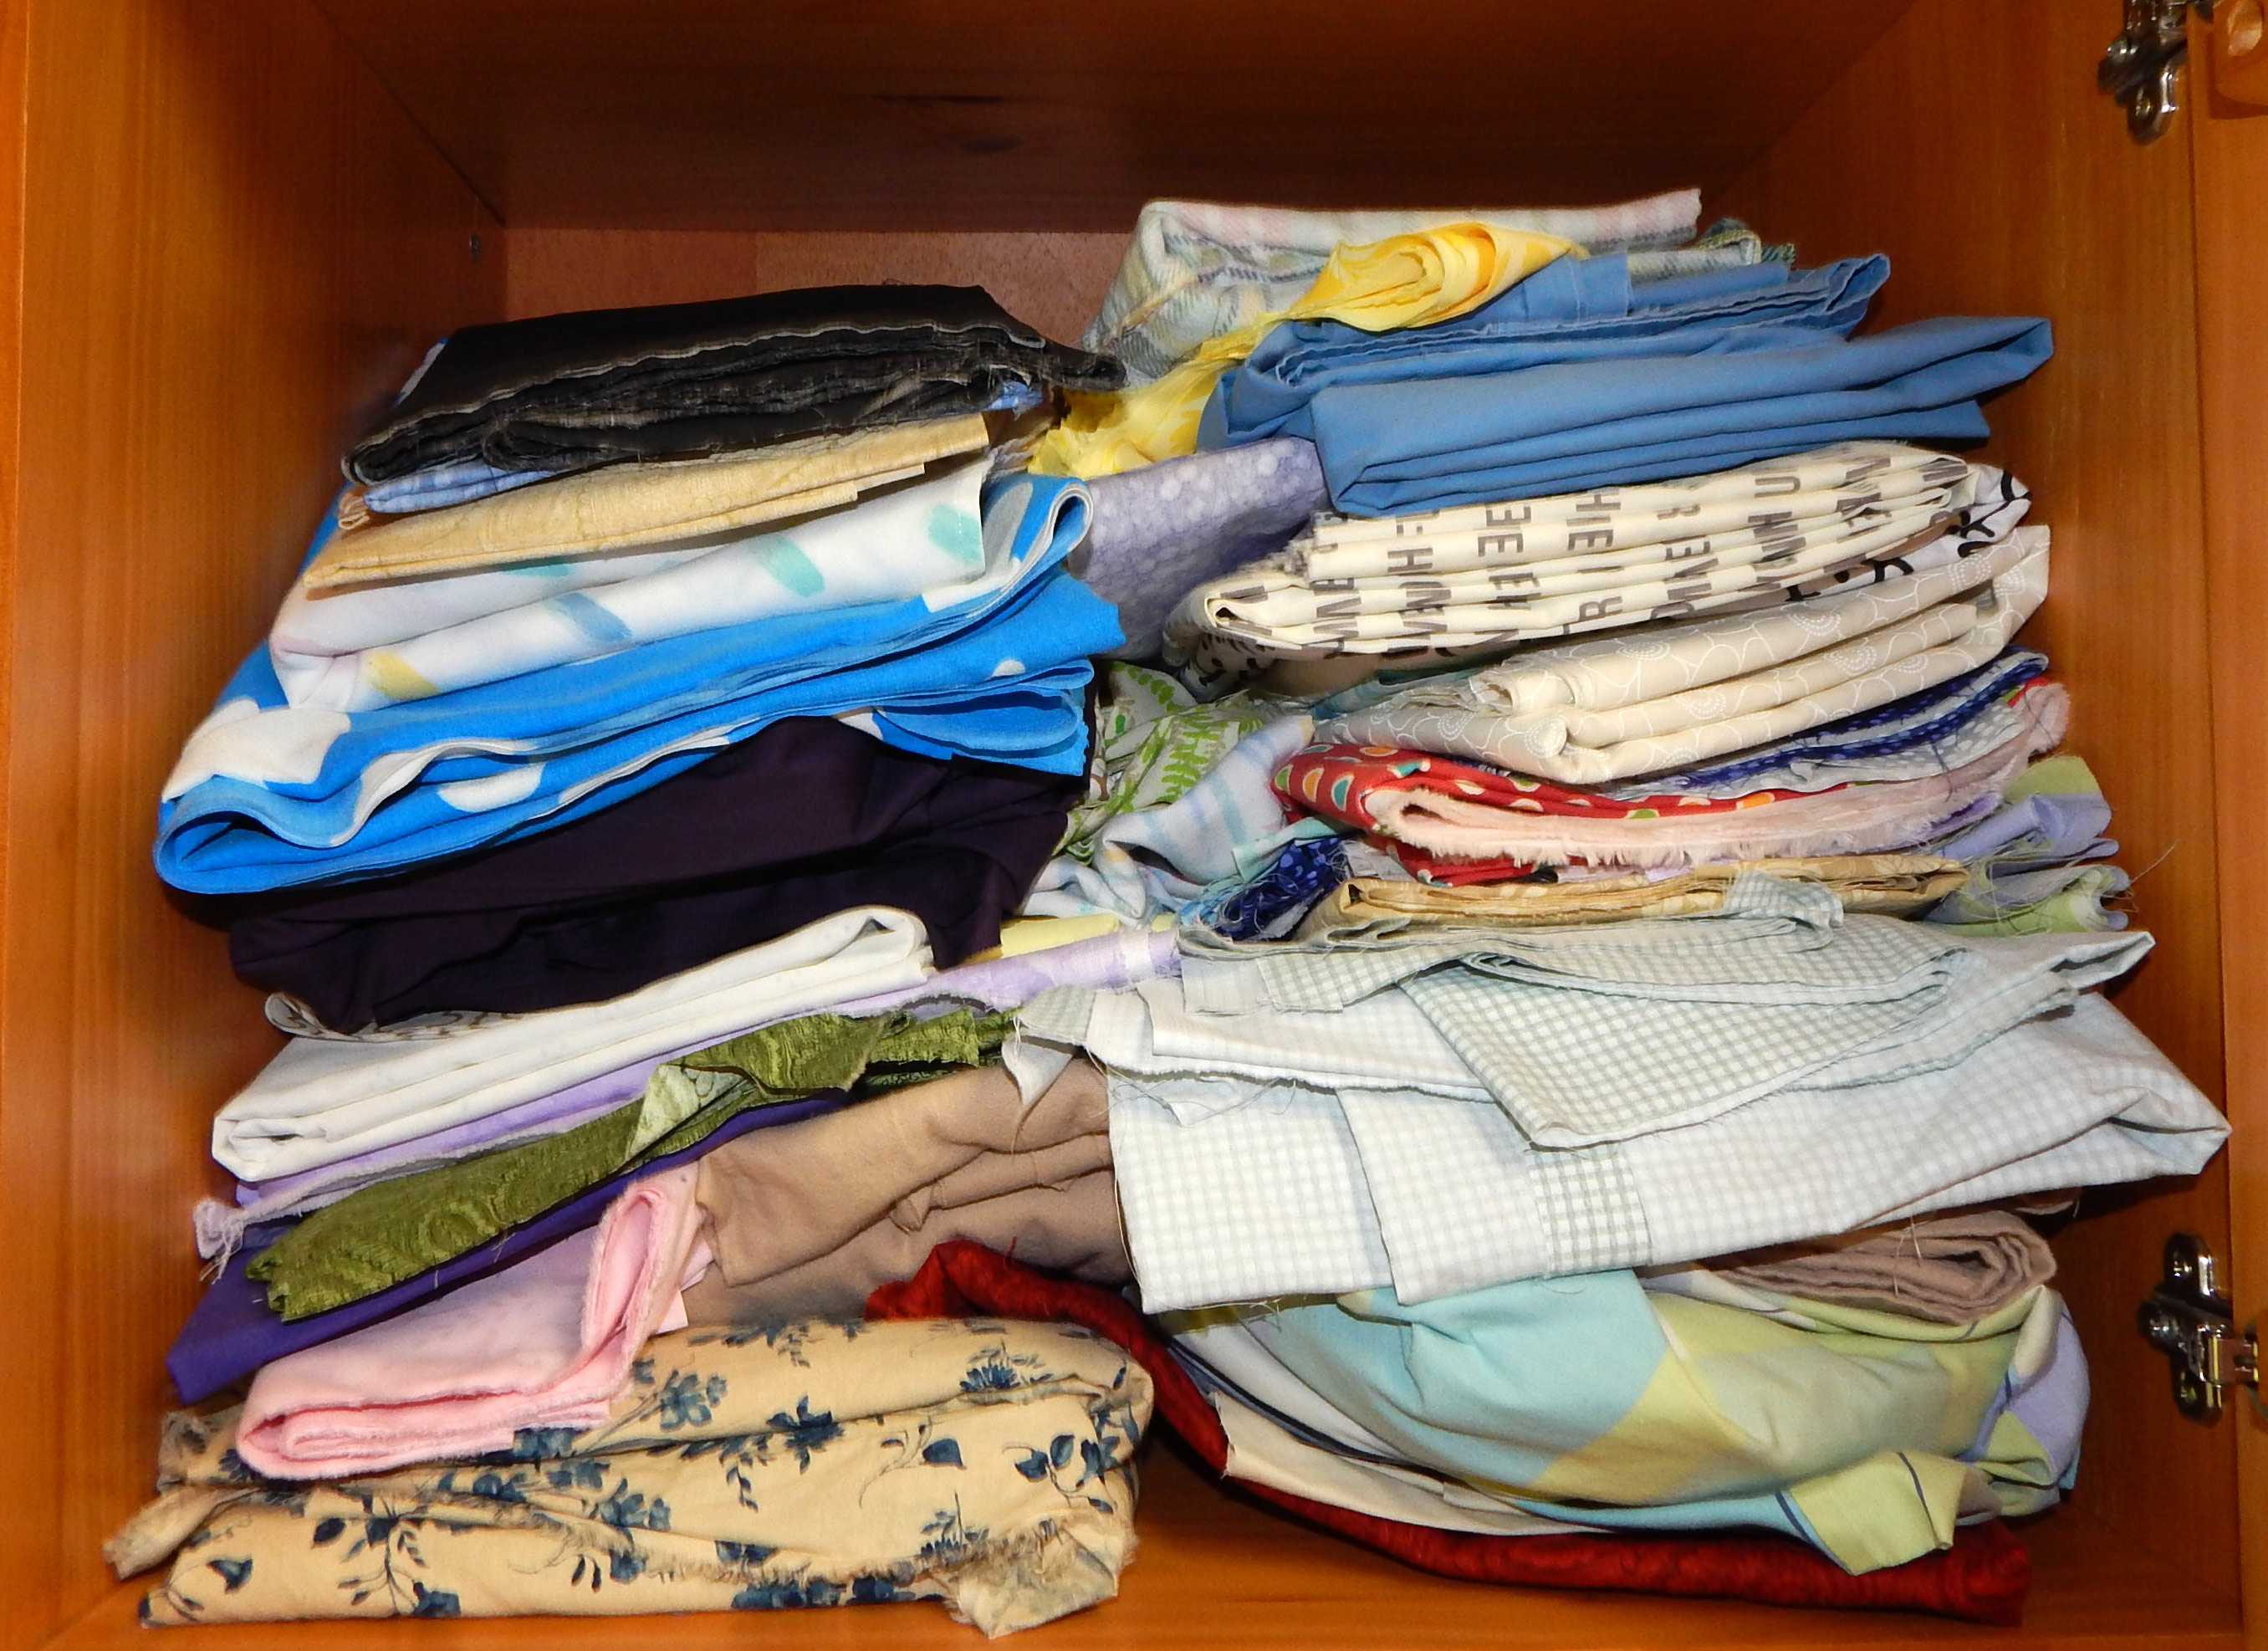
These are some of the brands of rulers I’ve accumulated in the past nine years, with Fine Line rulers being the ones I use most often… probably because that’s the brand I started with. I don’t own any Good Measure brand rulers.

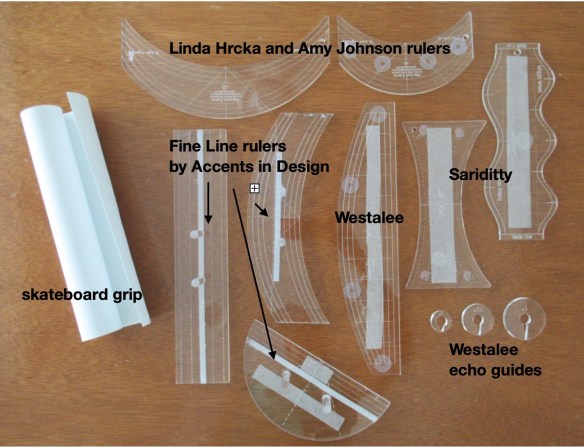
Photo by Linda Hungerford

My ruler photo includes a picture of a roll of skateboard grip – a sort of sandpaper that’s grittier than sandpaper with an adhesive back. It’s the best product I’ve found for the bottom of the ruler, to make it “stick” to fabric while quilting. Amanda suggests putting blue painter’s tape or Stable Tape (by Westalee) on the bottom of the ruler.

A bit about Fine Line rulers… They’re different – made with two vertical posts to “hang onto” when quilting (see first blog picture). However, after buying a sewing machine with the dual feed feature, I quickly learned that these ruler posts bump into the dual feed! I can’t use the ruler on the back of the ruler foot, so that’s something to keep in mind when considering a Fine Line brand ruler.

Fine Line ruler posts bump into dual feed mechanism

Amanda mentions Bernina’s echo clips, something I frequently use, though the brand I own is made by Westalee. Each slips on/off the ruler foot, and has different spacing, so you can choose how far away to quilt from the previous line of quilting. It’s well worth $10 for the Westalee set!

Westalee Echo Clips

Set-up is important: have a flat work surface with a means for easy quilt gliding

Amanda recommends the Sew Steady table, and that’s exactly what I have. Top it with a Supreme Slider (or a Queen Supreme if you have a large machine harp), and you’re good.

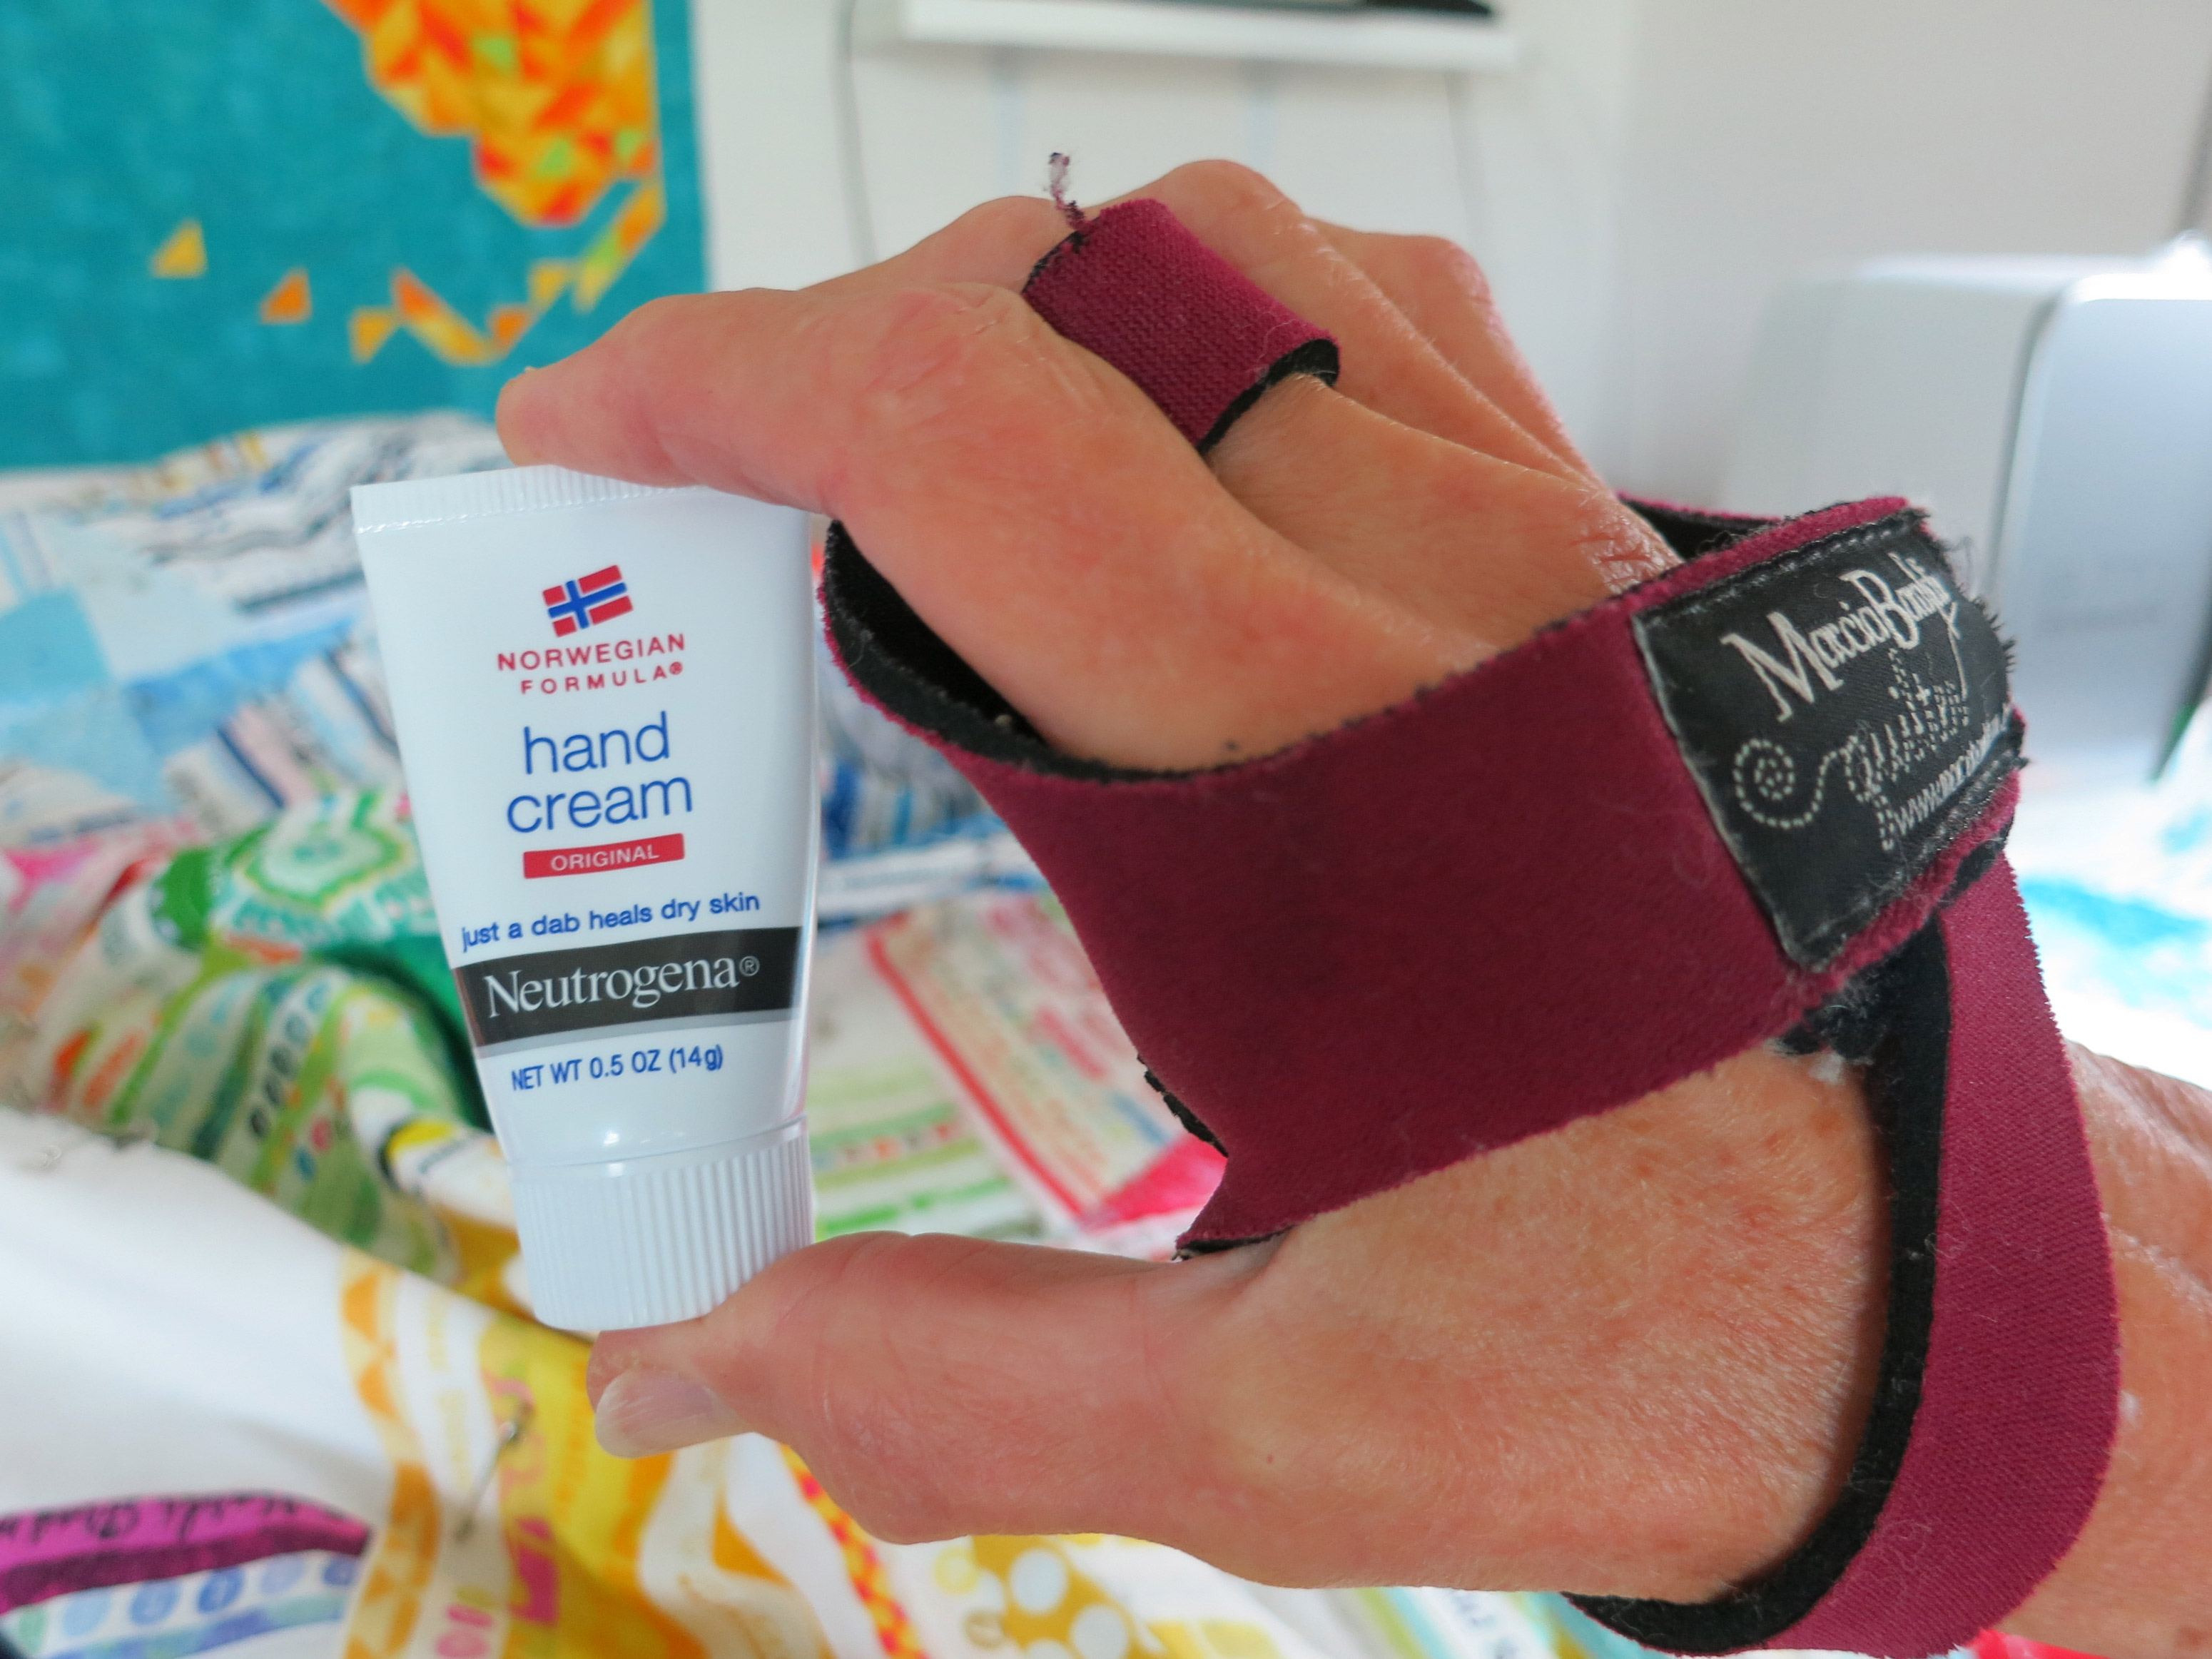
Here’s my quilting set-up contrived by placing two hollow-core doors across four IKEA adjustable-height Finnvard trestles.
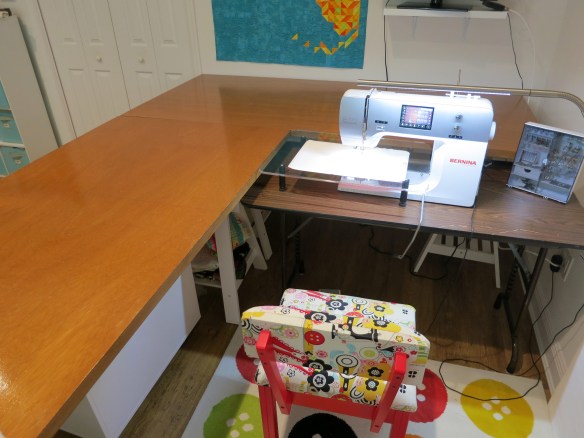
Amanda mentions wearing quilting gloves for rulerwork quilting. Personally, I prefer rubbing Neutrogena original formula hand cream on my hands, and then donning a pair of Marcia Baraldi Quilting Grip Gloves. It’s the perfect combo because my fingertips are  “grippy” and yet free to grab threads, tie knots, and even change a bobbin! (Neutrogena hand cream won’t harm your quilt.)

Although I have my favorite methods for rulerwork quilting, I also learned a thing or two in the book. The tip that meant the most to me is this one…

“Machine baste all the way around the sandwich through all layers, about 1/8″ from the edge of the quilt top.”

I’ve heard of taking a final “lap” around the outside of a quilt top, but I’d never heard of stitching around the perimeter of a basted quilt sandwich. I tried this on my latest quilt finish, my “Hole Punch Ribbon” quilt, and it worked to help keep my quilt “on the square!”  I blogged about this quilt here.

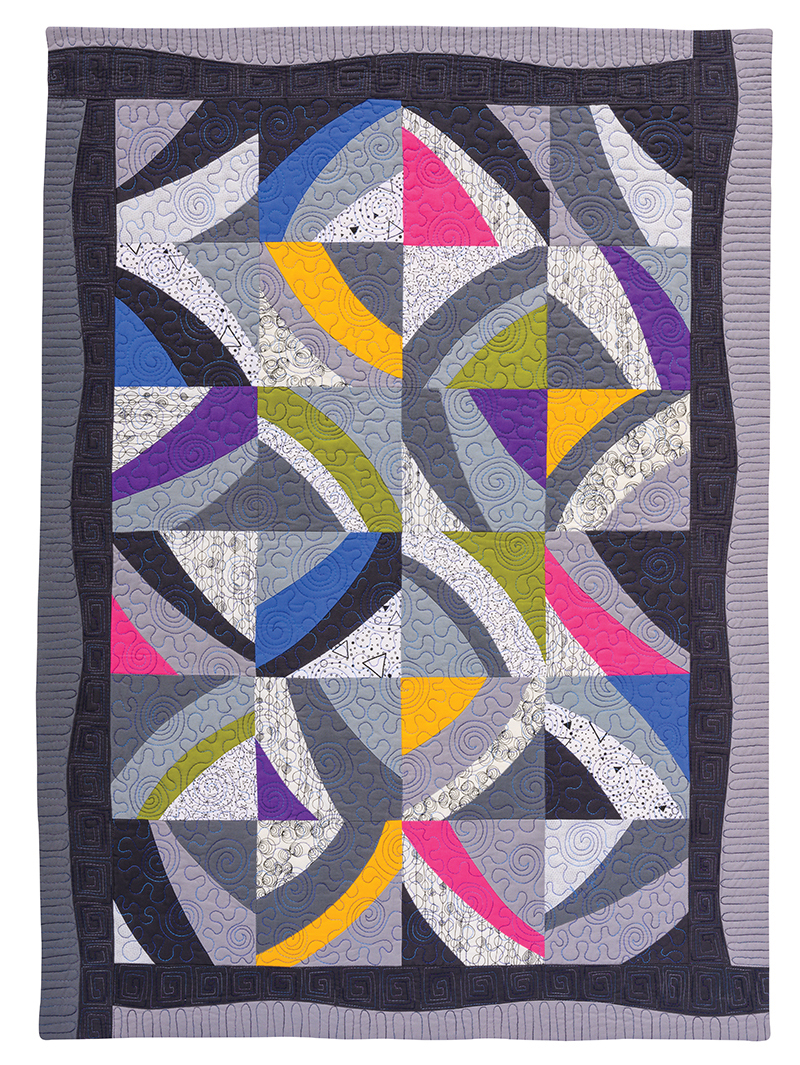
Amanda concludes the book with 31 pages of colorful quilt examples, showing different quilting designs on real quilts including quilt-as-you-go; followed by 14 pages about domestic machine quilting and troubleshooting; and 10 pages on longarm quilting and troubleshooting.

One of Amanda’s pretty examples from the book  Photo courtesy of C&T

All in all, this book is a good resource for a thorough introduction to rulerwork quilting, and is especially worthwhile if the quilter quilts on a Bernina. Then, it’s a must-buy!

Linda


Serendipity Quilt

Due to a series of fortunate events, I made this quilt:

Here’s how it happened.  You may recall that C&T sends me quilt books and products to review, and if I really like them I write about them here.  So a while back I received this book:

Photo Courtesy of C&T

Then a couple of weeks later, I entered a contest sponsored by Pineapple Fabrics and my project was a runner up.  They sent a wonderful box of pre-cuts, including a jelly roll.  So the only question was which quilt to make!  The book had many attractive options, including these:

Photo courtesy of C&%

Photo courtesy of C&T

I eventually chose the lattice quilt because it looked so do-able.  And it was!  The instructions even suggested designing your own spacing for the border, and you know how I like doing my own thing, so that was great.

Here’s a picture of the pretty flowers quilted on it by Julia Madison:

If you are thinking of making this quilt, know that it was fast, easy, and fun.  I did flip some of the seams when joining the pieces so the seams would match up well at the intersections.

Quilt Stats

Name:  Serendipity

Pattern source:  Love Jelly Roll Quilts, pictured above

Finished size:  51″ x 61″

Quilted by:  Julia Madison

Modern Curves and Stripes

One of the books C&T sent to me recently is Quilt Modern Curves & Bold Stripes, by Heather Black and Daisy Aschenhoug.   I found the quilts in this book to be new and interesting, not just a repeat of what I’ve seen elsewhere..

Photo courtesy of C&T

There are 15 projects in the book, all including curves and stripes, and I would be happy to make all of them!  The one I just HAD to make first, however, is called “Tidbits”:

Tidbits quilt, Photo courtesy of C&T

I’ve got to tell you, I’m in love with this block–it is just the cutest!  I’m thinking I might want to turn it on point to make a raindrop.  Here’s my first block:

The directions for the quilts offer the option of making your own strip sets or using striped fabric..  I used some fun striped fabric I had in stash.

As was the case with the last C&T book I used, the instructions were clear and complete.  For the Tidbits block it is important to keep track of the way stripes are oriented, and there are tips on how to do that.

The book includes templates to trace for each of the quilts, though it would be possible to use curved templates you have on hand if you don’t mind modifying the designs slightly.

I want to make this one next:

Sunset Horizons quilt, Photo courtesy of C&T

BTW, go to the C&T website and sign up for their newsletter  That way you’ll know when they’re having a SALE!  Click this link, scroll all the way to the bottom of the page, and find the box to sign up in the bottom right corner.  They also have a blog you may want to check out. (As always, this is not an affiliate link; it is provided for your convenience and I do not get paid if you click)

OK, more eye candy from the book.:

“Lys” quilt, Photo courtesy of C&T

Festoons quilt, Photo courtesy of C&T

I just love these fresh, modern designs! Which one do you want to make?


An Exciting New Book!

I agreed to review new quilt books for C&T this year, and here’s the deal.  They send me books they think might interest me and I tell you about the ones I especially like.  (If a book isn’t to my taste, I just don’t mention it.  That way you know that if I endorse a book, I really do like it.)

That being said, I am excited about several of the books they sent recently.  The first is  New Patchwork and Quilting Basics, by Jo Avery.

Photo Courtesy of C&T

This is a fresh, modern book with a whole range of projects.  It starts with three quilts for the true beginner and progresses to projects involving special skills such as applique, curved piecing, and even paper piecing.  It’s a nearly-complete set of quilting lessons all in one book!

I would LOVE to work with a local shop to develop classes from this book.  I’ve started on one of the earlier quilts that I hope to use as a class sample eventually.  Here’s the picture from the book:Photo Courtesy of C&T

And here’s my quilt so far 😀

I think the projects in this book will appeal to quilters of all ages.  I found the instructions and illustrations clear (and even more important, accurate) for the blocks I have made so far.  Although I wouldn’t recommend someone learning to quilt with only a book, I think it could be done with this one.

Here are a few more of my favorite projects from the book.

As you can see, this one demands some skill with HSTs, but the blocks are fairly large:

Photo courtesy of C&T

This artsy one appeals to me because it is a little whimsical.  It also looks as if it would be pretty easy to get an impressive result:Photo courtesy of C&T

Finally, I think I may try this one just for the challenge.  It’s pretty spectacular:

Photo courtesy of C&T

You can find the book at C&T, here.  (FYI, this is NOT an affiliate link.)

You can go to Jo Avery’s website here.

Let me know if you have used this book or decide to try it.  I’d like to hear someone else’s opinion–and that’s whether you agree with me or not!  

Now, I’m going to wash my hands and go make a quilt 🙂


Projects from 2014

As part of my effort to develop galleries for this site, here is a review of my projects from the first half of 2014.

The design and tutorial for this zippered pouch came from Noodlehead.

zippered pouch

I made a series of these little zippered pouches, and they have been useful.

These next two bags were made from a book entitled Ruby Star Wrapping.  You can read my review of the book here, if you want.

I continued my interest in improvisational piecing in 2014, making this confetti block…

improv quilt block

Confetti Block, 2014

…and this entry for the Quilt Alliance annual contest:

modern art quilt

Whirlwind, my 2014 Quilt Alliance challenge quilt

I made this quilt for the Pantone Challenge.  It looks better in person than in this picture, and now is used to decorate one of the rooms at our local free clinic:

Applique quilt

Radiating Orchid, my mini-quilt for the Radiant Orchid Challenge

As always, I made a number of donation quilts for Ronald McDonald House.  I used them to try out a variety of techniques and other experiments:

I made this baby quilt because I loved the fabrics:

baby quilt

Baby Dots–Front

baby quilt

Baby Dots–back.  I may like it even more than the front!

And I participated in several swaps, including one involving these blocks.  Don’t even think about the 88 little pieces in the block on the left!!!

I’ve reached my (self-imposed) length limit for a post, so the rest of the 2014 review will be coming up next week!  Please come back 😉

Save

Save

Save

Save