Visiting Susan Brubaker Knapp

Last weekend we had the opportunity to see some of the Orange County Artists Guild open studio tour. Our first stop was at the studio of Susan Brubaker Knapp, who makes really remarkable quilts. She also hosts a quilting art TV show, which is how most people know her.

Susan in her studio

Susan is a gracious hostess, and answered many questions for both me and the non-quilter friends who were with me. Her work is absolutely amazing!

One of Susan’s beautiful quilts

She discussed her methods, which you can read more about on her website. She also hosts Quilting Arts TV, so that’s another useful resource if you’re looking for information on how to make art quilts. A lot of her quilts are whole cloth works, painted with textile paint and then extensively quilted on one of her Bernina machines. The quilts are based on her own photographs, and she often begins by tracing a photo on white fabric.

The sheep quilt is amazing, and Susan loves chickens so she has them in a lot of quilts

The body on this butterfly is 3-dimensional

Here are more photos Susan allowed me to take during our visit. Please note, however, that she copyrights her designs.

I am in awe of Susan’s detailed work, and it was lovely to get to visit with her. You can find her teaching schedule on her website if you’re interested. When I expressed amazement at her free motion quilting, Susan pointed out that she has thousands of hours of experience with it! Nevertheless, her skill is amazing.

Poke weed is a native plant and is well represented in this quilt

This is my favorite! I’m happy to say that pitcher plants can grow in the yard here given the right conditions.

Here’s the back of one of the quilts so you can see Susan’s amazing free motion quilting

Of course every quilter needs a vintage machine on display in her studio

You can see much more extensive pictures of her studio on her website, here. Additionally, she has several tutorials on her techniques. You can also visit her blog and subscribe to keep up with what she’s doing. That’s how I learned about the tour. And if you have questions about her techniques, look at both the tutorials and the blog in detail.

Susan’s Ideas Explode

I took a class with Susan Cleveland at AQS-Paducah this year and it was excellent. Susan manages to be both pleasant and precise as a teacher and has many, many tricks for improving quilt making skills.

Thinking of Susan’s creativity and sense of humor, I decided to make my SAQA donation quilt a picture of ideas exploding out of her head.

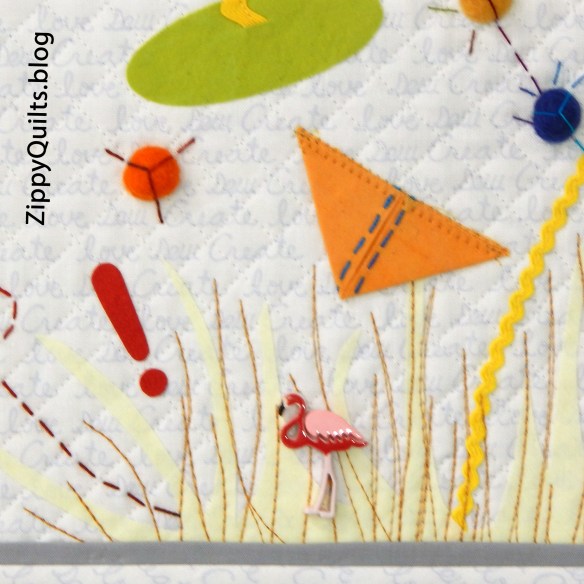
Here’s the resulting piece:“Susan’s Head Explodes”, 12″ x 12″, a tribute to Susan Cleveland

Susan is known for (among other things) her binding techniques, prairie points, and Dresdens. All these involve her signature precision and attention to detail. I used some of her techniques in this little quilt and added several of my own. Here are some details.

First, the martini glass. Please note that I have no idea whether or not Susan drinks alcohol; I just couldn’t resist this use of a prairie point!

You can see my binding up close in this detail photo. I used a flange to accent the edge. The little spheres are wool balls cut in half, a technique I learned from Susan.

The red exclamation mark is made with Kraft-Tex to avoid any risk of fraying on such a small element.The flamingo is a plastic button! Following a suggestion from a reader (Elizabeth, in response to my Habitat House), I removed the shank and glued the button to the quilt.

For one of the prairie points, I put a clear spherical button inside to hold it open a little. This button was one of my happy finds in Paducah, so it deserves to be in the piece!

The wool blend felt used for batting was a suggestion in a recent book by Sue Bleiweiss. It worked quite well in terms of being stable and easy to use.

Quilt Stats:

Name: Susan’s Head Explodes!

Designed and made by: me, with inspiration from Susan Cleveland

Finished size: 12″ x 12″

Materials include: Commercial cotton fabric, hand dyed fabric (Cherrywood), hand dyed embroidery thread (Artfabrik, Laura Wasilowski), Kraft-Tex (C&T), plastic buttons, commercial rick rack, wool felt balls, a polymer clay button, wool blend felt for batting, and various commercial threads.

Note: As always, the links in this post are for your convenience. They are not affiliate links.

Woo! The Book I’ve Been Waiting For!

I’m a fan of Cindy Grisdela’s work and have gone through the exercises in her previous book, so I was thrilled when C&T sent me Cindy’s new book for review. Adventures in Improv Quilts covers the basics of design and color, but includes some more complex quilts than her previous book. Some of them remind me of Maria Shell, whose book I also love.

Photo courtesy of C&T

Cindy’s colors are bright and interesting. She often combines colors I wouldn’t have thought to use together, which causes me to look twice at the design. That’s a plus!

Photo courtesy of C&T

The book includes plenty of detail on technique. I was especially amused (and gratified) to learn that part of Cindy’s design process is to outline the size for the quilt with blue tape on her design wall. I’ve done that for years and find it a very effective way to think about filling the space as I design. Validation is always nice!

Photo courtesy of C&T

The book includes a chapter on color choices, which will be welcomed by numerous quilters who worry endlessly about the “right” colors. I choose my palettes intuitively, with better results some times than others, so maybe I should pay more attention? I love the color examples in the book, starting with basic palettes and progressing to the addition of other colors or values to give the project variety.

Photo courtesy of C&T

Cindy then goes on to cover the basic principles of design. These won’t be news to most quilters, but her examples shine. I think I will go back to the “bits” left from working through her previous book and see if I can enhance them by using some of her examples from this book.

Photo courtesy of C&T

My favorite advice in the book: “Don’t fear wasting fabric”! That’s a liberating thought!

My second favorite is one of her tips for free-motion quilting, but I think it could apply to most any part of the process: “If you feel like you’ve made a mistake, keep going. Either ignore it or do it again so it becomes a design element.” I love that! I love this book!

The book is available here, but this is not an affiliate link. C&T sends me books for review, and I tell you about my very favorites among them.


I Digress…To Leaf Pounding

One of the things I love about quilting is that there is an endless supply of things to learn.  That often means that I get sidetracked onto something different, but that’s OK.

Several years go I took a class in leaf pounding but I never did anything with the results (sound familiar to anyone out there?)  I recently found the prints, still looking pretty good, in my DO SOMETHING box and decided to get busy.

Here is the first, a sycamore leaf that was pounded onto Kona PFD (fabric prepared for dying).

After the fabric dried, I outlined the leaf with a brown Pigma pen.  When I took it out recently I used cotton batting and muslin backing, spray basted it, and quilted it freehand.  I used my Bernina Stitch Regulator (BSR) and found it worked quite well for this purpose.  (I haven’t been so happy with the BSR on larger projects–as a friend once told me, “It’s like training wheels”, meaning it’s just too slow on something big.) However, I was pleased with the way the BSR worked it on this little piece.

Here’s a detail, showing some of the unevenness created when part of the leaf “stuck” to the fabric more than the rest of it.  I figure nature isn’t perfect so I’m not worrying about it.

If you want to try leaf pounding, there’s a tutorial here.

And now the question:  How should I finish this?  I don’t think binding would look right.  I have seen leaf pounding pieces framed, so I guess I could mount and frame it.  Edge finish with brown satin rat-tail?  Face the piece?  Other ideas?  Thanks, as always, for your suggestions!

Nothing Is Wasted

We recently spent far too many hours in the Greenville-Spartanburg (South Carolina) airport, but that situation lead to the discovery of this artwork in one of the terminals.

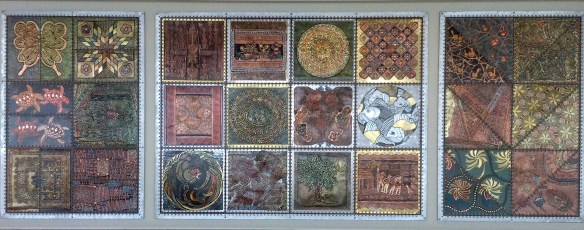
metal "art quilt" sculpture by Evelyn Rosenberg

South Carolina Quilt, by Evelyn Rosenberg 

Evelyn RosenbergThis is a metal “quilt” by artist Evelyn Rosenberg.  She has done other metal works that look like fiber art, and you can see pictures of a number of them by clicking on her name or here to link to her website.  (The website has better pictures than mine.)

As you can see, this work consists of a number of blocks making up 3 panels.  I’ve made pictures of each individual panel, shown below.

Left panel

Center panel

Right panel

Here are a couple of the individual blocks, showing a little more of how the blocks are made and the quilt is sewn together with metal cables.  I really enjoyed seeing this, so if you find yourself in the Greenville-Spartanburg airport, check it out 😉