A Little House Quilt

One of my guilds provides little wall quilts, featuring houses, to Habitat for Humanity. They give one of these quilts to each new homeowner, and have asked us to provide a few more.

To make this one, I used a pre-drawn block from EQ8 and printed a line drawing of it at 12″ x 12″. Then all I had to do was measure the components and make the fusible applique quilt. This is the block as it was shown in EQ8:

Block design taken directly from EQ8

And here is the line drawing I printed from the program (along with my notes!):
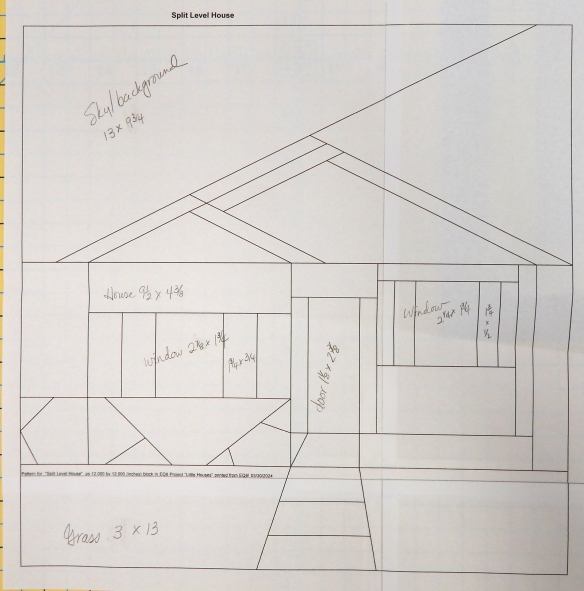
EQ8 drew this as if I were going to piece it. There was the option to print sections for paper piecing as well.

Finally, here is the finished house. It is all fused applique.
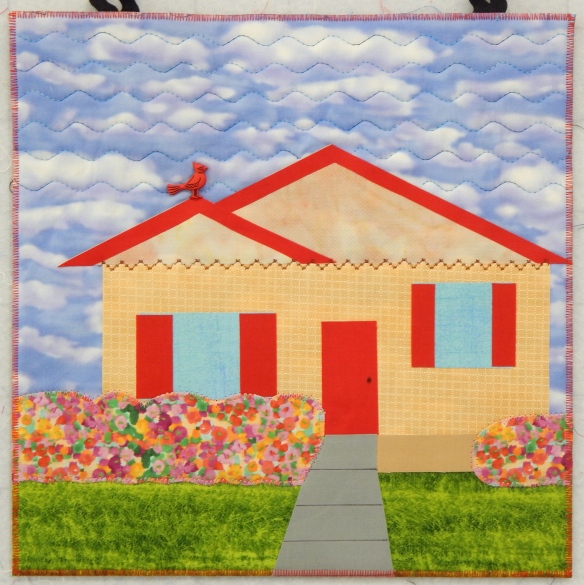
I use wool felt as the “batting” for wall quilts now, having learned from one of the many books I read that it is more stable for that purpose. It does, indeed, produce a nice firm quilt and this small one won’t sag even though it is to be hung with two loops at the top instead of a sleeve and rod.

I did a little decorative quilting and zig-zagging along the edges of some of the pieces, but this won’t be washed so I didn’t worry too much about it.

The redbird on the roof is a button! I collect them for things such as this 😀  As is often the case with decorative buttons, this one has a shank, so I poked a hole in the quilt and pushed the shank through so the button would lie flat. The back is secured with a pin.

Finally, after debating about what to do, I zig-zagged the edge to finish the quilt. I hope it will enhance someone’s new home.

Visiting Susan Brubaker Knapp

Last weekend we had the opportunity to see some of the Orange County Artists Guild open studio tour. Our first stop was at the studio of Susan Brubaker Knapp, who makes really remarkable quilts. She also hosts a quilting art TV show, which is how most people know her.

Susan in her studio

Susan is a gracious hostess, and answered many questions for both me and the non-quilter friends who were with me. Her work is absolutely amazing!

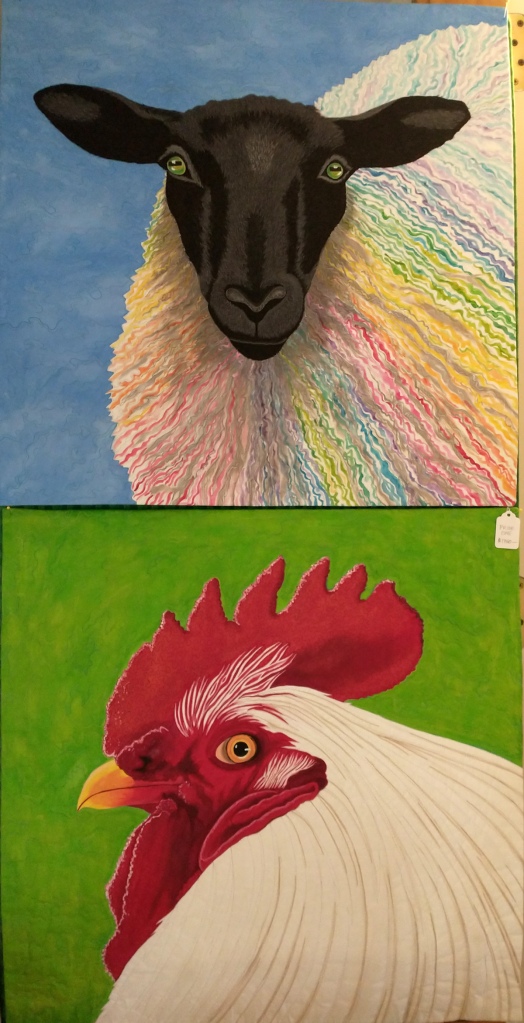
One of Susan’s beautiful quilts

She discussed her methods, which you can read more about on her website. She also hosts Quilting Arts TV, so that’s another useful resource if you’re looking for information on how to make art quilts. A lot of her quilts are whole cloth works, painted with textile paint and then extensively quilted on one of her Bernina machines. The quilts are based on her own photographs, and she often begins by tracing a photo on white fabric.

The sheep quilt is amazing, and Susan loves chickens so she has them in a lot of quilts

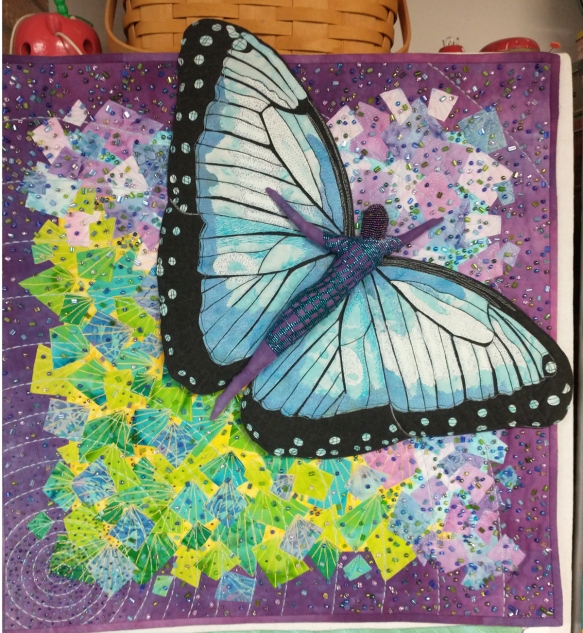
The body on this butterfly is 3-dimensional

Here are more photos Susan allowed me to take during our visit. Please note, however, that she copyrights her designs.

I am in awe of Susan’s detailed work, and it was lovely to get to visit with her. You can find her teaching schedule on her website if you’re interested. When I expressed amazement at her free motion quilting, Susan pointed out that she has thousands of hours of experience with it! Nevertheless, her skill is amazing.

Poke weed is a native plant and is well represented in this quilt

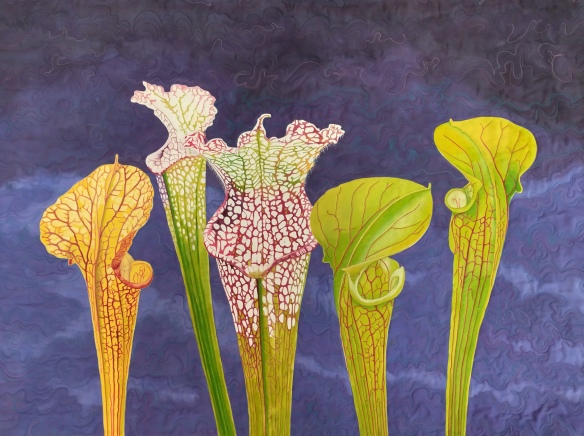
This is my favorite! I’m happy to say that pitcher plants can grow in the yard here given the right conditions.

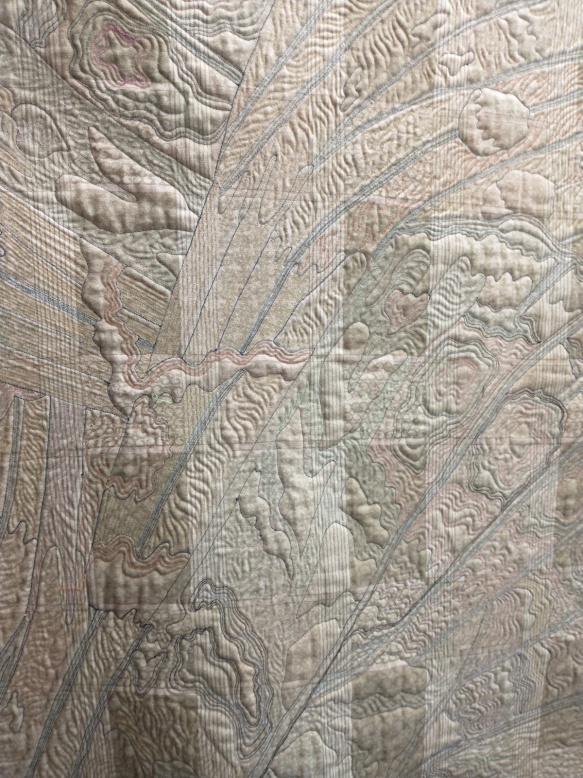
Here’s the back of one of the quilts so you can see Susan’s amazing free motion quilting

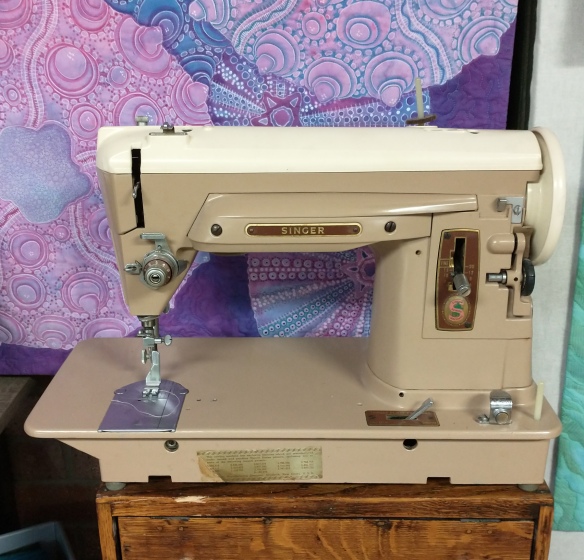
Of course every quilter needs a vintage machine on display in her studio

You can see much more extensive pictures of her studio on her website, here. Additionally, she has several tutorials on her techniques. You can also visit her blog and subscribe to keep up with what she’s doing. That’s how I learned about the tour. And if you have questions about her techniques, look at both the tutorials and the blog in detail.

Susan’s Ideas Explode

I took a class with Susan Cleveland at AQS-Paducah this year and it was excellent. Susan manages to be both pleasant and precise as a teacher and has many, many tricks for improving quilt making skills.

Thinking of Susan’s creativity and sense of humor, I decided to make my SAQA donation quilt a picture of ideas exploding out of her head.

Here’s the resulting piece:“Susan’s Head Explodes”, 12″ x 12″, a tribute to Susan Cleveland

Susan is known for (among other things) her binding techniques, prairie points, and Dresdens. All these involve her signature precision and attention to detail. I used some of her techniques in this little quilt and added several of my own. Here are some details.

First, the martini glass. Please note that I have no idea whether or not Susan drinks alcohol; I just couldn’t resist this use of a prairie point!

You can see my binding up close in this detail photo. I used a flange to accent the edge. The little spheres are wool balls cut in half, a technique I learned from Susan.

The red exclamation mark is made with Kraft-Tex to avoid any risk of fraying on such a small element.The flamingo is a plastic button! Following a suggestion from a reader (Elizabeth, in response to my Habitat House), I removed the shank and glued the button to the quilt.

For one of the prairie points, I put a clear spherical button inside to hold it open a little. This button was one of my happy finds in Paducah, so it deserves to be in the piece!

The wool blend felt used for batting was a suggestion in a recent book by Sue Bleiweiss. It worked quite well in terms of being stable and easy to use.

Quilt Stats:

Name: Susan’s Head Explodes!

Designed and made by: me, with inspiration from Susan Cleveland

Finished size: 12″ x 12″

Materials include: Commercial cotton fabric, hand dyed fabric (Cherrywood), hand dyed embroidery thread (Artfabrik, Laura Wasilowski), Kraft-Tex (C&T), plastic buttons, commercial rick rack, wool felt balls, a polymer clay button, wool blend felt for batting, and various commercial threads.

Note: As always, the links in this post are for your convenience. They are not affiliate links.

Woo! The Book I’ve Been Waiting For!

I’m a fan of Cindy Grisdela’s work and have gone through the exercises in her previous book, so I was thrilled when C&T sent me Cindy’s new book for review. Adventures in Improv Quilts covers the basics of design and color, but includes some more complex quilts than her previous book. Some of them remind me of Maria Shell, whose book I also love.

Photo courtesy of C&T

Cindy’s colors are bright and interesting. She often combines colors I wouldn’t have thought to use together, which causes me to look twice at the design. That’s a plus!

Photo courtesy of C&T

The book includes plenty of detail on technique. I was especially amused (and gratified) to learn that part of Cindy’s design process is to outline the size for the quilt with blue tape on her design wall. I’ve done that for years and find it a very effective way to think about filling the space as I design. Validation is always nice!

Photo courtesy of C&T

The book includes a chapter on color choices, which will be welcomed by numerous quilters who worry endlessly about the “right” colors. I choose my palettes intuitively, with better results some times than others, so maybe I should pay more attention? I love the color examples in the book, starting with basic palettes and progressing to the addition of other colors or values to give the project variety.

Photo courtesy of C&T

Cindy then goes on to cover the basic principles of design. These won’t be news to most quilters, but her examples shine. I think I will go back to the “bits” left from working through her previous book and see if I can enhance them by using some of her examples from this book.

Photo courtesy of C&T

My favorite advice in the book: “Don’t fear wasting fabric”! That’s a liberating thought!

My second favorite is one of her tips for free-motion quilting, but I think it could apply to most any part of the process: “If you feel like you’ve made a mistake, keep going. Either ignore it or do it again so it becomes a design element.” I love that! I love this book!

The book is available here, but this is not an affiliate link. C&T sends me books for review, and I tell you about my very favorites among them.


Happy As a Clam?

This is a little art quilt I started years ago just for fun.  It took quite a while to figure out how to make the clam and finish the quilt.

The “clamshells” were made by cutting out circles from fusible fabric and arranging them ever-so-carefully in rows.  I then fused the whole thing, and there it sat for a couple of years.  I considered adding a layer of netting, but ultimately just quilted it in waves.

I drew the clam early on but couldn’t decide how to put it on the quilt.  I considered thread sketching, drawing and coloring with pigma pens, etc.  I wanted a method that wouldn’t risk ruining the quilt if I didn’t get the clam right the first time!

Finally I read Karen Fricke’s article about thread sketching on stabilizer in my copy of The Best of Quilting Arts. (This book is an excellent resource, but it’s “old” so you probably can get it used.)  That method worked perfectly for me.  I was able to create the clam and then attach him to the quilt.  I printed the question mark on fabric and then cut it out and attached it.  For the dots going to his dialogue bubble I did, finally, have to draw directly on the quilt.

The edge is finished with satin rat-tail, a technique I learned in another class.

Quilt stats:

Name: Really? Clamshells?

Original design

Techniques: Fusible applique, machine quilting, thread sketching, drawing and coloring with permanent markers

Finished size:16″ x 16″

Quilted by me

Teaching Landscape Techniques

I’ll be teaching a one-day class on techniques for making landscape quilts at Studio Stitch in Greensboro (NC) on Friday, March 20, so I thought I’d show some more of my samples.  We’ll be making “tiny landscapes” so everybody can try several techniques.

Somebody asked me what I do with these little quilts, which are postcard size.  First, I use them to practice art quilt techniques.  Then I send them to friends who need a get well card or other pick-me-up.  I do put them in an envelope rather than sending them as postcards so that they arrive in good shape!


I made this after reading Happy Villages by Karen Eckmeier

This wonky house was inspired by a class I took with Laura Wasilowski several years ago; I used both hand and machine stitching

I have no idea why this rose is floating in a pond, but it gave me the opportunity to use little beads as dew on the rose

And this one gave me a chance to use one of my little antelope charms and some fabric markers; the binding is satin cord

This dragonfly has sparkly wings with Angelina Fibers as well as a rhinestone

This pine tree has green flannel for and lots of free motion quilting for texture

Finally, I couldn’t help making a card with this cow, who has been in my stash for some time!

Please join us for this fun class if you live near enough!

I Digress…To Leaf Pounding

One of the things I love about quilting is that there is an endless supply of things to learn.  That often means that I get sidetracked onto something different, but that’s OK.

Several years go I took a class in leaf pounding but I never did anything with the results (sound familiar to anyone out there?)  I recently found the prints, still looking pretty good, in my DO SOMETHING box and decided to get busy.

Here is the first, a sycamore leaf that was pounded onto Kona PFD (fabric prepared for dying).

After the fabric dried, I outlined the leaf with a brown Pigma pen.  When I took it out recently I used cotton batting and muslin backing, spray basted it, and quilted it freehand.  I used my Bernina Stitch Regulator (BSR) and found it worked quite well for this purpose.  (I haven’t been so happy with the BSR on larger projects–as a friend once told me, “It’s like training wheels”, meaning it’s just too slow on something big.) However, I was pleased with the way the BSR worked it on this little piece.

Here’s a detail, showing some of the unevenness created when part of the leaf “stuck” to the fabric more than the rest of it.  I figure nature isn’t perfect so I’m not worrying about it.

If you want to try leaf pounding, there’s a tutorial here.

And now the question:  How should I finish this?  I don’t think binding would look right.  I have seen leaf pounding pieces framed, so I guess I could mount and frame it.  Edge finish with brown satin rat-tail?  Face the piece?  Other ideas?  Thanks, as always, for your suggestions!

Current Series: Blue Ridge

My first Blue Ridge quilt just returned from the Vermont Quilt Festival and will next go to the Asheville Quilt show.

art quilt

Meanwhile, Maria Shell published a tutorial on how she makes flying geese blocks for her quilts, so of course I had to try it.The result is Blue Ridge II.

The colors of the quilt blended with the colors of my chimney, where I stuck it up to be photographed

In case a viewer doesn’t get why there is a red triangle among the earth-sky-water tones, I backed the quilt with cardinal fabric 🙂 The fabric is from Cotton + Steel in 2018, before they left RJR.

The quilt is faced using the technique from Terry Aske’s tutorial, which worked very well.  Here are the quilt stats:

Blue Ridge II

  • 28.5 inches wide, 26.5 inches tall
  • The fabrics are batik scraps left from other projects
  • The backing is from RJR, a Cotton and Steel fabric from 2018
  • The piecing was inspired by Maria Shell’s tutorial on flying geese (link above)
  • The facing was done using Terry Aske’s tutorial (link above)
  • Quilt was pieced and quilted by me.  The batting is Quilter’s Dream Cotton, Request loft.


Kraft-Tex Appliqué ! Woo!

Appliqué and I have a love-hate relationship.  I love the look of appliqué sometimes, and I’ve tried several methods, from needle turn to fusible and most things in between.  No method is perfect.

And just to show that I really have tried, here are some samples:

Machine appliqué of these circles was done after the quilting, so the backing and batting acted as stabilizer

The petals were fused on with Heat’n’Bond, and then I buttonhole stitched around them after doing the rest of the quilting, again eliminating the need for stabilizer

The snowmen and noses were a combination of fusible appliqué and Eleanor Burns’s appliqué with fusible interfacing.  I have washed this and it held up fine.

Sunbonnet Sue

Sunbonnet Sue Visits Quilt in a Day was done with Eleanor Burns’s method using fusible interfacing to produce turned edges

So, when I wanted a space alien to go on a quilt recently, I gave the appliqué process some serious thought.  This fabric is part of the background for a wonky star quilt I’m making, and I wanted one block to be a space alien to go with the theme.

Unfortunately, I have not saved the selvage from this fabric, so I don’t know who made it

Then I had an idea (drum roll, please).  The folks at C&T recently asked me to be an ambassador for Kraft-Tex, and since I was already a Kraft-Tex user and had blogged about it 3 times, I agreed.  They sent me some free Kraft-Tex!

I chose Marsala, Denim (hand dyed and prewashed), and natural prewashed for my free Kraft-Tex

Actually, I had already bought this black Kraft-Tex for another project, but I just want you to know that, for the first time ever, I have accepted a donated product for use in my blog.

I’ll have a tutorial on this whole quilt when it’s finished, but here’s an overview of how I used Kraft-Tex to avoid traditional appliqué .  I cut out the alien’s head using one of my circle cutters and attached it to the block with washable glue stick. Then I cut the outline from black Kraft-Tex and put it over the raw edge, with the raw edge kind of centered underneath.

Here is the alien on my design wall

The eye stalks and eyes were cut from Kraft-Tex and all the Kraft-Tex was glued down with the same washable glue.  That all worked well.  I then machine-stitched near the edges of the Kraft-Tex using a size 70 needle and matching thread.  Voila!  I didn’t have to fool with fusibles, bias strips, or much of anything at all.

Kraft-Tex is washable, and I’ll be interested to see how it does in this quilt.  It is stiffer than fabric, but I think that will be OK given the small amount I used on this twin-size quilt.

I can especially see using Kraft-Tex this way in art quilts very soon!

I’ll let you know how this all turns out!

North Carolina Quilt Symposium

I recently spent 2 weeks mostly doing quilty things rather than cooking, doing laundry, hanging on the internet, etc. The time ended with the North Carolina Quilt Symposium at Lake Junaluska, NC.

View from the hotel at Lake Junaluska

This was one of the best events I have ever attended in terms of the quality of instruction. The friends who went with me agree, so it wasn’t just me in my little bubble 🙂

I took a class with Cheryl Brickey (see her website here), who was a wonderful instructor and showed us her personal method of designing modern-traditional quilts using EQ8 (Electric Quilt).  I have used EQ for ages (OK, since EQ5, and they are now up to EQ8) but she showed me some cool new tools I had never discovered.

Cheryl and me with the partially completed quilt I designed and made in class

My second class was with Lyric Kinard.  (Her website is here.)  I learned a lot about creating portraits in fabric.  Here is one that was done for practice at the beginning of the class.  It’s supposed to be the woman who was sitting across from me, but I did not take a photo of her for comparison 😀

This was just a quick practice piece; I promise the woman didn’t really have blue skin!

Lyric went on to teach a much more elaborate and realistic way to do a portrait in fabric, but mine isn’t even far enough along to show.  The whole class was useful and Lyric is an encouraging instructor.

The details of next year’s NC Quilt Symposium are not finalized, but if you want to know more about the symposium and what was available this year, visit the website at NCQSI.org.  I hope to see you there next year, especially, because I have agreed to help recruit teachers!  Come join the fun!

I was able to interview 3 of the teachers at NCQS, so look for posts about them coming up in the next few weeks.