Susan’s Ideas Explode

I took a class with Susan Cleveland at AQS-Paducah this year and it was excellent. Susan manages to be both pleasant and precise as a teacher and has many, many tricks for improving quilt making skills.

Thinking of Susan’s creativity and sense of humor, I decided to make my SAQA donation quilt a picture of ideas exploding out of her head.
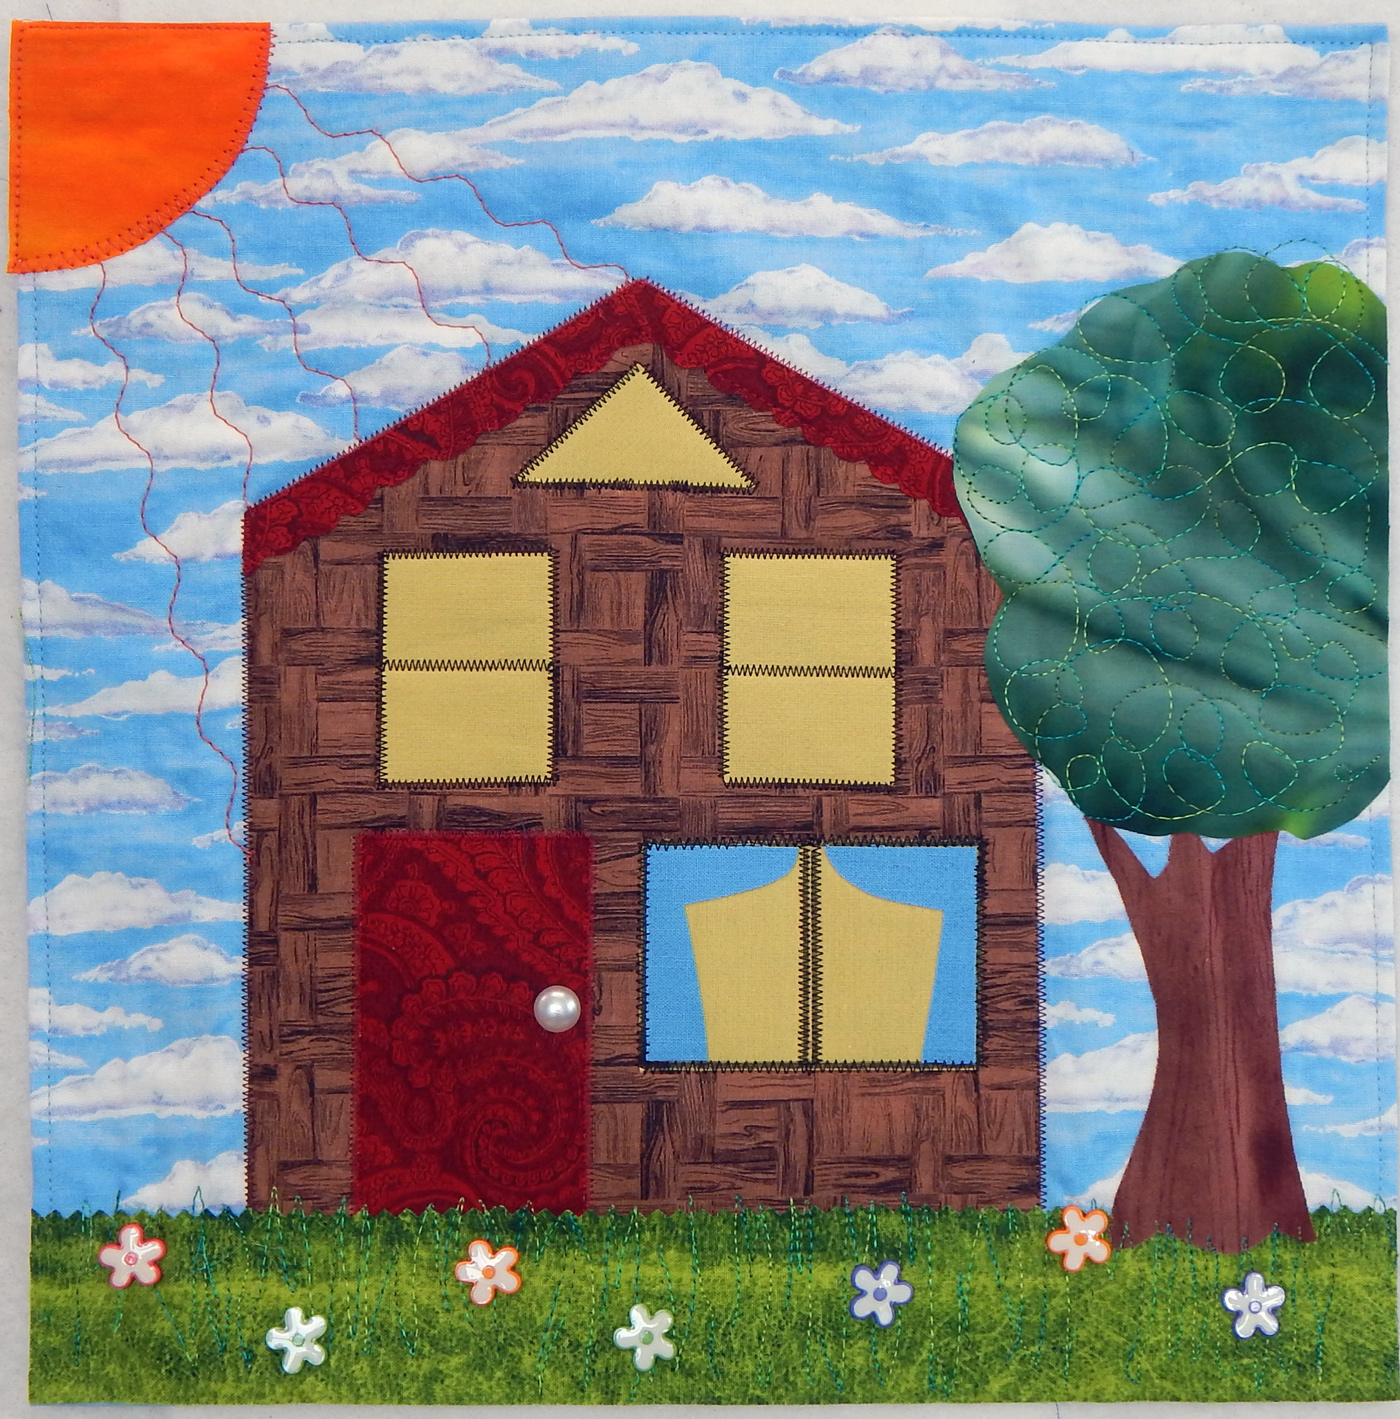
Here’s the resulting piece:“Susan’s Head Explodes”, 12″ x 12″, a tribute to Susan Cleveland

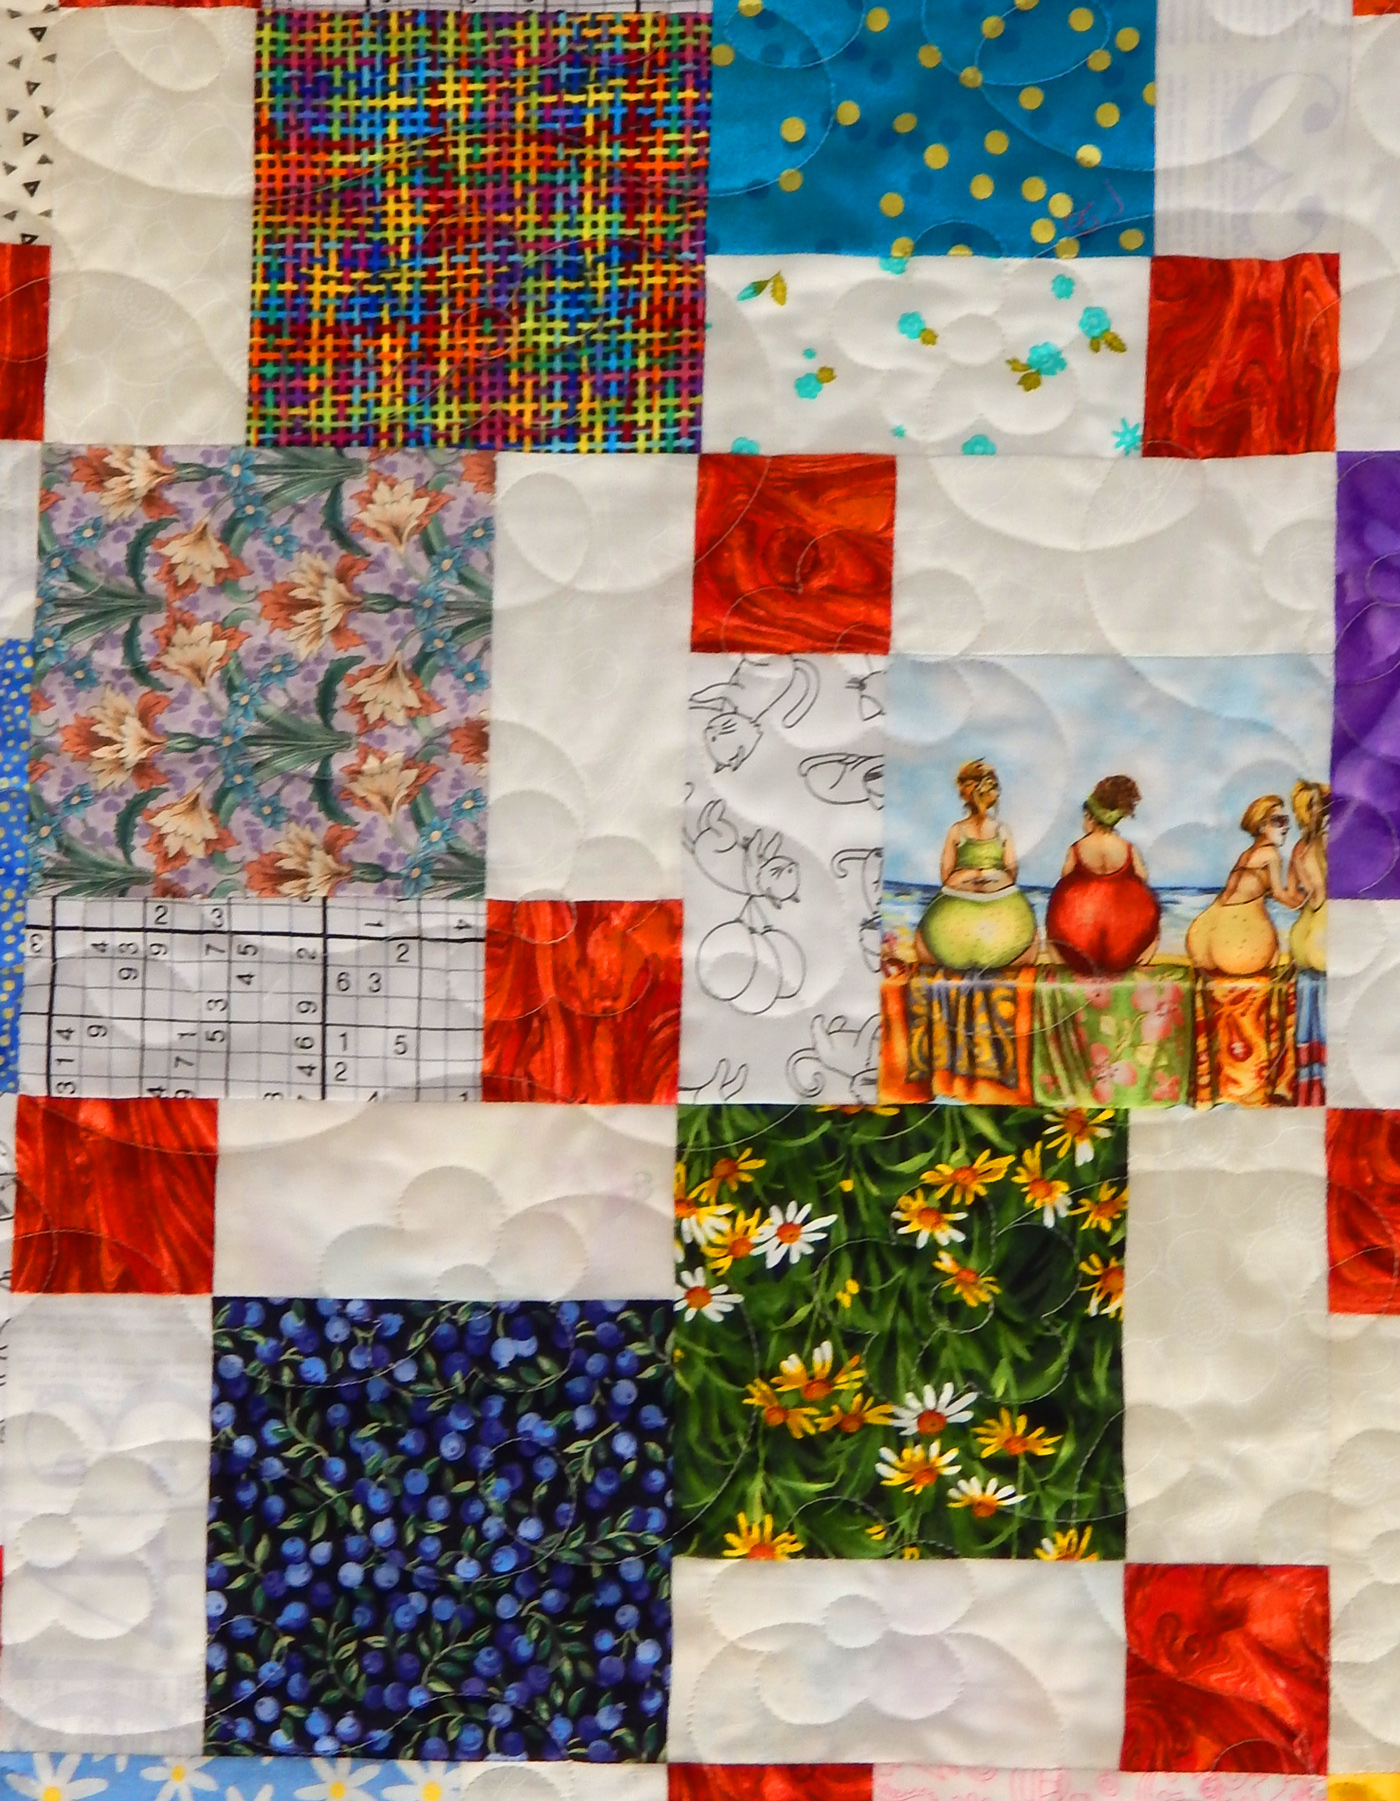
Susan is known for (among other things) her binding techniques, prairie points, and Dresdens. All these involve her signature precision and attention to detail. I used some of her techniques in this little quilt and added several of my own. Here are some details.

First, the martini glass. Please note that I have no idea whether or not Susan drinks alcohol; I just couldn’t resist this use of a prairie point!

You can see my binding up close in this detail photo. I used a flange to accent the edge. The little spheres are wool balls cut in half, a technique I learned from Susan.

The red exclamation mark is made with Kraft-Tex to avoid any risk of fraying on such a small element.The flamingo is a plastic button! Following a suggestion from a reader (Elizabeth, in response to my Habitat House), I removed the shank and glued the button to the quilt.

For one of the prairie points, I put a clear spherical button inside to hold it open a little. This button was one of my happy finds in Paducah, so it deserves to be in the piece!

The wool blend felt used for batting was a suggestion in a recent book by Sue Bleiweiss. It worked quite well in terms of being stable and easy to use.

Quilt Stats:

Name: Susan’s Head Explodes!

Designed and made by: me, with inspiration from Susan Cleveland

Finished size: 12″ x 12″

Materials include: Commercial cotton fabric, hand dyed fabric (Cherrywood), hand dyed embroidery thread (Artfabrik, Laura Wasilowski), Kraft-Tex (C&T), plastic buttons, commercial rick rack, wool felt balls, a polymer clay button, wool blend felt for batting, and various commercial threads.

Note: As always, the links in this post are for your convenience. They are not affiliate links.

Trying A New Binding Technique

I’m always on the lookout for ways to improve my binding (as well as my other quilting skills). Recently I ran across a video (YouTube, of course) showing how to use the Bernina #71 foot for binding. Here’s the link: https://www.youtube.com/watch?v=tpl-7L4SEzM

I have no idea who this woman is, but she’s using 2″ binding, which is my usual. I also use Quilter’s Dream Request Loft batting (the thinnest loft), which is part of why the narrower binding works.

After watching the video several times, I tried it out.

As you can see, the binding looks pretty good, and it’s still all done by machine. I achieved a more consistent width using this foot than with my usual method with the walking foot.

I did have some trouble with the corners, but I thought my binding was pretty good for a first try. (And no, I didn’t take a picture of a messy corner!)

Here’s the finished quilt, which is one of the samples for the beginning quilting class I’ll be teaching later this year. This is a pattern I modified from the book Jump Into Patchwork and Quilting. Specifically, I re-drafted it so the monkey wrenches are made with the flip-and-sew method rather than with half square triangles. This floats the wrenches so beginners will be less likely to cut off a point.

Photo courtesy of C&T

I’ll be using the book as a text for the class so students will have a written reference at home. The book is bright and modern and I think it will appeal.

It also has some easy projects students will be able to do on their own. This book costs only a bit more than a pattern, so it’s a good value. (The book is available from Studio Stitch or C&T.)

I’ll be making another sample before offering the class. Meanwhile, here’s the information on this one.

Quilt Stats:

Name: Making Waves Modified

Source: I re-drafted a pattern from the book Jump Into Patchwork and Quilting

Finished size: 48″ x 48″

Made and quilted by me.

AQS Paducah 2022

After a 2 year wait due to you-know-what, 3 quilty friends and I finally met up in Paducah for AQS Quilt Week.

Paducah is an interesting town to walk around. There are lots of old houses as well as some interesting new ones. These two were next door to each other!

Then there is the gigantic Hancock’s of Paducah, a must-visit for fabric collectors. I saw a woman there wearing a shirt that declared, “Quilting and Fabric Collecting are Two Different Hobbies”. Apparently I agree 😀

There used to be a number of other fabric shops, including Eleanor Burns’ Quilt In A Day, but they have closed due to COVID. We did find an interesting shop, though.

Photo courtesy of Trip Advisor

Tuscan Rose is a wonderful shop selling clothing, apparently collected from thrift shops and then overdyed. Of course I bought a shirt, and so did one of my friends. Tuscan Rose also had such beautiful hand dyed yarn that I was tempted to resume knitting. (As a favor to the beautiful yarn, I left it to be bought by someone who actually knits well!)

The quilt show itself was something of a disappointment. There were hundreds of beautiful quilts, but before long it was overwhelming. The workmanship was exceptional and I think I would have enjoyed seeing a few of them, but after a couple of dozen my head was spinning.

Modern quilts were rare. Here are a couple of my favorites.

Kandinsky’s Sewing Circle by Holly Hull

Morning Fog by Sarah Lykins Entsminger

I also liked this one, but I can only assume that nobody at AQS understood what “one in every four” referred to, based on the AQS history of avoiding even a hint of controversy.

One in Every Four by Carolina Oneto

I didn’t hear that any of you were going to Paducah. What is your experience with AQS shows?

Happy Habitat House

The Gate City Quilt Guild, which I recently joined, makes little house quilts for the local Habitat for Humanity. Each family then gets a little quilt as part of the ceremony in which they take over their new house. Of course I wanted to make one, so here we go!

The quilts are approximately 12″ x 12″, so I began by cutting two 13″ squares of fabric, one for the front and one for the back. I recently read in Sue Bleiweiss’s latest book that she uses a wool-blend felt for the batting in her art quilts, so I gave that a try. I cut the felt 12″ x 12″.

This is the back

I turned the edges of the front fabric to the back, turned under the edges of the backing fabric, and edge stitched the 3 layers together. The felt “batting” was easy to work with and avoided the puffiness that can distort a quilt when using regular batting.

I used Heat n Bond Lite to fuse the door, windows, and roof to the house, then fused the house to the quilt top.

The finished quilt front

I added stitching to the grass and tree for texture, and to make rays from the sun to show sunshine falling on the house. I collect fun buttons, so I had a round one for the door knob and some little flowers for the yard.

The buttons were shank-type, so I had to make little holes in the quilt to push the shank through so they would lie flat. The felt batting was extremely stable, which helped a lot with this process. Here’s the back, showing the button shanks held in place with little pins.

Although I like my quilt, I must say that there are some very talented quilters in the group and some of the houses were more realistic than mine! I look forward to learning a lot from these ladies.

Quilt Stats:

Name: Happy Habitat House

Size: 12″ x 12″

Designed and made by me

I hope the family who receives the quilt will enjoy it, though of course it is unlikely to look like their real house!

Tossed 9 Patch

The other day I considered what to do with my large stash of 5″ squares.

Bin of 5″ squares from a variety of sources

It occurred to me that I might be the only quilter in the world who hadn’t yet made a tossed 9 patch quilt.

Just on the off chance you haven’t made one yet, here’s the drill.

The 9-patch block was 15.5″ with raw edges. Drawing done with Electric Quilt 8.

Start by making a 9 patch (duh). I cut a bunch of light colored 5″ patches and enough red 5″ patches for 22 nine-patch blocks, then used various 5″ squares from my bin for the four corners.  (Yes, that only got rid of 88 5″ squares. Still…)

I included some old favorites from the 5″ bin:

Blueberry fabric bought in Maine, one of the Moda wildflower fabrics, the fruit ladies from Elizabeth’s Studio, and some of my favorite metallic dot fabric.

After assembling the 9 patch blocks, I cut them in quarters, resulting in 88 blocks like this:

This is one quarter of the original 9-patch block. Drawing done with Electric Quilt 8.

When all my 88 blocks were made, I played with layouts until I had one I liked. There are a lot of different ways to cut the 9 patch block, and even more ways to lay out the resulting blocks, so it took a while.

After it was quilted, I decided on a blue and white striped border, which I cut on the bias.

And here’s the finish:

Quilt Stats:

Name: Tossed 9-patch

Designed and made by: me, though of course there is nothing new under the sun, This idea has been around forever.

Finished size: 51″ x 71″

Quilted by: Linda