Visiting Susan Brubaker Knapp

Last weekend we had the opportunity to see some of the Orange County Artists Guild open studio tour. Our first stop was at the studio of Susan Brubaker Knapp, who makes really remarkable quilts. She also hosts a quilting art TV show, which is how most people know her.

Susan in her studio

Susan is a gracious hostess, and answered many questions for both me and the non-quilter friends who were with me. Her work is absolutely amazing!

One of Susan’s beautiful quilts

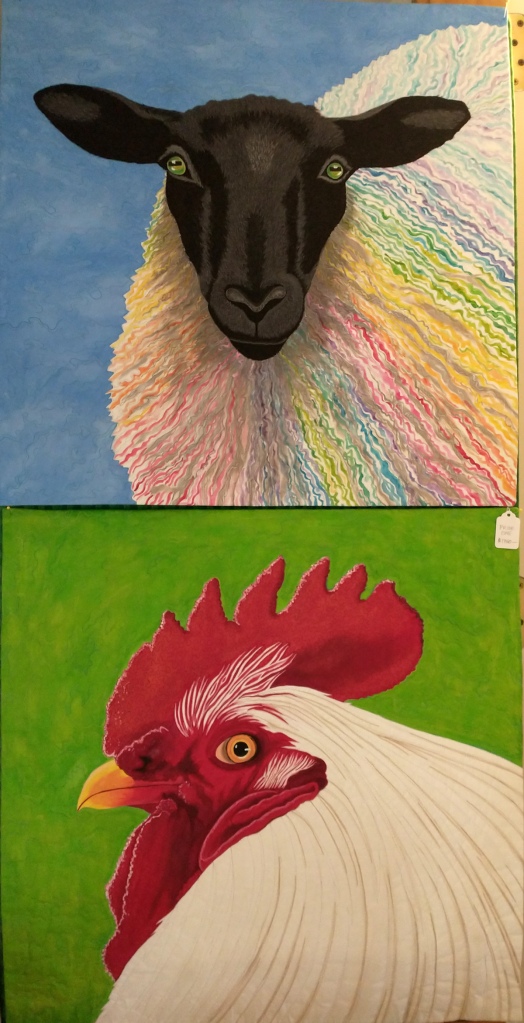
She discussed her methods, which you can read more about on her website. She also hosts Quilting Arts TV, so that’s another useful resource if you’re looking for information on how to make art quilts. A lot of her quilts are whole cloth works, painted with textile paint and then extensively quilted on one of her Bernina machines. The quilts are based on her own photographs, and she often begins by tracing a photo on white fabric.

The sheep quilt is amazing, and Susan loves chickens so she has them in a lot of quilts

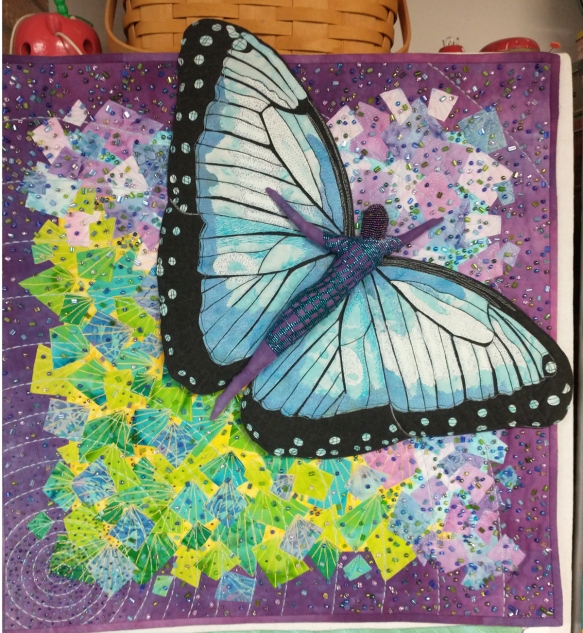
The body on this butterfly is 3-dimensional

Here are more photos Susan allowed me to take during our visit. Please note, however, that she copyrights her designs.

I am in awe of Susan’s detailed work, and it was lovely to get to visit with her. You can find her teaching schedule on her website if you’re interested. When I expressed amazement at her free motion quilting, Susan pointed out that she has thousands of hours of experience with it! Nevertheless, her skill is amazing.

Poke weed is a native plant and is well represented in this quilt

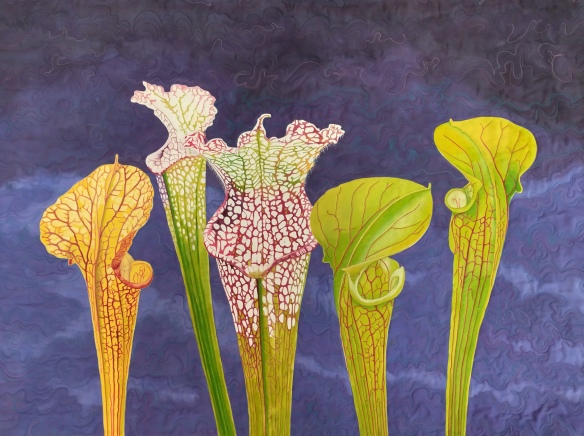
This is my favorite! I’m happy to say that pitcher plants can grow in the yard here given the right conditions.

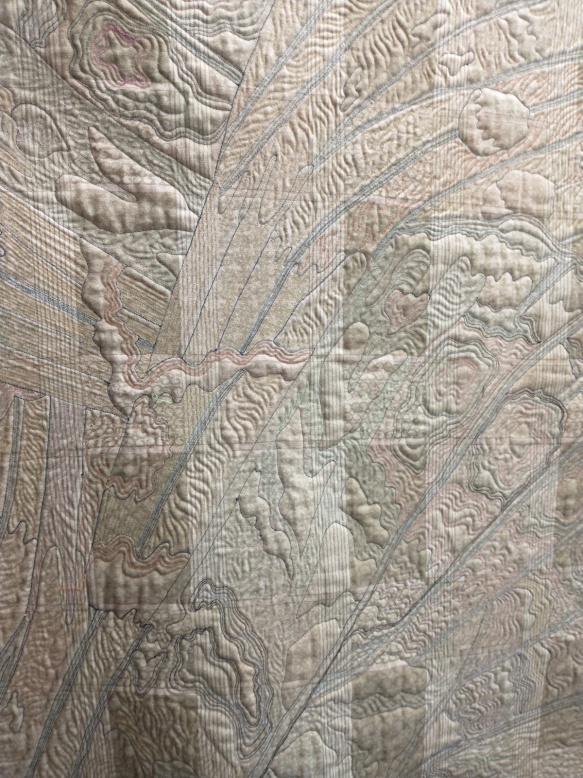
Here’s the back of one of the quilts so you can see Susan’s amazing free motion quilting

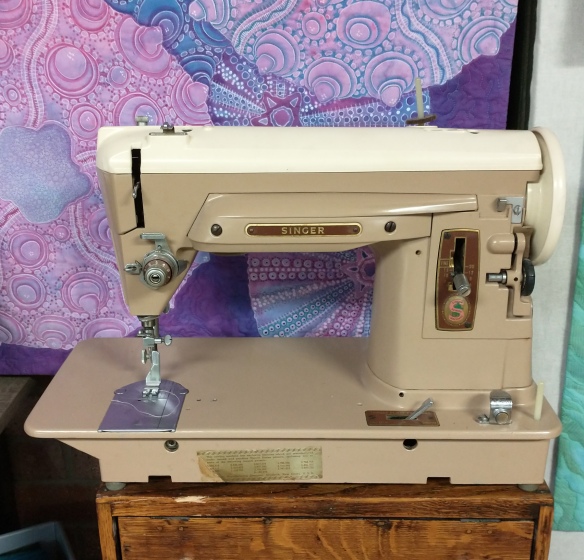
Of course every quilter needs a vintage machine on display in her studio

You can see much more extensive pictures of her studio on her website, here. Additionally, she has several tutorials on her techniques. You can also visit her blog and subscribe to keep up with what she’s doing. That’s how I learned about the tour. And if you have questions about her techniques, look at both the tutorials and the blog in detail.

A Village

I made a lot of little improvised houses and related blocks during COVID and decided to combine them into a quilt for our builder, since we love our house!

Here are a few of my favorite blocks from the quilt.

First, this is a watermelon canning factory. I told the builder it really needs to be re-purposed to make garage doors, since those are in short supply and nobody eats canned watermelon.

Really it’s just my idea of whimsy.

Then there are several little houses that came pre-made from some fabric I’ve had on hand for a long time. I enjoyed placing them in various locations.

My husband especially likes the stars in the sky on this block, not to mention the car pulled up to the house 😀

I made a number of wonky houses of my own.

And even one modern house.


Quilt Stats

Name: It Takes a Village to Build a House (because it really did)

Finished size: 45″ x 53″

Designed and made by me

Quilted by Linda

I still have a number of quilts to be bound and blogged, but there is progress!


Finish! A Really Old UFO

A number of years ago we had a guild program in which we made 3-dimensional fabric. I know I got this fabric wet and pushed it through a cake rack, but I don’t recall the details and can’t find instructions online. If you know how to do this, please tell me!

So this fabric (just the purple piece, with no beads yet), sat around for quite a while.

Then I layered it on batting and added all the rest of the stuff–beads, ribbon, side triangles, and quilting.

Then it sat around. OK, there was a lot going on in those years, but really, it just didn’t rise to the top of the “to-do” list.

Finally this week I got it out and applied binding.

Quilt Stats

Name: Shiny

Designed and made by: me

Quilted by: me

Finished size: 11″ x 11″

Whew! I’m guessing it took 5 years to make this quilt. Well, at least to get it finished 😀  What’s your oldest UFO?

Susan’s Ideas Explode

I took a class with Susan Cleveland at AQS-Paducah this year and it was excellent. Susan manages to be both pleasant and precise as a teacher and has many, many tricks for improving quilt making skills.

Thinking of Susan’s creativity and sense of humor, I decided to make my SAQA donation quilt a picture of ideas exploding out of her head.

Here’s the resulting piece:“Susan’s Head Explodes”, 12″ x 12″, a tribute to Susan Cleveland

Susan is known for (among other things) her binding techniques, prairie points, and Dresdens. All these involve her signature precision and attention to detail. I used some of her techniques in this little quilt and added several of my own. Here are some details.

First, the martini glass. Please note that I have no idea whether or not Susan drinks alcohol; I just couldn’t resist this use of a prairie point!

You can see my binding up close in this detail photo. I used a flange to accent the edge. The little spheres are wool balls cut in half, a technique I learned from Susan.

The red exclamation mark is made with Kraft-Tex to avoid any risk of fraying on such a small element.The flamingo is a plastic button! Following a suggestion from a reader (Elizabeth, in response to my Habitat House), I removed the shank and glued the button to the quilt.

For one of the prairie points, I put a clear spherical button inside to hold it open a little. This button was one of my happy finds in Paducah, so it deserves to be in the piece!

The wool blend felt used for batting was a suggestion in a recent book by Sue Bleiweiss. It worked quite well in terms of being stable and easy to use.

Quilt Stats:

Name: Susan’s Head Explodes!

Designed and made by: me, with inspiration from Susan Cleveland

Finished size: 12″ x 12″

Materials include: Commercial cotton fabric, hand dyed fabric (Cherrywood), hand dyed embroidery thread (Artfabrik, Laura Wasilowski), Kraft-Tex (C&T), plastic buttons, commercial rick rack, wool felt balls, a polymer clay button, wool blend felt for batting, and various commercial threads.

Note: As always, the links in this post are for your convenience. They are not affiliate links.

Happy Habitat House

The Gate City Quilt Guild, which I recently joined, makes little house quilts for the local Habitat for Humanity. Each family then gets a little quilt as part of the ceremony in which they take over their new house. Of course I wanted to make one, so here we go!

The quilts are approximately 12″ x 12″, so I began by cutting two 13″ squares of fabric, one for the front and one for the back. I recently read in Sue Bleiweiss’s latest book that she uses a wool-blend felt for the batting in her art quilts, so I gave that a try. I cut the felt 12″ x 12″.

This is the back

I turned the edges of the front fabric to the back, turned under the edges of the backing fabric, and edge stitched the 3 layers together. The felt “batting” was easy to work with and avoided the puffiness that can distort a quilt when using regular batting.

I used Heat n Bond Lite to fuse the door, windows, and roof to the house, then fused the house to the quilt top.

The finished quilt front

I added stitching to the grass and tree for texture, and to make rays from the sun to show sunshine falling on the house. I collect fun buttons, so I had a round one for the door knob and some little flowers for the yard.

The buttons were shank-type, so I had to make little holes in the quilt to push the shank through so they would lie flat. The felt batting was extremely stable, which helped a lot with this process. Here’s the back, showing the button shanks held in place with little pins.

Although I like my quilt, I must say that there are some very talented quilters in the group and some of the houses were more realistic than mine! I look forward to learning a lot from these ladies.

Quilt Stats:

Name: Happy Habitat House

Size: 12″ x 12″

Designed and made by me

I hope the family who receives the quilt will enjoy it, though of course it is unlikely to look like their real house!

Atomic Sunflower

This started as an experiment with some leftover fabric, then sort of wandered off into an art quilt for the International Quilt Museum’s “Modern Meets Modern” challenge.

The fabrics are scraps of Michael Miller Cotton Couture left from another project. I saved them as a group because I particularly like the color combination. I started cutting the wedges freehand while working on a Cindy Grisdela-inspired project. When I decided to make them into a circle, I found a large platter in my kitchen and traced it because the rim was irregular. I then used reverse applique to set the circle in its background.

My friend Chela helped with input regarding the center design.

When I saw the Modern Meets Modern Challenge, I thought this piece would be a good fit, so I finished it up after Christmas, just in time to submit it. You can see the contest and the entries here.

Mine was not judged a winner, but here’s the good news: I agree the winners are better.

In looking at the entries, it’s clear that the better designs go all the way to the edge of the quilt, while mine is isolated in the middle. I’ve noticed this element of design several times over many years. In good modern designs, the design extends to the edge, often with the implication that it goes past the edge. But this time I got so wrapped up in what I was doing that I didn’t think “outside the circle”. 😀

As Nelson Mandela said, “I never lose. I either win or learn.” So, on to the next quilt!

Woo! The Book I’ve Been Waiting For!

I’m a fan of Cindy Grisdela’s work and have gone through the exercises in her previous book, so I was thrilled when C&T sent me Cindy’s new book for review. Adventures in Improv Quilts covers the basics of design and color, but includes some more complex quilts than her previous book. Some of them remind me of Maria Shell, whose book I also love.

Photo courtesy of C&T

Cindy’s colors are bright and interesting. She often combines colors I wouldn’t have thought to use together, which causes me to look twice at the design. That’s a plus!

Photo courtesy of C&T

The book includes plenty of detail on technique. I was especially amused (and gratified) to learn that part of Cindy’s design process is to outline the size for the quilt with blue tape on her design wall. I’ve done that for years and find it a very effective way to think about filling the space as I design. Validation is always nice!

Photo courtesy of C&T

The book includes a chapter on color choices, which will be welcomed by numerous quilters who worry endlessly about the “right” colors. I choose my palettes intuitively, with better results some times than others, so maybe I should pay more attention? I love the color examples in the book, starting with basic palettes and progressing to the addition of other colors or values to give the project variety.

Photo courtesy of C&T

Cindy then goes on to cover the basic principles of design. These won’t be news to most quilters, but her examples shine. I think I will go back to the “bits” left from working through her previous book and see if I can enhance them by using some of her examples from this book.

Photo courtesy of C&T

My favorite advice in the book: “Don’t fear wasting fabric”! That’s a liberating thought!

My second favorite is one of her tips for free-motion quilting, but I think it could apply to most any part of the process: “If you feel like you’ve made a mistake, keep going. Either ignore it or do it again so it becomes a design element.” I love that! I love this book!

The book is available here, but this is not an affiliate link. C&T sends me books for review, and I tell you about my very favorites among them.


Eight Years

I’ve now been blogging weekly for 8 years. One of the best things about it is “meeting” people from all over the world and reading about what they are doing. Some of them have been at it even longer than I have, though many of the bloggers I’ve “met” have since quit writing.

Here are my current favorite quilts from each of the years I’ve been blogging.

Rising star art quilt

Rising Star, made for the Quilt Alliance TWENTY contest in 2013

quilt photo

My Zippy Star Quilt and Pillow as shown in Modern Quilts Unlimited, Summer 2014

modern quilt

Happy Squares, designed and made by me, 2015

improvisational quilt

Cherrywood Toss, 2016.

scrap quilt

Scrap quilt made with strips that finish 1″ wide, 2017

Equilateral Triangles, 2018

My “Little Green Man” quilt, June 2019

“Clamshells? Really?” 2020

I’m going to delete many of the older posts since I doubt they are serving any purpose at this time. I have had a book made for each year, as suggested by my friend Linda, so I can always look back at them if I want.

Landscape Quilting Books

I’ve been making landscape quilts for years and have collected several books on the subject. Since I’m going to be teaching landscape quilting again soon, I thought I’d list the books I am familiar with as a resource for anyone interested in the subject. This absolutely is not an exhaustive list of all the books available; it’s just brief reviews of the books in my own collection.

Create Landscape Quilts by Meri Henriques Vahl, C&T, 2021. This is by far the best of the bunch if you want to put people in your quilts. She covers all the basics but particularly excels at detailed directions for including realistic people. Since I have a “hang-up” about drawing people, this was especially helpful for me. Of course, she has a number of examples of art quilts that do not include people, as well. Her technique is basically collage with a tulle layer on top. Look at the amazing detail in this sample of her work!  Book available here.

Photo courtesy of C&T

Happy Villages by Karen Eckmeier, 2nd Edition, The Quilted Lizard, 2014. This book presents step-by-step instructions for making a number of landscape quilts. It is easier to jump right in here because of the specific instructions, but some of the pieces she uses are tiny. I used tweezers. This is another collage technique with a tulle layer on top. Connecting Threads had it here for less than the used book site I generally go to.

I made this little landscape based on the ideas in Happy Villages

Mickey Lawler’s Skyquilts by Mickey Lawler, C&T, 2011This is a fabric painting book, entirely different from the previous two. It does address some basic principles, and if you enjoy fabric painting this is a good place to start. The author uses several different dyes and paints, which are explained in the book. I did not invest in most of them, but did enjoy using my Setacolor dyes and her ideas. I particularly like her suggestion to use tracing paper over your finished quilt to decide where/how to quilt it, since quilting lines can make all the difference in any type of quilt. It is available from C&T as an e-book here, or I found a good price on a used copy at Abe Books (use their search feature to find what is available).

This pine tree has green flannel for foliage and lots of free motion quilting for texture

I “painted” the sunset here with markers, and attached a little charm I found in my stash

Easy Batik Landscape Quilts by Patricia L. Brown, AQS Publishing, 2011. The technique here takes advantage of the natural variability in batik fabrics to make more realistic looking landscape quilts without having to apply paint or other media. Ms. Brown makes paper patterns and uses piecing and applique to assemble her quilts, so a tulle layer is not necessary. There are examples of both realistic and abstract designs with specific instructions for making a number of them. I have found that batiks are, indeed, excellent for landscape quilts, but I don’t have the patience to make paper patterns the way she does. (I made one landscape quilt using patterns I designed in a workshop with Georgia Bonesteel years ago, so I did try!) At the time of this writing, Connecting threads had a good price on it here.

The mountain in the background is made from a batik so did not need to be painted to have the right appearance. The commercial prints in the foreground were altered with markers.

Accidental Landscapes by Karen Eckmeier, The Quilted LIzard, 2008.This book has an excellent discussion of the elements and techniques that make a successful landscape quilt without resorting to technical language or going into too much detail. The sample projects she uses to teach techniques are easy and helpful. Her examples are much less elaborate than those in most of the other books, which is especially nice if you’re just getting started. The publisher sells it through Amazon.

Batiks and markers were used in this little quilt, and I put a UFO in the sky 🙂

Points of View by Valerie Hearder, Martingale, 2007. This book covers a variety of media that can be used in landscape quilts, from commercial prints to fabric crayons, paint sticks, and embroidery. She constructs the quilt on a muslin base, which I have found helpful. She shows how to use tulle and batiks as well. If you want just one book that covers a variety of techniques, this is a good one. I particularly like the way she plays with scale to add interest to some of her designs. This was available through Thrift Books at the time of this writing–use the search feature to find available copies.

This one was made with fused fabric, using techniques I learned several years ago from Laura Wasilowski

The Art of Landscape Quilting by Nancy Zieman and Natalie Sewell, Krause, 2007. I love Nancy Zieman’s practical approach to sewing and quilting, and this book starts with how to generate ideas and goes right through to finishing the quilt. There are no instructions for making specific quilts. Instead, the authors use many pictures of landscape quilts they have made to explain a variety of techniques for making your own designs. At the time of this writing, the book was unavailable through Thrift Books and available but not cheap at Abe Books. It was $71 on Amazon, so better check your library!

I think I made this one so I could use those round red buttons!

Landscape Quilts for Kids by Nancy Zieman and Natalie Sewell, Krause, 2004. This is a fun book that covers all the basics. I especially enjoyed her idea of cutting out people and animals and applying them broderie perse style to the quilts. She gives tips on how to print pictures of your own kids on fabric for use in landscape quilts. Amazon had one left at a reasonable price as of this writing, but Abe Books had a better price for a used copy; use the search boxes to see what they have available.

I found pre-printed fabrics for everything I needed to build my husband his ideal woodshop 🙂

There are many more landscape quilts waiting to be made from the pictures I’ve taken at beautiful places we have visited.

One of these days I’ll use this as inspiration for a landscape quilt

Please note: the links are for your convenience; they are not affiliate links for which I get paid. I do receive books from C&T for review, but I only review the ones I like!