An Oldie

I made this quilt years ago at my husband’s request, and when he retired last year it came home with him. It was inspired by a quilt on a calendar I had in 2004 or 2005, but unfortunately I did not save the inspiration. If anyone recognizes where I got this design, please let me know so I can give proper credit.

The fabrics are all Kona cotton because for many, many years that was the only choice in solids.  

Quilt Stats

Design source: unknown, but it came from a calendar

Finished size: 42.5″ x 43″

Pieced and quilted by me, 2005

Class With Maria Shell!!!

COVID rolled over my plans to attend the Vermont Quilt Festival (VQF) this past summer and take classes there with Maria Shell.  So imagine my excitement when I got an email from VQF offering one of Maria’s classes online!  (Here’s the link if you want to learn more.)

This is the Announcement from VQF

I signed up immediately and started gathering the materials–there really isn’t much needed in that department since I’ll be in my own studio for the class!  The class will be interactive, and the student information included lots of funny reminders like “Remember, we can see you.  Wear pants if you plan to stand up!”  I have no idea how to mute my microphone or much of anything else, so there’s no telling what they’ll see/hear from me, but I’ll be sure to be fully clothed 😀

As you may know, I love Maria’s book (here’s the link if you want to know more about the book.).

I’ve made some “mat-cut stripes” inspired by her, though I haven’t figured out yet what to do with them next,

as well as a little art quilt for which I used her method for making free-cut flying geese.

This quilt is titled “Blue Ridge–Cardinal”

One thing that is different about Maria’s technique for improvising is that she does NOT just combine fabrics randomly.  She looks to see if they go together visually before she sews.  Her quilts are graphic and striking, and I look forward to learning more from her.  I’ll let you know how it goes!  And here’s the link to Maria’s site if you want to explore her work more.

Just a reminder:  The links in this post are for your convenience; they are not affiliate links that generate money for me!

Happy As a Clam?

This is a little art quilt I started years ago just for fun.  It took quite a while to figure out how to make the clam and finish the quilt.

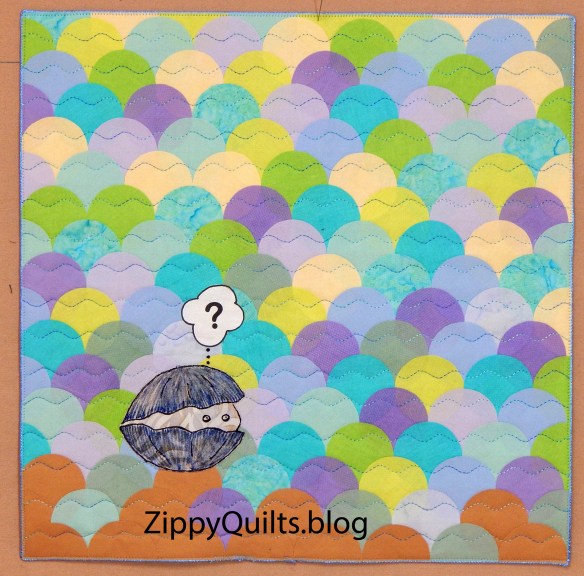
The “clamshells” were made by cutting out circles from fusible fabric and arranging them ever-so-carefully in rows.  I then fused the whole thing, and there it sat for a couple of years.  I considered adding a layer of netting, but ultimately just quilted it in waves.

I drew the clam early on but couldn’t decide how to put it on the quilt.  I considered thread sketching, drawing and coloring with pigma pens, etc.  I wanted a method that wouldn’t risk ruining the quilt if I didn’t get the clam right the first time!

Finally I read Karen Fricke’s article about thread sketching on stabilizer in my copy of The Best of Quilting Arts. (This book is an excellent resource, but it’s “old” so you probably can get it used.)  That method worked perfectly for me.  I was able to create the clam and then attach him to the quilt.  I printed the question mark on fabric and then cut it out and attached it.  For the dots going to his dialogue bubble I did, finally, have to draw directly on the quilt.

The edge is finished with satin rat-tail, a technique I learned in another class.

Quilt stats:

Name: Really? Clamshells?

Original design

Techniques: Fusible applique, machine quilting, thread sketching, drawing and coloring with permanent markers

Finished size:16″ x 16″

Quilted by me

Elizabeth’s Village

My blogging friend Elizabeth (OP Quilt) has designed a number of nice patterns and I recently found myself “forced” to make one because it is so cute.  Here is one of her samples.

Photo courtesy of Elizabeth Eastman

She has given instructions for multiple variations in the pattern.  (I love all of them.)

Photo courtesy of Elizabeth Eastman

Naturally, I didn’t quite follow the pattern.  I had some cute fabric left from another project so used it for the town square in the center.

When I was finished, I wanted to make the quilt large enough to be used as a donation quilt (crib size), so I ordered some wilderness fabric to surround the town.

And here’s the finished quilt:

Quilt Stats

Name:  Elizabeth’s Village

Pattern:  Merrion Square, by Elizabeth Eastmond

Finished size: 39″ x 39″

Quilted by:  Julia Madison

And yes, I used the same fabric for binding as for the border.  You may want to check out Elizabeth’s beautiful projects on her blog and website: OPQuilt.com.

If you’re interested in her patterns, they are available through Payhip.

Serendipity Quilt

Due to a series of fortunate events, I made this quilt:

Here’s how it happened.  You may recall that C&T sends me quilt books and products to review, and if I really like them I write about them here.  So a while back I received this book:

Photo Courtesy of C&T

Then a couple of weeks later, I entered a contest sponsored by Pineapple Fabrics and my project was a runner up.  They sent a wonderful box of pre-cuts, including a jelly roll.  So the only question was which quilt to make!  The book had many attractive options, including these:

Photo courtesy of C&%

Photo courtesy of C&T

I eventually chose the lattice quilt because it looked so do-able.  And it was!  The instructions even suggested designing your own spacing for the border, and you know how I like doing my own thing, so that was great.

Here’s a picture of the pretty flowers quilted on it by Julia Madison:

If you are thinking of making this quilt, know that it was fast, easy, and fun.  I did flip some of the seams when joining the pieces so the seams would match up well at the intersections.

Quilt Stats

Name:  Serendipity

Pattern source:  Love Jelly Roll Quilts, pictured above

Finished size:  51″ x 61″

Quilted by:  Julia Madison