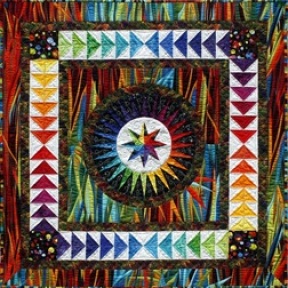
Meet J. Michelle Watts

I make frequent trips to the Southwest, and you KNOW they include visits to quilt shops along the way. For years I’ve been seeing Southwestern-themed patterns by J. Michelle Watts, who seems to have that niche all to herself. So this last time I thought I’d ask her for an interview. Here she is:

southwestern quilt designs

J. Michelle Watts

Tell us about your quilts and your other projects, too.

When I started quilting in 1982, I hand pieced and hand quilted mostly traditional quilt blocks.

I designed my first original southwestern wall hanging, Adobe Sunrise, in 1987. In 1989, I started a small mail order pattern company with my own collection of southwestern quilt patterns. I have also designed a line of patterns that use the 9 degree wedge ruler and a couple of jelly roll friendly scrap quilt patterns, written 3 books,  and designed 3 collections of fabric for Moda.

Ojo de Dios quilt

One of Michelle’s designs for wedge ruler.

“Stenciling Quilt Blocks” is my favorite class to teach right now. The technique is simple, fast and fun and the finished projects can fool you into thinking they are pieced or appliqued.

Stenciled quilt, J. Michelle Watts

Pueblo Rhapsody

The black designs in “Pueblo Rhapsody” have been stenciled onto 40 odd shaped turquoise blocks and then the blocks are sewn together.  My newest pattern collection, “It’s Simple With Stencils”, is a collection of quilt patterns that use laser cut stencils and Paintstiks to stencil quilt blocks and quilts. The collection features a variety of small traditional quilt blocks and some with a southwestern style.

Inquiring minds always want to know: do you have a “day job”, or do you teach and develop patterns full time?

I print and package all my own patterns. This is my day job, night job and weekend job. I now travel about 120 days a year teaching and vending at quilt shows. I manage a website that features all my patterns. I host a small quilt retreat each year near Ruidoso, NM.  This year I want to try to make some short tutorials on several techniques I teach.  When people ask me “So what do you do for a living?”, I love being able to tell them ” I am a quilter.”  There is a quilted wall hanging in my studio that says “Love what you do and do what you love.” That pretty much says it all.

J. Michelle Watts quilt pattern

Casa Blanca, Michelle’s newest applique pattern. Thank goodness it will be available as a stencil, also!

What’s next?

My newest applique pattern, Casa Blanca, which is inspired by an old ironwork door. This design will also be available as a stencil pattern. The dark wine pieces are machine appliqued to a cream background.  I have many other patterns in the works as well.

If you want to see all Michelle’s patterns, visit her website.  Here are a few of my favorites:

.


Lines

I’ve been kind of stuck on lines lately, since doing the article on narrow inserts (i.e., lines) for Modern Quilts Unlimited.  As a result, I took a series of pictures of lines to explore their functions.

Lines can define forms and set boundaries:

Lines can make patterns, and those patterns can be distorted for more interest:

Lines can link people, patterns, or shapes, both literally and as design elements:

Guy lines from the poles keep them stable, and the poles carry lines for power and telephone service in this rural area

Guy lines from the poles keep them stable, and the poles carry lines for power and telephone service in this rural area

And too many lines (or enough lines) can make a tangle!

All of them make interesting patterns.  I can feel a new quilt design on the way 🙂

Crunchy Numbers

The WordPress people send me two statistical reports a year regarding my blog, and of course I can look at statistics on my administrative page at any time. I don’t stress it or check very often, so I was quite surprised when the recent report from WordPress said people from 61 different countries viewed my blog in 2015!

This picture of Iceland is from NordicFoodFestival.org

This picture of Iceland is from NordicFoodFestival.org

Most of the countries were predictable: the U.S., Canada, U.K., Australia, and New Zealand. But there were views from every continent except Antarctica! The place I got the biggest kick out of was Iceland 🙂

This improvised log cabin block, which was made into a pillow, appears to have been the most viewed picture on the site.

improvised log cabin block

improvised log cabin block

Jo Glover, big stitch quilting

Jo Glover

And my most popular post was about Jo Glover, who first developed Big Stitch quilting but doesn’t always get enough credit now that everybody does it. You can find that post HERE if you missed it.

Another popular topic was my ongoing modern sampler quilt, and there’ll be much more about that coming up soon.  A few of those blocks are shown below.

The stats show my readership growing steadily over the 2-1/2 years I’ve been blogging. The growth is slow, but I’m blogging for fun (and I’ve kept my day job!) so that’s just fine. I’ve made some new friends, which is even better.

As always, I’m amazed by the power of the internet. I’ll skip the chance to philosophize about that and just wish anyone who reads this a very happy 2016!

Little House Class at Studio Stitch

I’ll be teaching my fusible applique class, called Little House on the Wall (with no

Studio Stitch

Samples for the Little House workshop

apologies to Laura Ingles Wilder) at Studio Stitch in Greensboro (NC) on January 30.

I visited the shop recently to talk with the staff about materials for the class, and of course I HAD to look at EVERYTHING.  Well, I needed to look so I could discuss what would be appropriate for the class, but it’s OK to just drool on the fabric a little, right?

They had landscape fabrics and plenty of batiks that will be great for the class.

There was even a bundle that seemed just made for creating my little houses!Studio-Stitch-8

I even found 28 weight thread for embellishment in a variety of yummy colors.


28 weight thread can be hard to find, but Studio Stitch has plenty!

28 weight thread can be hard to find, but Studio Stitch has plenty!

Of course I wandered a little…they had gorgeous batiks made specifically for use with the Jacqueline De Jonge patterns.  They even had one as a kit, with a more restful background fabric than this sample I took from Jacqueline’s site.

The ladies at the shop were all friendly and helpful, and I’m looking forward to teaching there.  You can find out more about the shop and my class on the Studio Stitch website. 


Cover for The Quilter’s Planner

I was pretty excited to get the newly-developed Quilter’s Planner (more info HERE if you’re interested) for Christmas.  I decided it needed a fancy cover to protect all my

The Quilter's Planner 2016

The Quilter’s Planner

plans!  A quick Google search for “planner cover tutorial” found one HERE by Jodi Bonjour on her blog Sew Fearless.

Now, Jodi’s tutorial is for a planner of a DIFFERENT SIZE, You can follow her general directions, but here are my modifications to make it the right size for the Quilter’s Planner. As is often the case, it took 2 tries to get this right, so I’ve also made a few notes about what worked for me.

First, about cutting:  I cut the pieces for the cover, lining, fusible fleece, and Peltex (stiffener) 20-1/2″ x 11″.  The sleeves were cut 5-1/2″ x 11″.  Here are pictures of the interior of the planner cover, showing what the sleeves are:

cover for the quilter's planner 2016

Interior of the planner cover, showing the sleeves and the closing tab

cover for quilter's planner 2016

Interior with the planner in place, cover inserted in the sleeves

I pretty much followed Jodi’s instructions, BUT here are a few hints:

  • I spray basted the backing to the Peltex–that stuff is slippery.
  • It may be a good idea to cut these pieces 1″ larger than needed and trim to size after quilting the cover.  As always, things shift a little during quilting.
  • Jodi used a big snap to close her cover, but I used hook-and-loop tape.  It’s more adjustable, and who knows what all I may jam in with the book?  (Plus, I couldn’t find my snap setter 🙂
  • Jodi’s directions just say to attach the tab closure.  For the record, you do that by lining up the unfinished end of the tab with the unfinished edge of the planner cover, centering it along one side.
  • I cut my binding 2-1/4″ wide, attached it to the inside with a 1/4″ seam, and turned it to the outside.  This made the seam attaching it to the outside almost 1/2″, which made the planner cover fit tightly into the pockets.  It worked out fine, but check your seams so you don’t find the pockets have gotten a little too small!

I quilted my cover, which holds all the layers together really well.  I’m not sure what would happen if you didn’t do that.  Here’s a picture of the quilting:

cover for quilter's planner 2016

Quilting on the exterior of the cover

And here is my planner cover, ready to start 2016!

cover for quilter's planner 2016

The finished planner cover

What are your plans for the new year?