Great Aunt Bess’s “Fizzle Drawer” and A Busy Week

I have a number of pieces of antique furniture, as much out of obligation as desire. These belonged to my grandparents, great-grandparents, and in one case to my great-great-grandmother. One of them contains Great Aunt Bess’s “Fizzle Drawer”.

Granny once commented on it, saying that whenever her sister, Bess, had a sewing project that “fizzled”, the project went into that drawer. I’m not sure what happened after that. This would have been in the early part of the 20th Century, but I don’t even know whether the “fizzle” items were clothing or something else.  By the time I inherited the furniture they were long gone!

I think some of my UFOs probably should go in the “fizzle drawer”, but I don’t know when to quit, so I keep working on them.  This next one was a class I did not especially enjoy, but I’ve converted it to 4 large blocks to be combined into a donation quilt.

This next one is not a fizzle, it’s a set of place mats I made for a quick holiday class to teach this fall.  I developed this pattern YEARS ago for McCall’s Quick Quilts and have made many versions of it since.  Place mats are a nice hostess gift to have on hand.

We went to the “apple barn” this weekend and got some apples–must be fall!  Here is the view from the apple barn, looking across some trees heavy with red apples to the mountains beyond.  It doesn’t get any better than that!

How was your week?

Guild Challenges, Part I

When I volunteered to arrange programs for one of my modern guilds this year, I didn’t realize the job included coming up with a challenge each month.  Luckily, there were lots of ideas for guild challenges in internet-world, so the challenges weren’t too much of a challenge.  (Sorry, that just slipped in!)

I thought it might be helpful to other modern guilds if I posted our proposed challenges, since I’m sure other folks are in need of ideas, too.  So here’s the first one: slabs.  If you don’t know what a slab quilt block is, Canadian quilter Cheryl Arkison published the idea in her book Sunday Morning Quilts.  You can see a picture and instructions here.

modern quilt challenge

Slabs can be addictive!  And a quilt of many colors is fun.

In January, each member received brief instructions on how to make a “slab” of a single color of the rainbow.  Sort of.  While trying to figure out how to set up the rainbow challenge, I found this quote from Isaac Asimov (one of my heroes):

It is customary to list indigo as a color lying between blue and violet, but it has never seemed to me that indigo is worth the dignity of being considered a separate color. To my eyes it seems merely deep blue.

So our colors for the challenge are red, orange, yellow, green, blue, purple.  Seems like the main value of indigo and violet is that they let us spell out ROY G BIV.  Huh.

Our slabs are 15-1/2 inches square, to be 15 inch finished blocks.  Each person makes one in her assigned color, then can make as many others as she wants in as many of the six basic colors as she wants.  At the next meeting, we’ll put all our slabs in a pile and each person’s name will go in a basket once for each block she turns in.  Then we’ll draw a name and somebody gets all the blocks.  Of course she’s expected to make something wonderful with those blocks before the next meeting!

I e-mailed examples of slab quilts to guild members as part of the challenge and also took some of my quilts to show.

slab quilt

Jerri Szlizewski combined her purple slabs with neutral slabs, then appliqued purple dots on the neutral backgrounds

Improvised slab quilt

I cut up the yellow-orange slabs I got in a swap and inserted blue

Does your modern guild have some great challenge ideas?  Let me know!  I’ll be posting about our other challenges as we go along so you can use them, too.


Two Quilts, 3 Reviews, 4 “Learning Experiences”

“Wow!” my husband said, as he watched me taking quilting stitches out with my new skin4electric seam ripper.  And his is an informed opinion, since he has seen PLENTY of seam ripping over the years between my adventures and those of his 3 sisters.

So here’s the story:  I designed a quilt made of all equilateral triangles, in all solid colors, several years ago.  It was one of those projects that looked better in my head than in reality, so I backed up and started again.  (Learning experience #1: this design stinks.)

The Lombard Street pattern by Sassafras Lane caught my eye, so I ordered it, thinking I probably could re-cut my blocks to work.  When the pattern arrived, it was just as beautiful as it looked online, and the block size was such that I could, indeed, salvage my fabric. But it is paper pieced–not my favorite technique.  (Learning experience #2: check the construction method before ordering!)

In any case, I got the top made and was pleased with the result

modern quilt

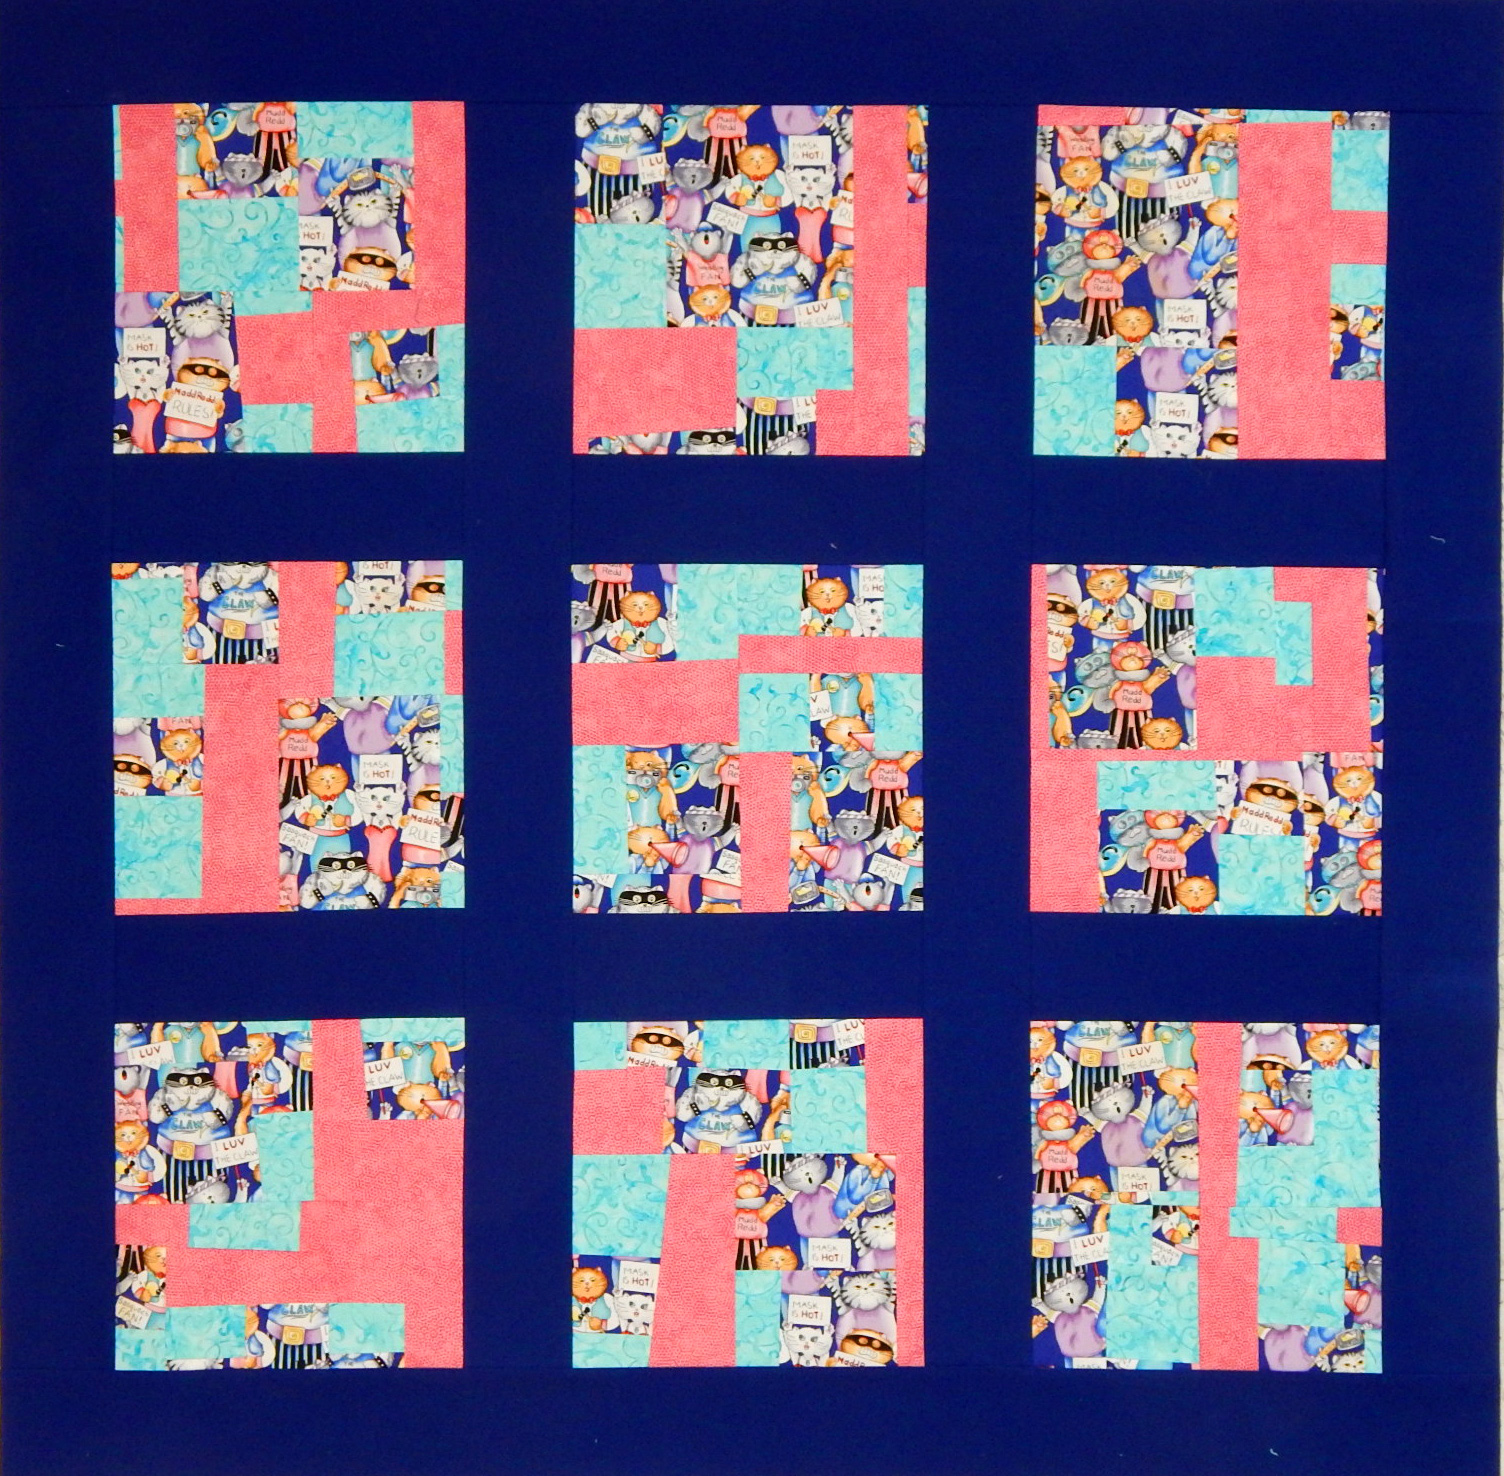
The pattern is Lombard Street, by Sassafras Lane Designs.  The blocks are on my design wall.

Review #1:  the Lombard Street pattern had excellent instructions, and came out just as great in person as it looked on the pattern.

I layered the quilt with Quilter’s Dream bamboo batting.  Review #2:  The batting felt just wonderful, soft and with a good drape.  But OH MY did it make a mess of the black fabric!  I don’t know how, but it kept giving off lint that completely covered the quilt top.  I LOVE Quilter’s Dream batting and use both the poly or the cotton request loft almost exclusively. But this bamboo!  Yikes!  My trusty lint roller fixed that.  Several times.  (Learning experience #3: I won’t use bamboo batting again.)

It’s a long story, but after several trials, I decided to use Metrosene poly quilting thread in dark grey, thinking it would blend in with all the fabrics.  This strategy has worked well on several other quilts, but not so much this time.  I didn’t like the way it looked–when I had the quilting 80% done!!!  (Learning experience #4: stubbornness isn’t always a virtue.  Sometimes sticking with the task is not the best option 😀Review: Lombard Street pattern

Enter the electric seam ripper.  I went online and researched just HOW other people had gotten the quilt stitches out of quilts in similar situations.  I read about 3 different electric seam rippers and watched demos on You Tube.  I purchased one, put in a AA battery, and got to work.Review: electric seam ripper

By the way, removing the backing from a quilt this way, in order to remove the quilting stitches, is called “skinning the quilt” according to my online research.

Review #3:  The electric seam ripper worked amazingly well!!!  I had the entire top un-quilted by 1 p.m., and I did two loads of laundry, made breakfast and lunch, and put dinner in the crock pot besides!  I had to use a traditional seam ripper where I had made tiny stitches at the sharp corners, but otherwise it went very fast.  The only holes created were a tiny hole in the batting made with my traditional seam ripper, and a tiny hole in the backing made by the electric seam ripper when I tried to insist that it cut through those very close stitches (it just said no).electric seam ripper

The discussions online reported being able to lift the top quilting thread off in one long piece.  As you see, that didn’t work for me–maybe when I’ve had more practice?  (Oh please, no more practice!)  Anyway, the trusty lint roller saved me again.

And this top is going to a long-arm quilter.  Done!


Fixing an Oops

I’m quilting a lap size quilt on my home machine. I’m not fond of the process, but custom quilting isn’t in my budget, so here I go. About half way through the process, I discovered a loose seam where, despite paper piecing, one seam allowance had been TOO small and the seam had opened up.  There wasn’t enough fabric to allow me to just overlap and top stitch the seam.  The edges barely met and, while one was a folded edge, the other was a raw edge.

fixing a quilt mistake

The opening was about an inch long

Luckily, I have a tool from garment sewing I used to fix it.

using stitch witchery to fix a quilting mistake

Stitch Witchery is a heat-activated glue in a strip

I used the Stitch Witchery to bond both sides of the seam to the batting.  This also stabilized the edges so they won’t fray.  Then I zig-zagged across the place.  Thank goodness it was a black-to-black seam so there’s no problem of one side of the zigzag showing on a colored block.

Fixed with minimal fuss

Fixed with minimal fuss

I’m not glad it happened, but I’m satisfied with the fix.  I will NOT be pointing it out to anyone looking at the finished quilt 🙂

Now I’m back to the quilting.  The piece is about half done.  I’ll show it to you when I finish.

Good News, Bad News!

First, the bad news: I sliced a good-sized hunk out of my finger with the (nice, sharp) rotary cutter. When I couldn’t get the bleeding stopped after an hour, I went to Urgent Care. A nice Physician Assistant there got it all fixed up.rotary cutter accident

Quilting with 9 fingers is a challenge 😉  Another learning experience…

In better news, I made Lora Douglas’s Roxie bag this week, and it is as cute as expected! This project is part of Quilted Adventure, an online retreat I’m taking part in throughout 2016.  As always, I learned several things from making this bag.  And unlike the learning experience mentioned above, this was fun:

Roxie Bag, Quilted Adventure

Roxie Bag, Designed by Lora Douglas

Lora’s instructions requested foam batting, a product I had never heard of!  Luckily, my “local” quilt shop had it. It did give the bag really nice structure without making it stiff, and I probably will use foam batting for future bags.  A nice find!

I purchased the hardware for the bag from Lora’s Etsy shop,  I had no idea a flex frame could be so sturdy.  Most bags I’ve seen were made with lengths of metal measuring tape as the closure.  That works just fine (if your husband isn’t very vigilant about his tools) but the closure isn’t very tight.  The flex frame that came with the kit holds that bag closed with certainty!  And unlike the measuring tape closure, this one can hold itself open when needed.

Lora Douglas

Roxie Bag with the top snapped open

Lora’s instructions also called for glue-basting the binding, which I had never done.  It actually worked great!  I’ll probably do that again.

If you’re interested in the year-long Quilted Adventure, all classes are online for the whole year, so you can sign up any time.  Just use the link above to go to Lora’s site and click the button in her margin.  If your main interest is the bag rather than the whole retreat, she’ll release the single pattern some time in 2017.

So the good learning experiences certainly outweighed the bad this week!


One Big Improvement

Here’s the donation quilt that resulted from following one of Sherri Lynn Wood’s “scores” as it originally turned out. I didn’t much like it. As several friends pointed out, there wasn’t anywhere for the eye to rest!

improvised quilt

This came from following one of Sherri Lynn Wood’s “scores”

I got some great suggestions from readers and other friends.  I considered them all and finally used EQ7 (the Electric Quilt design program) to draft a layout.  I removed the borders and cut the center into 9 equal blocks, each 10″ square.  I loved Wanda’s idea to make the blocks different sizes with frames, but I was afraid the design already suffered from too much “creativity” so I didn’t do it.

improvised quilt blocks

10″ x 10″ blocks cut from the quilt center

Checking my stash, I came up with these options for sashing. I guess if I’d wanted a “really” modern quilt I’d have chosen the gray 😉

improvisational quilt block

Sashing options for the revised quilt

I chose the marine blue because it calmed things down without making them dull. I’m pleased with the result.

improvised quilt

The “New! Improved!” quilt top

Thanks to everyone who provided input about what to do with this!

What To Do x 2?

Here are two projects I need to “fix”, and I’m open to suggestions.

improvised quilt

“Swim” is about 50′ x 50″

This first one, shown above, is an improvisation I did about 2 years ago.  I haven’t finished it because the lines between the layers are more distinct than I intended.  I joined the layers with curved seams cut freehand, and I changed the fabrics I used in each layer gradually, but the layers still aren’t blended as well as I’d like.

My “UFO finish” for June is to do SOMETHING with this top. (Mother used to say, “Do something, even if it’s wrong!” when we got stuck on a task.)

My current thought is to cut some freehand diamonds and applique them intermittently along the seams I want to blend.  Any other ideas?

And here’s the second one that needs “fixing”:

improvised quilt

This is to be the June donation quilt, 40″ x 40″

This is my second attempt to follow a Sherri Lynn Wood “score”.  I followed her instructions more closely than last time, and I like it a lot less!

I chose a focus fabric from my novelties because this is a quilt for a child. I followed Sherri Lynn’s directions to make some “rules” and cut up 3 fabrics for the quilt, etc, etc. When I finished, I thought it needed something to “pull it together”, so I added a border of the focus fabric.

BUT, my friend who coordinates our donation quilts looked worried when she saw it. (PLEASE don’t tell me you think that’s a donation quilt?)

So help me out here! What should I do with this?

1. Leave it as it is and quilt it, already!

2. Cut it into blocks to be joined by solid color sashing to calm things down.

Option 1

Option 2

3. Dye it black and use it to back something else (kidding!)

4. Another idea?

Option 2

Option X

Hope you have a good week 🙂

March News x 3

First, here’s the stack of quilts my group made for Ronald McDonald House:Donation Quilts

Second, here are some other projects along the way:

Improvisational Quilt Blocks

Gwen Marston Style Improvisational Blocks (made by me)

Group-block-2

One of the blocks from our group block swap (24 inches square!)

Jerri's start on a BIG Bonnie Hunter quilt

Jerri’s start on a BIG Bonnie Hunter quilt

improvised blocks

Improvised “slabs” for our next group block swap!

Finally, the March finish (as in, I am DONE with this one!)

Storm at Sea

Paper Piecing Gone WAY Wrong!

I bought this paper-piecing pattern for Storm at Sea in 2006 and cut the pieces over a (long) period of time with the intention of making it of scraps from other quilts.  What I FAILED to do was to make a sample block before cutting the whole thing!!!

I wanted to paper piece this design so the points would be perfect.  Instead, carefully piecing along the lines on the paper produced what you see above.  The pattern and paper went into the trash, and the thousands of pieces I cut will be re-purposed!

I almost always make a test block, and now I expect it will be always-always instead of almost-always 😉

5 Silly Things I Won’t Do Again Next Year…

batik quilt back

This is the back of one of my bright batik quilts–it was fun!

‘Tis the season to make resolutions, and I’m not big on those, but there are a few things I don’t plan to repeat. And to go with the list, a few of my quilts.

1.  I won’t put a cup of hot coffee on my cutting mat.  Turns out that little sucker is VERY heat sensitive and warps locally just from having a cup of coffee on it for a few minutes!  Of course I knew not to leave it in a hot car, but I really didn’t think the bottom of a coffee cup got that hot.

2.  I won’t drink red wine while free-motion quilting (FMQ).  Yes, wine does help with FMQ, but white would be easier to get out of fabric 😉

3.  I won’t “wait until later” when I see a really

batik quilt

Another batik quilt! I love batiks and straightforward designs.

terrific fabric I “need”.  It can be WAY too difficult to find it again, let alone to find the coordinates to go with it.

4.  I won’t assume a marker will come out of my fabric just because the manufacturer says it will.  The manufacturer also said to “test on an inconspicuous area” before using, and that WOULD have been a good idea!

5.  I won’t set the piecing foot from my machine in a box of binding clips when I need a safe place for it “just for a few minutes” while I use another foot!  That foot walked off with the binding clips and was lost for 2 weeks.

And of course, there are a few things I will plan to repeat:

T shirt quilt

A T shirt quilt for a friend

1.  I’m going on retreat with my best quilty friends.  At least twice next year.

2.  I’m going to at least one big national quilt show.

3.  I’m going to submit at least four of my quilts to shows or contests.

4.  I’m going to take at least one workshop to learn a new technique or get some new ideas.

5.  I’m going to have lots of fun.  I hope you are too!  Happy new year!

baby quilt

A very important baby quilt!