What Was I Thinking?!?

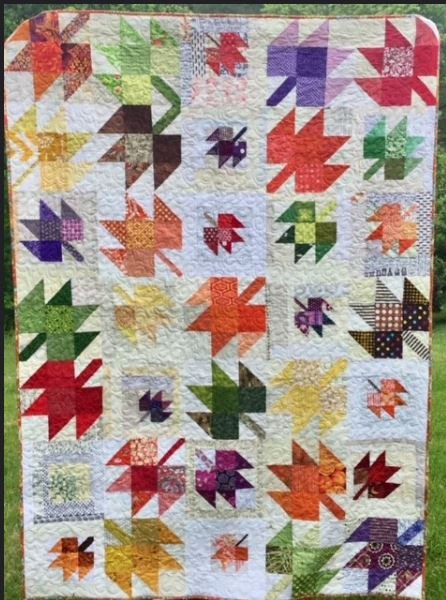
I found this unusual pattern at Five Little Monkeys and liked the look of it.

The pattern wanted me to buy a 120 degree triangle ruler, but after discussion with a math-loving friend I decided to try cutting those 120 degree angles using the 60 degree line on my long ruler.

It worked, sort of. After making a few blocks that way I concluded that the price of the recommended triangle ruler was less than the price of the fabric and time I wasted trying to get the triangles right.

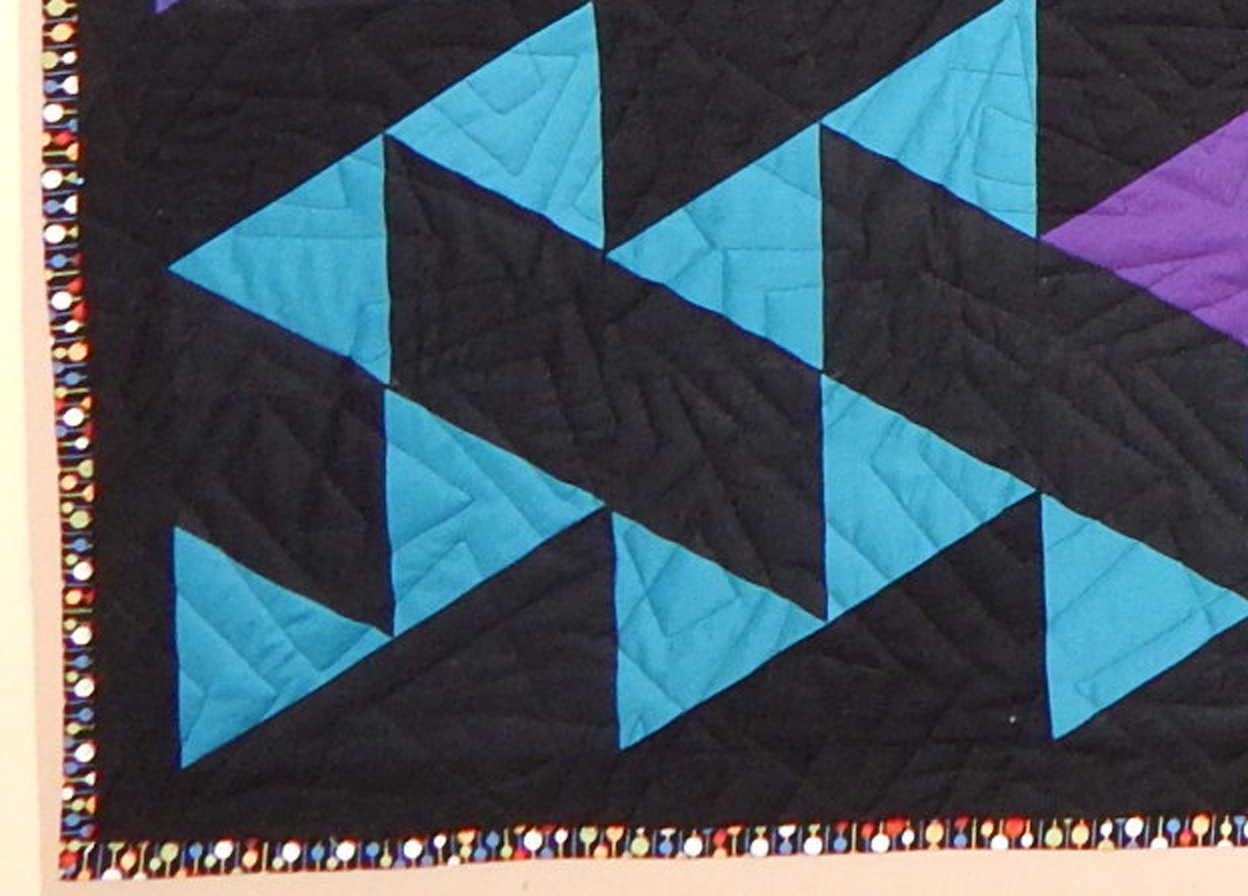
The result was that some of the triangles for the quilt were cut with one method, some with the other. However, the real oversight on my part was failure to notice that there are places in this quilt where TWELVE points come together! Or don’t actually come together, in my case. Yikes!

I do love this quilt. It is a striking design that works well with these bright fabrics.  So I’ll make do with these points that don’t match and use my own little trite saying for this situation: “A good quilt is a done quilt!” (Thanks, Diana, for this insight years ago in another context!)

Quilt stats

Name: Oops

Finished size: 54″ x 63″

Pattern: Henry’s Humongous Hexagons by Carl Hentsch

Made by: me

Quilted by: Linda Nichols

Two More Orphan Block Quilts

As I probably have mentioned, I have over 100 orphan blocks. Some are from swaps, some from blocks I made to learn something, some just extras from quilts I’ve made.

Yes, that bin is full of smaller orphan blocks, with the big orphans stacked on top!

I have made numerous quilts in the past to use some of them up. Here are a few just for review.

Aha! Orphan blocks can be cut up to make new blocks, as I did with my Giant Circles quilt, here

I’ve used orphan blocks to make greeting cards, here

orphan block on bag

This is a great use for orphan blocks. Just attach to a bag, and you have a handmade gift!

Splendid Stars, 51″ x 53″, was made from orphan blocks left from numerous projects

And of course I’ve attached orphan blocks to shirts.

quilt block on a shirt

Here’s another orphan block on a shirt

Recently I was browsing patterns and noticed that the folks at Maple Island Quilts had used one of their patterns to set some orphan blocks, so of course I ordered the pattern.

I have made two quilts. Here’s the first, which I considered the less successful of the two.

Quilt made using orphan blocks and the BQ5 pattern from Maple Island Quilts.

I thought the points coming together would make the design cohesive, but the blocks were just too dissimilar. And yes, there is a “mistake” block that I decided to leave “as is” when including it in the quilt 😀

Oops. But this is not the time to re-make this block!

The second quilt was made with the other design offered in the pattern, and I believe the blocks are more homogeneous as well.

Finished quilt 54″ x 68″, made from BQ5 pattern

Perhaps Elvis helped this quilt be more successful.

But the favorite block is this one. It’s a print from many years ago. I used the fabric to make a quilt for a friend who is a child psychologist.

What do you do with orphan blocks? How many do you have?

And just in case you have a LOT, the BQ5 pattern is available here. It is well written and I do recommend Maple Island Quilt patterns because I’ve never had any trouble following their directions! Several other patterns in the line would work for orphan blocks, too.

More Stars

Lucky Stars by Atkinson Designs is one of my all-time favorite quilt patterns because it is so clever. It uses fat quarters and makes lovely stars without the need to worry about cutting off the points!

I don’t recall how many quilts I’ve made from this pattern, but here’s another one. It’s made with the fossil fern fabrics I’ve collected over the years for no particular reason other than a love for those fabrics. Hoping to use them up, I made the back out of my scraps.

Julia Madison quilted it with stars and loops–perfect!

Quilt Stats:

Pattern: Lucky Stars by Alex Anderson

Fabric: Benartex Fossil Ferns

Finished size: 59″ x 44″

Quilted by: Julia Madison

Pattern available here. As always, this is not an affiliate link; it is just for your convenience.

2020–Yikes!

My blogging friend Velda at Freckled Fox Quiltery  posted a while back that she is making a temperature quilt for 2020 because–what a year!  I liked that idea. I certainly feel that this year deserves to be memorialized in a quilt, but I do not want to paper piece a picture of the COVID virus, or make the quilt I designed to represent the ICU, or quilt anything else directly COVID related.  Making and wearing masks is a sufficient reminder, thanks!

In addition, Velda linked to a free pattern that I liked the looks of.

Here’s a link to the free pattern.

Any temperature quilt will require a lot of research (high and low temps for every day of the year for your location) and organization.  Here are a couple of things I learned along the way.  This pattern is clearly written and she has some good suggestions regarding fabric choice.

First, of course, I pulled fabric from my stash.  I was happy to see that I had everything I needed, since quilt shops were closed for browsing and I thought it might be difficult to order by phone. 

The colored blocks in the pattern are cut 2″ square (yikes!) so I decided to try something new to cut down on fraying.  I recently purchased a product called “Terial Magic” at A Stitch in Time.  It is a “fabric stabilizer” and has several uses.  It kind of glues the fibers in the fabric together to decrease fraying and also makes the fabric stiff.

After talking with the lady at the shop, I mixed the Terial Magic 1:3 with water and put it in a spray bottle. I will say that I was happy to have to prepare only fat quarters of the fabric, as the process was kind of time intensive.  However, the fabric came out very crisp and wrinkle free and did not fray at all when I cut it.  Actually it was easier to cut than usual.  The stuff is supposed to wash right out once the quilt is finished, and I’m trusting that it will 🙂

When I got the squares all cut and started sewing, I discovered that I had somehow tricked myself into believing there was enough contrast between these two shades of green!

Luckily there was an adequate substitute in the stash!  Here are the strips for the first quarter.  Each strip is sewn together, but I have not joined them yet.

One final hint: I cut up the January calendar page and pinned the numbers on the blocks to keep them in order until they were sewn together. 🙂

Are you making a temperature quilt?  Another quilt to commemorate 2020?


Don’t Try This At Home

Sometimes I feel that there’s an unspoken rule in quilt-blog world against showing our mistakes or talking about patterns or tools that we didn’t like.  In fact, I often write about patterns or books I love, but skip over the others.  Well, here are a couple of things I won’t do again!

First, a pattern that just did not work for me, though you may have better luck.


I’ve had this pattern a long time and really like the quilt on the cover.  However, I found it involved matching all those seams.  I first modified the pattern so the strips were of varying widths, eliminating the need for matching.  However, when I started making the last set of triangles, they just didn’t fit!  At that point I made a few more modifications and completed enough blocks for a donation quilt, and DONE!

It’s entirely possible the problem is with me rather than with the pattern.  I still like the look, so I may design my own version later on.  Alternatively, it appears (on Pinterest) that Zen Chic had an almost-identical design called “Fractured”, but I can’t find it on the Zen Chic website now–perhaps it was too identical and they withdrew it?  Don’t know.

Anyway, if I ever make this again I’ll re-design it completely so it works for me.  I do still love the look.

Has anybody made this quilt from either pattern?  How did it go for you?

Second, a pattern that worked out exactly right, possibly because I did it in a class!  It is beautiful, but it is paper piecing (of a different type, but still).  In this case, the pattern is perfect and the instructor was great.  I just did not care for the process so I won’t make the other 11 gems in the series!  If you want to try it, here’s a link to the site for all the gem patterns and classes.

I do like this, but it finished the size of a large block or a wall quilt–what shall I do with it?  All suggestions that don’t involve paper piecing are cheerfully invited!

And what have you messed up lately? 😀

Swirly Leaves: Support Your Local Quilt Shop

My friend Lynn Kline developed this pattern to make fall leaves easy and modern by using scraps, low volume fabrics, and points arranged so they come out well.  I took her class last fall to make the quilt, mostly because my friends were taking the class, too.

Photo courtesy of Lynn Klein

Everyone who came to the class brought scraps to share, so we had a lot of variety.  I’m always amazed at how many people can bring scraps and still not have any two fabrics the same.

My version of Lynn’s quilt

This quilt was fun.  I always have more scraps than yardage, so it was good for my scrap collection.  I enjoyed making leaves of several different sizes rather than just one block repeatedly.  And of course it was fun to do it with friends!

As you can see I didn’t do it exactly by the pattern.  I changed the background.  Lynn used a variety of low volume fabrics but I used a blue that made me think of October sky.  Oh, and I changed the layout.  Whatever!  It’s still Lynn’s pattern 🙂

Lynn’s pattern  includes a handy chart for cutting leaves of various sizes and leaves that make it easier not to cut off your points.

The pattern is available from Lynn’s shop, here.  She and her staff are working to make goods and services available during the quarantine, so you can order and do a drive-by pickup or have things mailed to you.

Here’s a detail showing the swirly quilting by Julia Madison:

Quilt Stats:

Name: Swirly

Pattern: Scrappy Modern Maple Leaves, by Lynn Klein

Finished size (for my variation):  51″ x 62″

Quilted by: Julia Madison

As always, the links in this post are for your convenience; they are not affiliate links.

Three Bag Patterns That Were Worth Paying For

Just as there are lots of great free bag patterns, there are many excellent patterns for sale on the internet. Here are 3 of my favorites.

1. Divided Basket.  This is another pattern from Noodlehead, who also designed one of my favorite free patterns.  The instructions are excellent and the divided basket is cute.  It was just right for a diaper basket for the changing table for my grandson.  It is available here.

fabric basket

Divided basket made from pattern by Noodlehead

2. Clothesline bag/basket.  This pattern is from Indygo Junction and was much easier to do than I had anticipated.  You can read my review of it here, or buy it here.

3. Sweetpea Pods, by Lazy Girl Designs..  This little bag was so.much.fun that I made more than a few!  Once you learn the zipper trick it is easy, quick, and so satisfying.  I’ve given away many of them and I keep a couple on hand for when I need a little gift for someone.  (Of course it should contain chocolate!).  I even gave one to a male friend, and rather than ask “what the heck” he said he’d use it to carry his guitar picks!  The pattern is available here.

And so you know I’m not just blowing sunshine, here’s one I thought was more trouble than it was worth, even though it is very, very cute (and was all over the internet for a while):

Which bag patterns do you recommend?

Clothesline Basket Fun

It’s been over a year since I purchased the Indygo Junction pattern for a basket made of covered clothesline, so I expect everybody else in America has tried this already. Anyway, it was fun.

The pattern gives basic instructions for starting the basket, shaping the bottom, and then shaping the sides.  Instructions are given for two types of handles, and for making the lining.  The basket itself was easier than I expected, then the lining was a little tricky.  Probably my fault because I changed the instructions 😀

My husband sometimes asks, “What is this one for?”  The answer is, “For making something I’ve never made before.”  Which means I have no idea of a use for this basket, but I do want to make at least one of (almost) everything just for the experience!  (Bonus: this used a lot of scraps!)

What about you?  Do you have a plan for everything you make?

A Little Quilt

Finished the smallest size (41″ x 35″) Lombard Street pattern and I’m about to send it to Studio Stitch, where I’ll be teaching the class. The triangles are all dots, though not polka dots!Lombard Street quilt pattern
I quilted this on my home machine, just following the zigzags in the background, and it worked just fine.Lombard Street quilt pattern
And the backing is a fun fabric I found on the sale rack at Studio Stitch last time I taught there! Win!triangle quilt

I’m teaching this as an introduction to modern paper piecing, of which it’s a great example.  Paper piecing makes it easy to get all those nice sharp points, and the arrangement of blocks makes people wonder, “How did she DO that???”  It’s always fun to keep people guessing 🙂

Pattern Review: Lombard Street

After over a year of dawdling, I have finished my quilt from the beautiful Lombard Street pattern by Sassafras Lane Designs.

Quilt pattern review

“Amish on Lombard Street”, my quilt made from a Sassafras Lane pattern

I rarely use patterns, since I prefer to design my own quilts, but this one caught my eye! The “trick” is that it is paper pieced, which helps all those points come out nice and sharp. The pattern is well written and the instructions are clear.  I had no trouble from that quarter.

I did have trouble when I decided to quilt it myself, and ended up taking out quilting from the entire quilt, then sending it off to my favorite longarm quilter!  She did a great job, and I’m happy to say I had the perfect binding waiting when the quilt came back to me 🙂  Pattern review Lombard Street

And look at that nice angular quilt pattern that reinforces the overall design!

Here’s a picture of the original pattern, courtesy of the Sassafras Lane site:

I haven’t made any of the other patterns from Sassafras Lane, but I was very satisfied with this one, and they certainly have some cheerful and interesting designs. I do recommend checking them out if you like cute modern patterns.