The Modern Sampler Continues

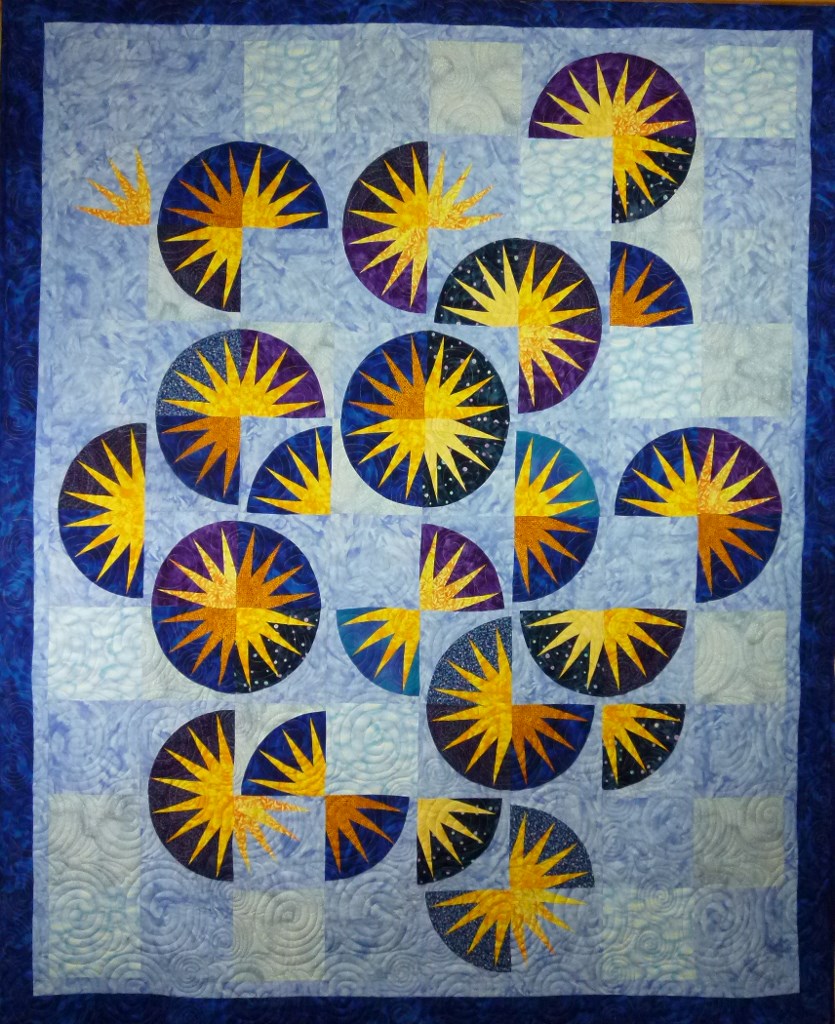
These next two blocks were made from inspirations I found on Pinterest (yes, I love Pinterest!)  The first I simply copied because I loved the colors and their arrangement in the original artwork by Richard Paul Lohse.

Modern Quilt Block

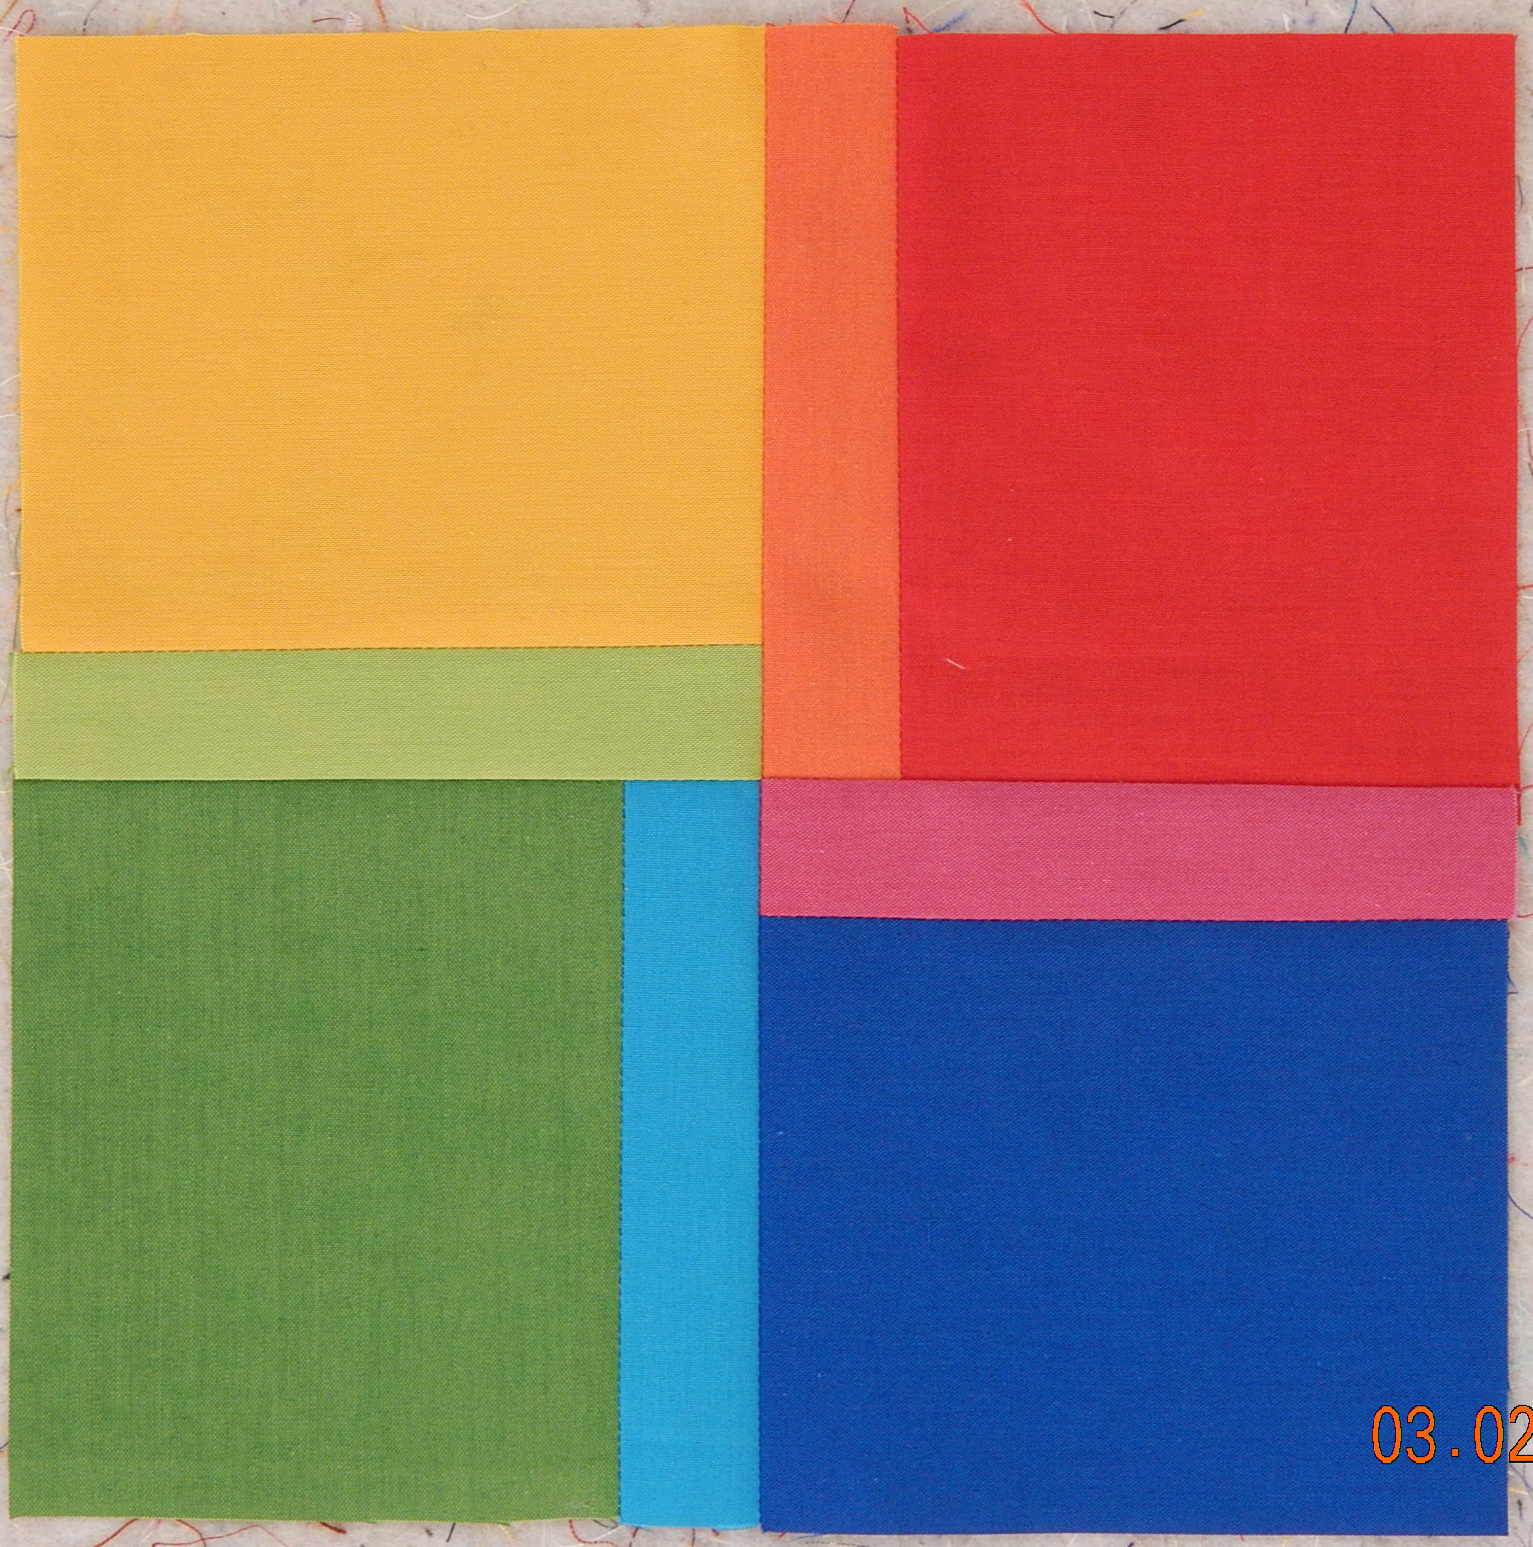
Quilt block based on the work of artist Richard Paul Lohse

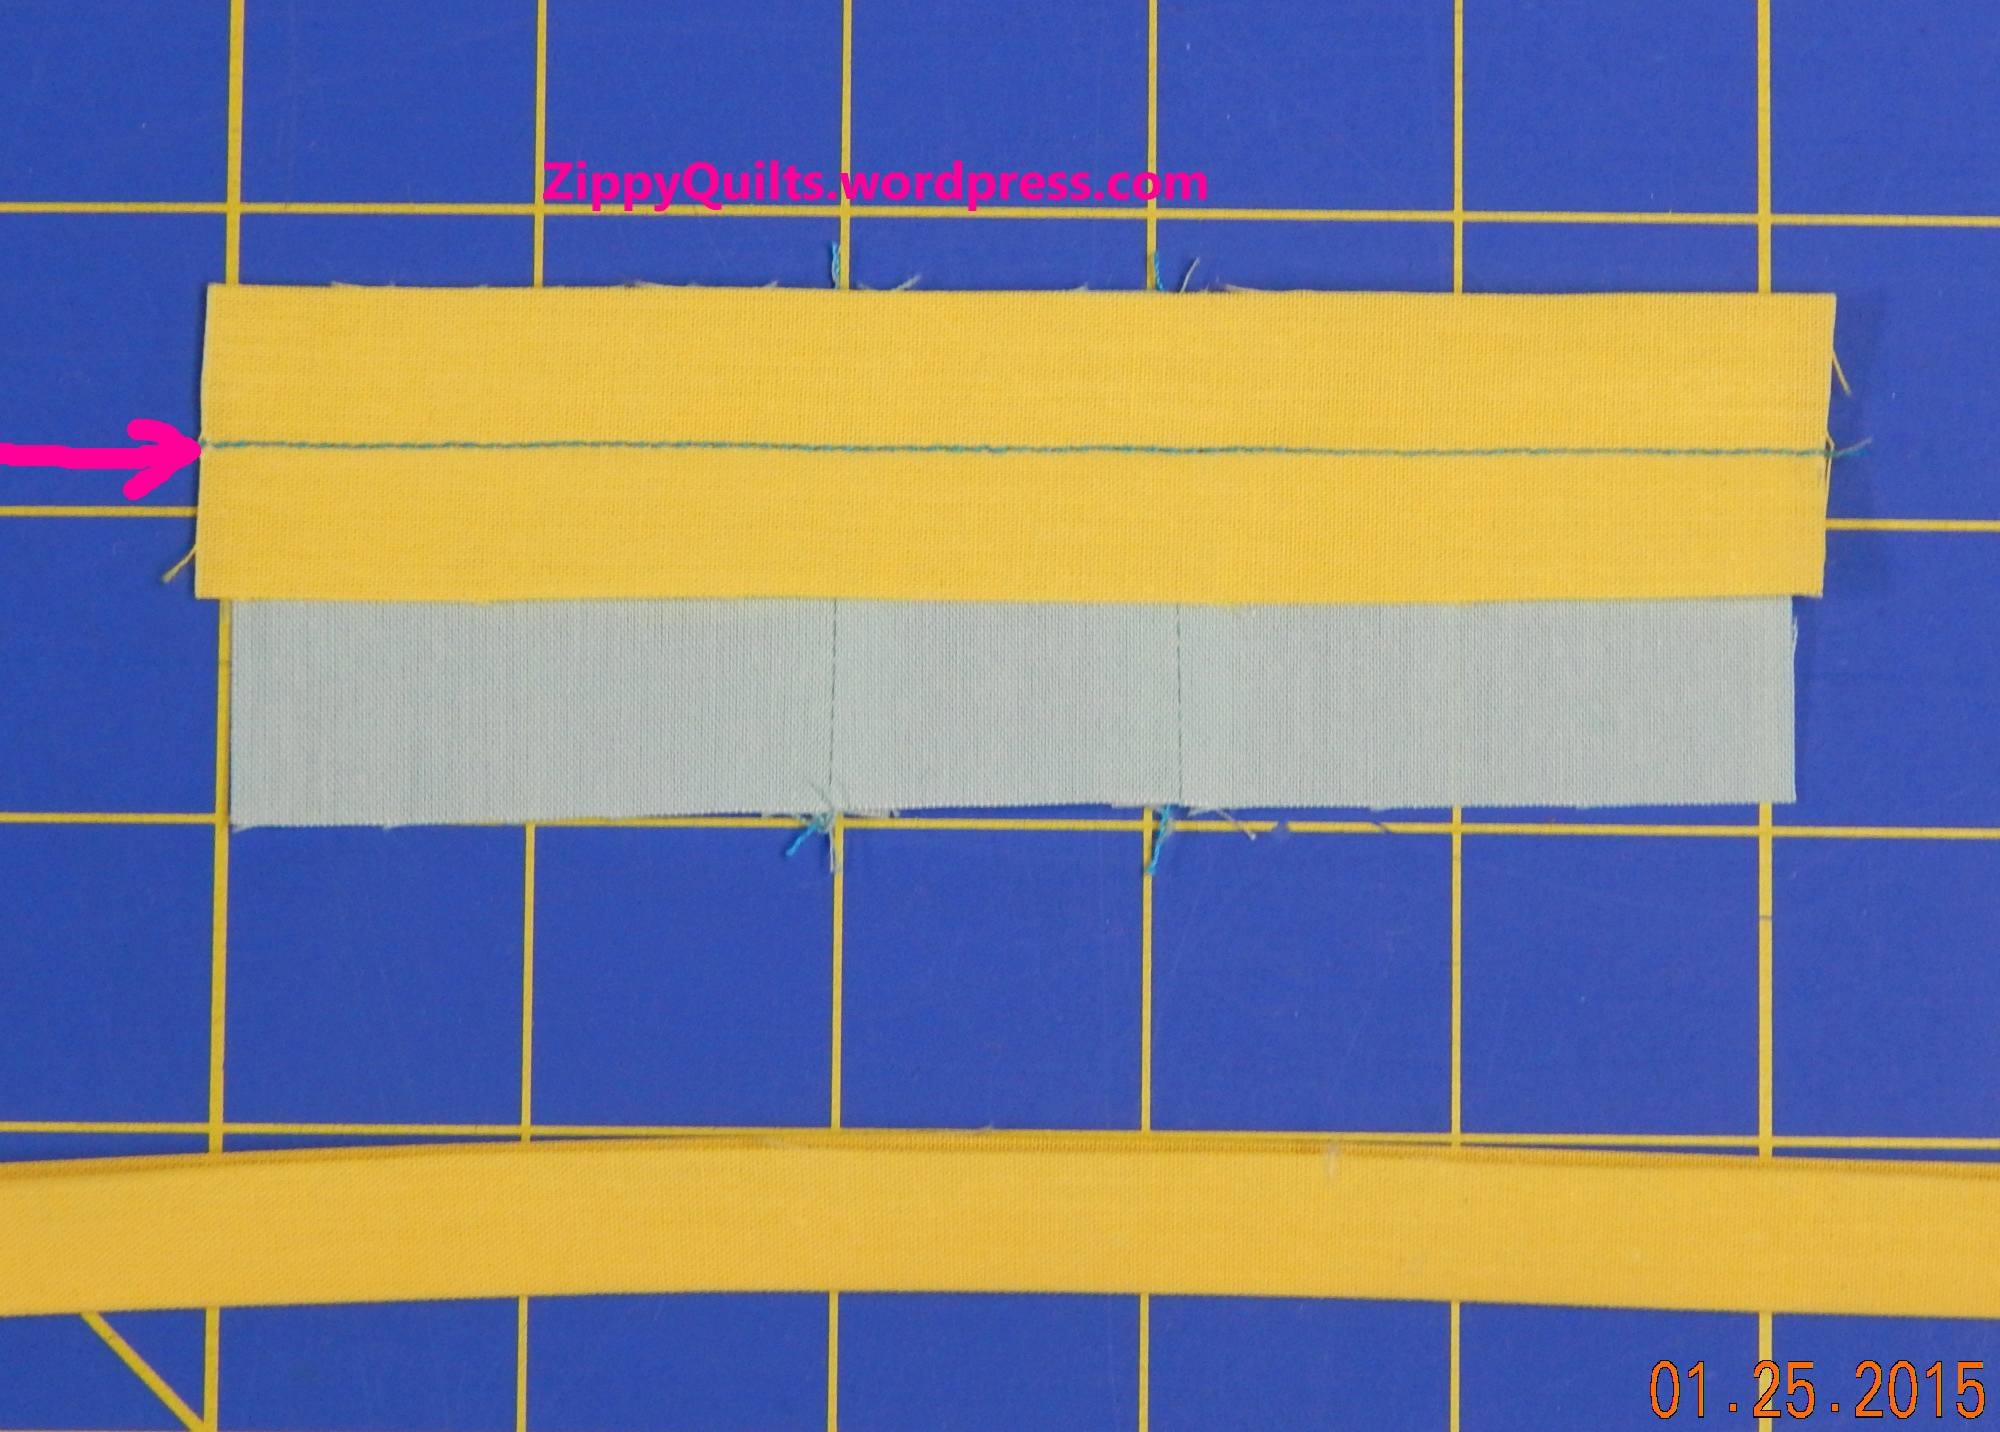
Here’s a drawing of how I constructed this block, with measurements, if you want to copy him, too.  There are 4 units, each 4″ finished (4-1/2 inches for each unit before joining) so that the entire block is 8″ finished.  I’ve marked the size to cut each piece on one of the 4 units, assuming you can take it from there 🙂

modern quilt block

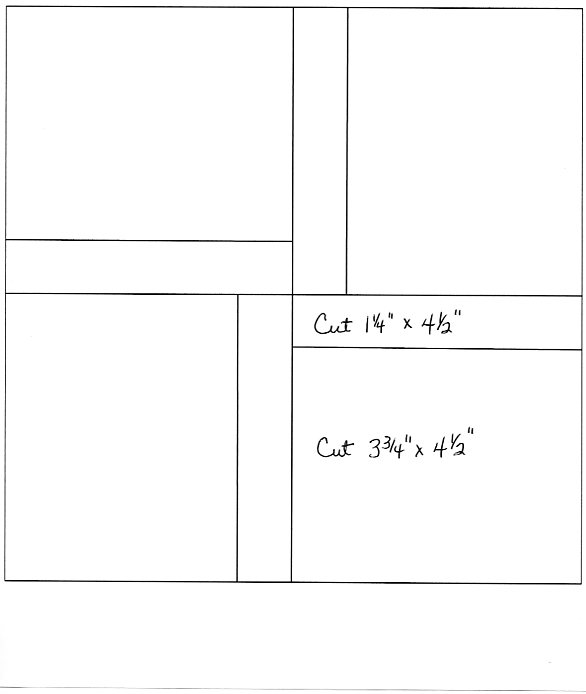
Layout for block based on art of Richard Paul Lohse

If you look up the artist Richard Paul Lohse, you’ll see that a lot of his designs would make terrific blocks or whole quilts.  Great sense of color!

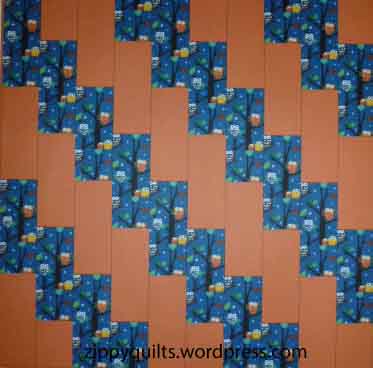
The second block was made from a tutorial I found at a website called Piece By Number and you can find the free pattern on her site here.

modern paper pieced block

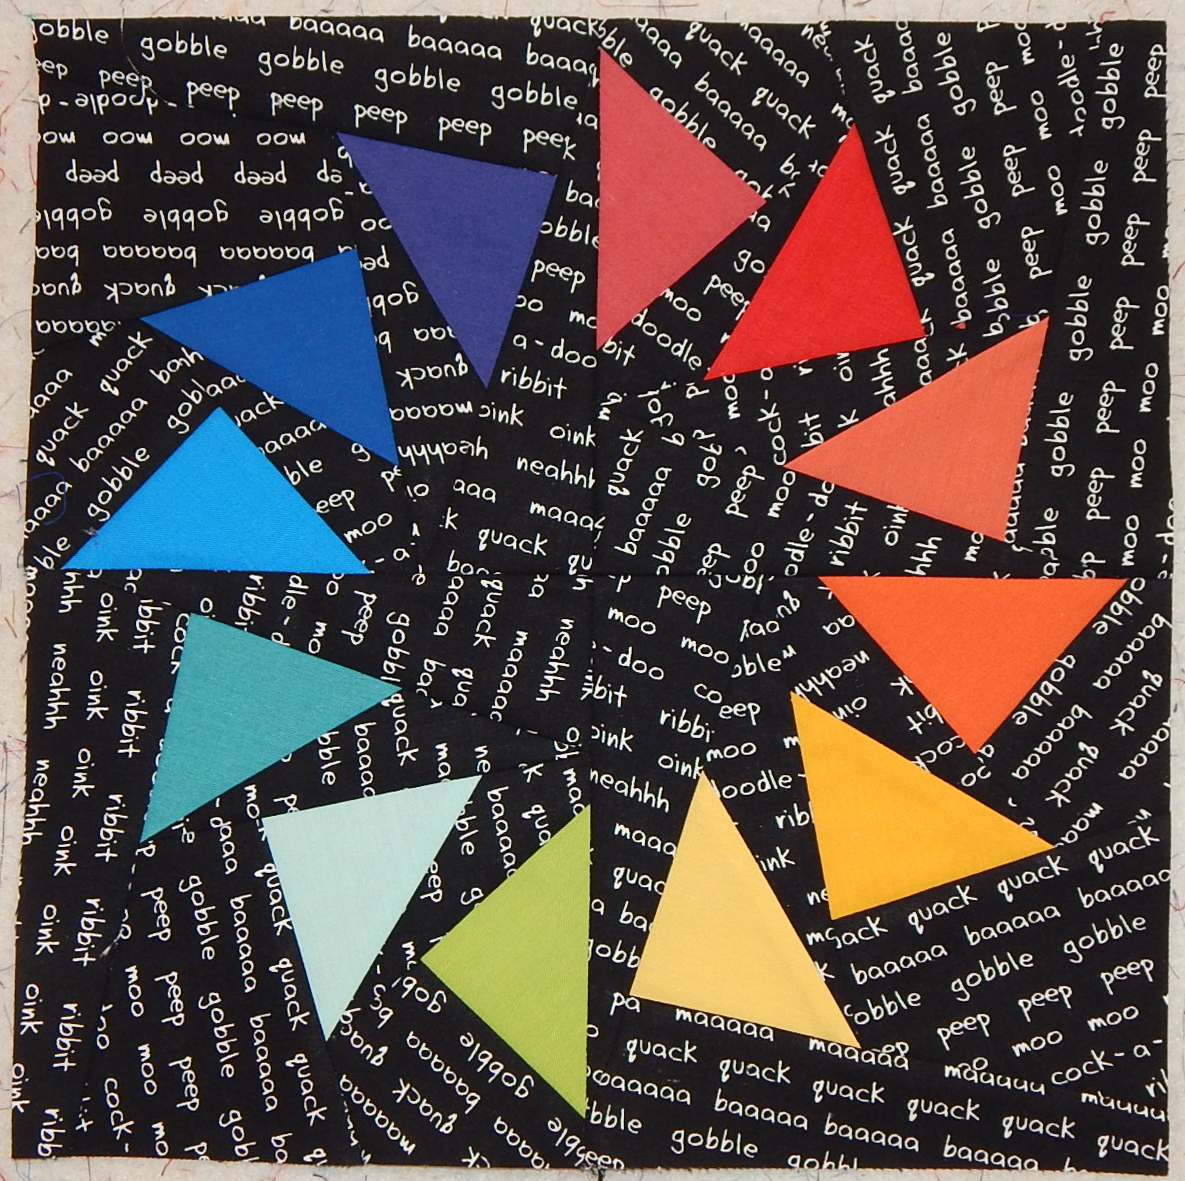
Circle of Geese block made from a pattern at PieceByNumber

This block was easier than it looks thanks to paper piecing.  I enjoyed making it, though I feel no need to make another right away!

I think these two blocks have a lot of ZIP for the relatively little amount of effort they required.  The Lohse block depends very much on choice of color, so be sure to lay out the fabrics and look at them a while before cutting.  Have fun!

Perspective on Quiltcon

There are numerous blogs showing pictures of the winning quilts from QuiltCon, so if you want to see them go to Houzz or the MQG blog here and here. Lots of interesting quilts to see.  Here are some of my thoughts:

Quiltcon winner

Fill the Void by Cinzia Allocca

First, I was very happy to see that Fill the Void, by Cinzia Allocca, won a prize in the handwork category.  This was one of my favorite quilts at the Vermont Quilt Festival last year, and the hand quilting really is beautiful.

I was happy to see some of my friends’ quilts in the show.  Here is Jean with hers:

QuiltCon quilt show

Jean Larson with “Floating”, her QuiltCon show entry

And here is Amy’s entry in the Michael Miller spring challenge.

QuiltCon quilt show

The New New, by Amy Anderson

That really WAS a challenge for most of us who don’t often use pastels, but Amy met the challenge with a nice design, so I was glad to see it at the show.

There were several quilts that obviously drew from mid century modern art, though that was not referenced in the show notes.  Here are two designs that were especially striking.  They are Ethos by Natasa McFadyen and Amazonia by Nathalie Bearden.

To me, these look like mid-20th Century art, especially Mark Rothko.

There were several quilts that drew on common forms from mid-century graphic design. I thought this one was fun:

QultCon show

Bowls and Balls #2, by Rachel Kerley

Finally, I loved this quilt by Luke Haynes, which he frankly states is a re-working of the Andrew Wyeth painting “Christina’s World”.  It’s a great example of how good design is good design, regardless of the medium.  I particularly like that, although he has changed a number of details to make it his own, the reference is immediately recognizable to anyone who knows the original painting.

QuiltCon 2015

{The American Context #16} Christina’s World, by Luke Haynes

In view of a lot of this, I was interested to see in the newsletter from one of the modern guilds that they want to focus on “modern quilts, not art quilts”.  Obviously the definition of “modern quilt” isn’t yet settled despite much discussion.


2015 Donation Quilt #1

A couple of my quilty friends try to make a quilt a month for various charities, so I thought I’d try that this year.  The group with which I make donation quilts sends them to a Ronald McDonald House to be given to sick children.  The House wants all quilts to be 40″ x 40″, which doesn’t seem too big to do one a month.  Here goes….

For January I took some of my orphan blocks and related fabrics and made this quilt.  The blocks also happen to be on my UFO list for 2015, so there’s TWO projects accomplished at once 🙂

Donation quilt

February finish and January donation quilt

The blocks finish 12″ square, which means that with a 2″ border the quilt comes out 40″ x 40″ as planned. The 9-patch blocks were made using the stack and shuffle method I learned years ago from Karla Alexander’s books.  It’s easy and fun.  To end up with blocks this size, I started with 15″ x 15″ squares of fabric (since they’re cut wonky on purpose it takes a bigger starting square than you might think).

The center block has little inset strips using a technique I modified from one of Judy Niemeyer’s ideas.  To make a quarter inch inset that doesn’t “wobble”, do this:

block tutorial

Block pieces, including yellow insert

Cut a 1″ strip of fabric and lay one edge along the raw edge of the piece where you want a narrow inset. Stitch through both the strip and the quilt piece 1/2″ away from the edge, either by using the 1/2″ mark on your machine’s throat plate or by marking the center of the strip.

Quilt tutorial

The center pieces of the block have been jointed and the insert laid along the side

Fold and press along the seam-line so that you now have 3 raw edges, all lined up.

quilt tutorial

Strips have been added to all sides of the center pieces and pressed along the seam

I don’t usually trim away the extra fabric because I like the stability, but it DOES make for some weighty intersections if you choose not to trim away the bottom 1 or 2 layers.  Then assemble the block as you normally would, using 1/4″ seams.  The strip you added will show up as a 1/4″ inset.

Let me know if you try either of these blocks.  I thought they were fun!


Tessellations! By Jean Larson

As promised, my friend Jean Larson has written a tutorial on tessellation quilts.  I hope you enjoy it as much as I did!  –MJP

Tessellating designs make me happy.  Tweaking those designs is even more fun.   I want to share the joy of starting with a very, very simple design and watching it blossom.  My inspiration comes from this web site:  http://gwydir.demon.co.uk/jo/tess/

Start with a simple gridded block and create a light/dark design.  Here, I’ve started with a 3 x 3 grid.  Then re-color the same block with the lights and darks reversed

.The grid lines are only for design purposes, and each block can be constructed with a single square block with 2 corner triangles attached using any method you prefer.

Here are some design possibilities…Quilt_1A simple “cat head” quilt using only 2 colors.

Different looks can be achieved with variations in the color placement.

Blocks can be inverted and turned for even more quilt designs.

Just imagine all the possibilities with color in these!!!!!

It’s even more complex when you design with a 6×6 grid.  Here are the positive and negative versions of another block.

These blocks can be constructed using half-square triangles integrated with larger fabric pieces.  If these blocks were to finish at 6 inches by 6 inches.  The center column on each block would be a single 3.5 inch wide by 6.5 in long piece of fabric.  The side strips would include some half-square triangles.

A couple of the quilts that can be made:

Looks like spools, some gray, some white, all standing up.  Same quilt with alternate blocks turned a quarter turn yields a different  clearly recognizable tessellation.  Reminds me of tessellating doggie rawhide chews 😉

Now back to the spool quilt from above.  The “thread” areas have been colored in.  No blocks have been turned.

Jean spool 5This shows the power of color and value (lightness and darkness).   The colored part, being next to the gray and being closer in value to the gray, unites those parts of the block, and gives the illusion that we have all gray spools on a white background, some standing up, some lying down.

I hope these examples can be the seeds to sprout some design experimentation with tessellating shapes.

  1. Start with 2 square grids
  2. Create a positive design, and its negative design
  3. Alternate them in a quilt layout
  4. PLAY!
  5. And play more with color!

Happy Quilting (and Designing)!!   –Jean Larson


Meet Lee Monroe of May Chappell Patterns

Images for this post are the property of Lee Chappell Monroe, May Chappell and used with permission.

Lee Monroe

Lee Chappell Monroe

Lee is a North Carolina quilter, designer, and teacher who came to my attention through her blog, which is titled May Chappell. Like a lot of other people, I initially thought May Chappell must be her name. Here’s her explanation of where the name of the blog actually came from:

Why May Chappell? There are always loads of questions about why the company is May Chappell and not Lee Chappell Monroe. You can read all about it here. The short version is that it is named for an awesome lady, my great grandmother.
Lee designs quilt patterns and sells them through quilt shops.  She went to quilt market for the first time last year, hoping to give her patterns a wider audience.  In addition to quilts, she designs pouches and “loves all things fabric”.  Like many modern quilt designers, she is trained as a graphic artist.  Here’s one of her quilt patterns:

May Chappell quilt

All Strung Up, a May Chappell design

And here are a few questions Lee was kind enough to answer for me, as well as pictures of more of her patterns:
tote bag pattern

Here’s a tote bag Lee designed to use mini-charm squares

Q:  Where do you think the quilting field is going?

A: This is a toughie. I usually see trends in the questions that I get from my students. I’ve had a lot of students lately that are self taught and they’re interested in learning more about precision. I’m a big believer that there is more than one right way to do things in quilting, but there sure are some wrong ways!
Q: What about your personal quilting future?
A: I have new patterns coming for Spring Market that I’m really excited about. I’m a terrible secret keeper so I usually want to put out the design right as I draw it!
Q: I know you took your patterns to quilt market, but where could I buy them?  I don’t see them on your website [Note: They ARE on her website, at least now.  Silly me 😉 ]

Eye Candy quilt

Eye Candy, one of Lee’s quilt patterns

Designer star quilt

Lee’s Designer Star Quilt. If you go to her website/shop you can see a picture of the whole thing.

A:  I love designing patterns and the printed patterns are available through local quilt shops. Because I also teach quilting at local shops, I’m a huge advocate for supporting local! Quilt shops are a huge resource for the sewing and quilting community. If your shop doesn’t have my patterns, they’re available through the distributors. You can also purchase PDF patterns through my website here. I teach all over North Carolina and I’m starting to expand out across the country. Teaching is my favorite part of my job; I’m passionate about quilting and I love sharing that. You can see my teaching schedule on my website, too.

Q: Show us something pretty you’ve made lately!
A: This is a table runner I made for my brother using my Blue Ridge pattern.
table runner quilt

Table runner by Lee Monroe

This post ran longer than usual, but that’s because I just HAD to explain a little about why Lee Monroe has a blog named May Chappell 🙂

A Toddler Quilt and a “Finish”

One of the things I like about Aunt Marti’s UFO challenge is that I get to decide what constitutes a “finish”.  With that in mind, my January “finish” consisted of sending my Charley Harper quilt off to the longarm quilter.  Lest you think that just means handing it over, I had to select backing and make binding so that when it comes back I’ll be all ready to bind it.  So here it is ready to go:

Turning Twenty Again, Charley Harper fabric

Binding is ready for when the Charley Harper quilt is returned to me

I started making the binding when I finish the quilt top for two reasons:  I already have the fabric right there, so it saves time later.  And I don’t accidentally use that binding fabric for something else before the quilt is ready for it 😉

My other finish this week (and this one is really, really finished) is a toddler quilt.  It is 42″ x 52″ and is backed with Minkee Dot fabric.  It has no batting. (Yeah, I know, that means it’s “not a quilt”.  Right.)  This makes it both soft and light, so a toddler can carry it around with him.  He can use it to make a fort, take a nap, have a picnic, or whatever else.  Here it is, from start to finish:

Toddler Quilt

Toddler Quilt

I think this simple design would be good for a donation quilt, as well.  It was quick and easy to make, and I think it shows the cute fabric to advantage.

Year End Review

For better or worse, I published goals at the beginning of the year, so here’s the review of my progress:
I met all the goals! (Does that mean I didn’t set them high enough?) I retreated with my buddies THREE times instead of just two! I attended 3 big national shows as well as 2 local ones (all were excellent). I took a couple of fun and useful classes, one of which I still need to write up here so you’ll know about it. I submitted several quilts to shows/contests and 3 were accepted. The one I donated to the Quilt Alliance even won something, and sold for $300 to benefit the Quilt Alliance!  And I had lots of fun, which was really the point of it all.

Here are pictures of a few of my projects from the second half of the year. The pix of projects from the first half of the year are in this post.

Spring Sun, a design by me, using blocks paper pieced from a totally different Judy Niemeyer pattern!

Spring Sun, a design by me, using blocks paper pieced from a totally different Judy Niemeyer pattern!  It took about 2 years, but it’s now DONE.

quilt photo

Zippy Star Quilt and Pillow as shown in Modern Quilts Unlimited, Summer 2014

Michael Miller challenge quilt

Packet of Posy Seeds, done for the Michael Miller spring challenge

modern quilt

Zippy Star I, which sold at the Asheville Quilt Show in September.  This was my “practice piece” for the MQU quilt shown above.

Improvisational quilt

Donation quilt for Ronald McDonald House.  I’m going to work more on using up orphan blocks next year.

And, despite the risk, here’s what I plan for the coming year:

1.  I’ll retreat with my buddies at least twice, probably 3 times again!

2.  I’ll attend one big national quilt show, maybe two.  I’ll attend at least one local show.

3.  I will limit much more strictly the shows and challenges I enter.  It takes too much time and effort that could be spent on making what I want to make 🙂

4.  I’ll continue to make donation quilts, including one for the Quilt Alliance.  Please consider making one for the Quilt Alliance yourself.  You can read about their mission here.  Click on “2015 Quilt Contest” to learn about this year’s challenge.

5.  I’ll continue my blog, and I think I’ll put up instructions for a few easy donation quilts just in case somebody is looking for ideas.

What’s coming up for you?

Tidbits: One may be for you

1.  Here is some beautiful fabric that just arrived from the Michael Miller company!  It’s for my next magazine project (for Modern Quilts Unlimited).  I love to use batiks for the “solids” in my quilts because of the texture and highlights they give to the design.

Michael Miller batiks

Michael Miller Batiks

2. Who wants these selvages I’ve been saving? I know the author of one of the blogs I read commented that there is a selvage quilt in her future, and I’m pretty sure there’s none in mine.  Comment or e-mail me if you want them.Selvages

Melanie, whose blog is

Melanie, whose blog is Catbirdquilts.wordpress.com

3.  For those who may want  more traditional lessons on color than the ones I’ve provided in my design series, my friend Melanie in Iowa has some nice posts.  You can find them here and here.  I think you’ll like them!

Zippy Star quilt by Mary J Puckett

Zippy Star I, which was sold at the Asheville Quilt Show

4. Woo!  I recently sold a quilt at the Asheville Quilt show!  And it’s a good thing, because–

5. My digital camera somehow got a little piece of lint inside (at a quilt show, of course) and I can’t get it out!  Any recommendations for a good replacement?

6.  I aim for a blog length of around 350 words.  I figure my attention span is short, so yours may be too 😀

7. And the more pictures in the blog, the better. So here’s my October finish, another quilt for Ronald McDonald House.  I quilted it on my new Bernina 530QE. There’s definitely a learning curve to that BSR, but I’m pleased with the result.

free motion quilting

Free motion quilting with my new Bernina


Meet Jo Glover–The BigStitch Quilter

big stitch quilting

BigStitch Quilting by Jo Glover

Big Stitch quilting has gotten to be a big deal in the past few years, so I was thrilled when Jo Glover, who published the original directions for BigStitch Quilting, spoke to our guild last year.  She agreed to be interviewed for this blog.  Here’s what she said about her development of the technique:

Jo Glover photo

Jo Glover

“In 1988, when I started quilting, I was more interested in the line designs of the quilting, rather than the patchwork.  It frustrated me that my fine hand quilting–natural thread on muslin background–didn’t show.”

“In 1991, I went to Japan and saw their sashiko with its strong visual impact.  Thick light thread on solid dark fabric.”

big stitch quilting

Another sample of Jo’s BigStitch Quilting

 “Upon my return to the US, I started using a high contrast #8 pearl cotton, longer stitches, with the traditional rocker motion of hand quilting with a hoop and thimble.
I was pleased to find that larger scale designs looked good with the longer, thicker stitches.  The new needlepunched cotton battings permitted a longer distance between quilting lines.”

BigStitch quilting

Jo Demonstrates BigStitch Quilting

“BigStitch was coined in the booklet I wrote and copywrited in 1993 (under my name at the time, Jo Walters).  It still sells.”   [You can get a copy of Jo’s booklet directly from her for $7.50; just e-mail her at GloverGirl52 at gmail dot com for her mailing address, and of course give her your address.]
 “To reach a wider audience, I uploaded a series of BigStitch lessons.  They are available at no cost on YouTube; just search “BigStitch Jo Glover” for the 5 lessons and Gallery.  I’m for the preservation of hand quilting.” [Here is the link to Jo’s YouTube lessons.  I am so impressed that she did this!]
BigStitch quilting

Matisse’s Goldfish, by Jo Glover

 “Right now, I’m stitching straight lines about 1/3 inch apart, using crochet thread AND NO HOOP OR THIMBLE, ssshhhh.  My friend Jane Cole brought this style, called chiku-chiku, to my attention.  (Chiku-chiku is the sound a sewing machine makes when stitching) Jane got it from Quiltmania magazine, issue # 100, in an article featuring the originator, Akiko Ike.”

Jo Glover quilting

Pillow with close lines of BigStitch quilting by Jo Glover

 “Mixing fine hand quilting, BigStitch, and machine quilting (and now, chiku-chiku) in the same quilt is fantastic.  I do prefer solids or hand dyed fabrics to showcase the hand stitching.  I see many Modern quilters featuring their machine quilting on solids, and that’s great.”
Quilt by Jo Glover

Amerika Blooms by Jo Glover

 “Quilters I have known and loved include Gwen Marston, Jonathan Shannon, my friend Jane Cole, the Gee’s Bend quilters, Fran Skiles, Jacquie Gering and Katie Pedersen, and Yoshiko Jinzenji.”

5 Things I’m Grateful for in Quilt-World

Gratitude is always a good exercise, as I was reminded when I met with an old friend the other day. So, here are 5 of the things I’m most thankful for in my quilt life:

1. Good friends! Some of my best buddies are people I’ve met through quilting, and, as I’ve mentioned before, joining a quilt group is a great way to make friends.

quilt group

Some Quilty Friends

2. New challenges. I count any day in which I learn something new as a success.

Amish design quilt

I made this quilt when we lived in Pennsylvania.  The biggest challenge was to design and produce the stencils for the quilting.

3. A creative outlet. Like many quilters, I’ve had careers with a scientific focus. It’s nice to have the opportunity to do something that engages my creative side.

applique art quilt

This leaf, made in class with Laura Wasilowski, was a fun way to be more creative than I am when I make bed quilts

4. The opportunity to help. Giving a quilt, whether through a charity or through a personal contact, gives me the opportunity to do something for someone. Often it’s a situation in which there’s no other way to express my concern.

modern quilt

One of my quilt groups makes quilts for Ronald McDonald House

5. The circle is unbroken. When I quilt, I feel connected to my ancestors who made quilts, to friends who use my quilts, and to people all over the world engaged in similar activities. I don’t think about this very often, but it is definitely part of my quilting experience.

wheel of mystery quilt

I made this quilt to learn curved piecing.

So, what are you thankful for?