A Little House Quilt

One of my guilds provides little wall quilts, featuring houses, to Habitat for Humanity. They give one of these quilts to each new homeowner, and have asked us to provide a few more.

To make this one, I used a pre-drawn block from EQ8 and printed a line drawing of it at 12″ x 12″. Then all I had to do was measure the components and make the fusible applique quilt. This is the block as it was shown in EQ8:

Block design taken directly from EQ8

And here is the line drawing I printed from the program (along with my notes!):

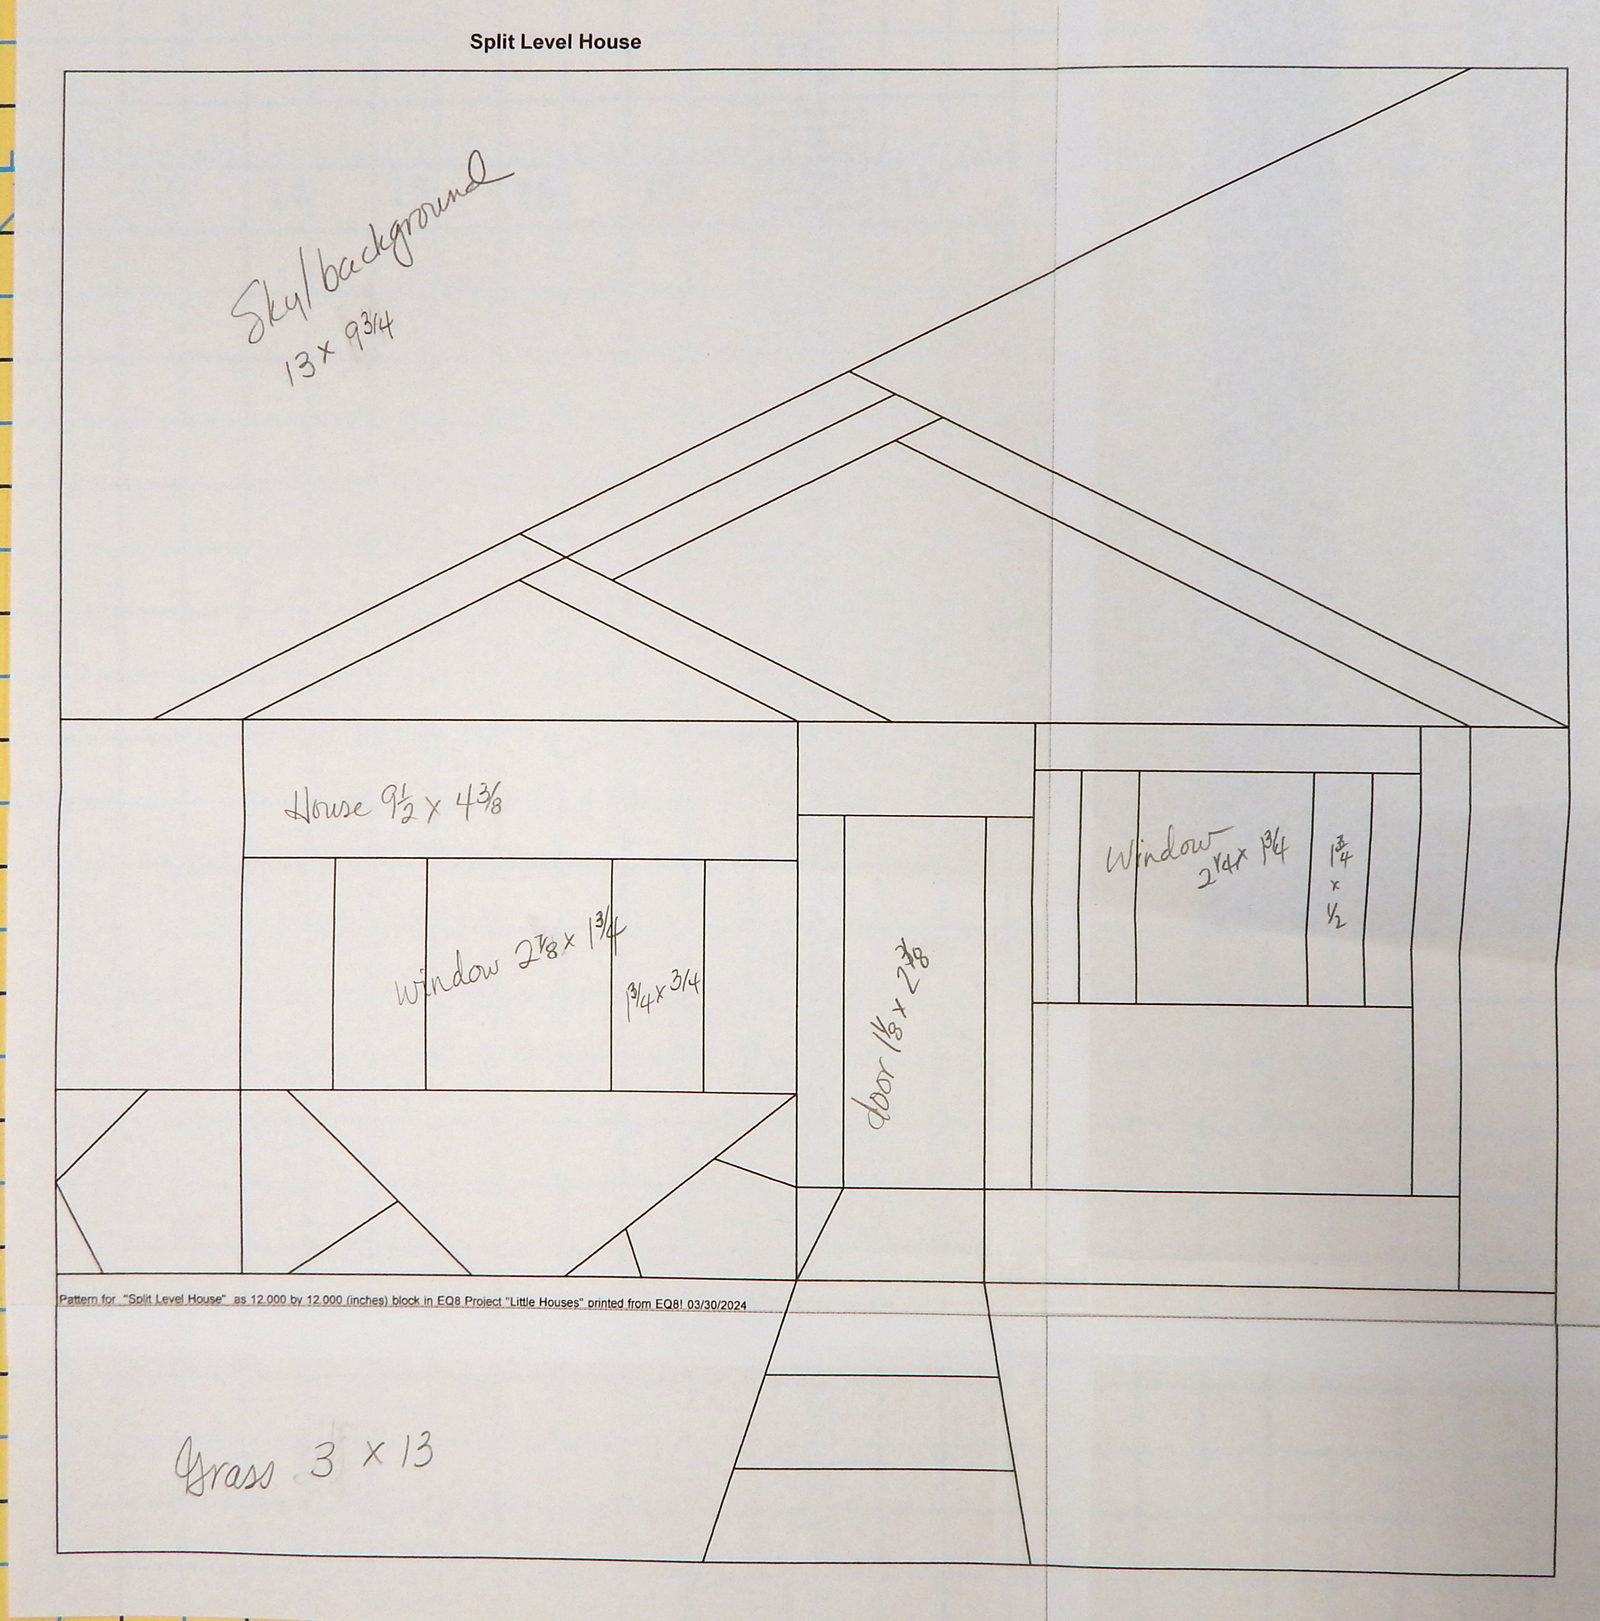
EQ8 drew this as if I were going to piece it. There was the option to print sections for paper piecing as well.

Finally, here is the finished house. It is all fused applique.

I use wool felt as the “batting” for wall quilts now, having learned from one of the many books I read that it is more stable for that purpose. It does, indeed, produce a nice firm quilt and this small one won’t sag even though it is to be hung with two loops at the top instead of a sleeve and rod.

I did a little decorative quilting and zig-zagging along the edges of some of the pieces, but this won’t be washed so I didn’t worry too much about it.

The redbird on the roof is a button! I collect them for things such as this 😀  As is often the case with decorative buttons, this one has a shank, so I poked a hole in the quilt and pushed the shank through so the button would lie flat. The back is secured with a pin.

Finally, after debating about what to do, I zig-zagged the edge to finish the quilt. I hope it will enhance someone’s new home.

Electric Quilt, and Why I Use It

I’ve been using the quilt design software Electric Quilt (EQ) since the EQ5 version. I’m now using EQ8, so it’s been a few years. OK, quite a few.

All the drawings in this post were done with various versions of EQ.

I love EQ for several reasons:

  • I like to design my own quilts. At first I didn’t have many ideas, so I just combined the blocks provided by EQ in various ways. There are almost endless possibilities. Here’s where I re-drew Arkansas Crossroads to see how it would look with a scrap slab center.
  • Once a quilt is designed, it can be exported as a JPEG to share with friends! That’s how I got the pictures in this post from EQ to the blog 😀 Here’s one from 2007:
  • I can fiddle endlessly with various layouts, block sizes, colors, etc, etc. before deciding how I want to do a quilt. Here are a few options I considered for a doll quilt for a friend.
  • When the instructions in a pattern don’t work out, or the size of the quilt doesn’t suit me, I can draw the quilt in EQ and try out various solutions. Here’s a block I re-drafted after the instructions in the pattern didn’t really work. And by the way, I was able to print templates straight from EQ in the desired size once I got it re-drafted.
  • AND on top of all that: the block above was colored with my actual fabric because I was able to scan the fabric into EQ, scale it, and then fussy cut the block center from it!
  • It’s possible to make everything from simple to elaborate designs.
  • EQ gives me an estimate of the yardage needed for a quilt. It does over-estimate a bit, but of course that’s waaaay better than underestimating! So, for example, I drew this quilt and then decided what size I could make it based on how much fabric I have. I can change the size of the blocks until the quilt fits my yardage!
  • I just like to draw things in EQ for fun. Here’s a tile floor I photographed in a restaurant and then drew in EQ. No way would I make this, but it was fun to draw. The asymmetry shown was indeed in the floor from which I copied the design.

There are sooo many other things I love about EQ! I’ve just taken the on-line classes to learn to use it better and they were very helpful.

And finally, the folks at EQ provide wonderful customer service. A friend and I both failed to figure out how to draw the quilt below in EQ. I emailed tech support about it and Heidi drew it for me! She also sent a link to a lesson on how it was done 😀 That’s great customer service!

I get so much use out of this program! Have you tried it?

PS: No, this is NOT a sponsored post! But here’s the link if you want to learn more about EQ8: ElectricQuilt.com  

The EQ folks have a video program for guilds, too. Don’t know about you, but we’re always looking for program ideas.

Starting Bloem

I had seen Libs Elliott’s Bloem quilt several places online before I found the pattern at Five Little Monkeys recently, so when I saw the pattern I decided to make the quilt.

I got these two patterns at Five LIttle Monkeys and I’m starting Bloem, the pattern on the left

I like the fact that the quilt is designed for several alternative layouts, and I like the bright colors. When I bought the pattern I thought I already had templates for most of the blocks, but when I got home and looked at the templates they weren’t quite right.

So I got a big piece of template plastic and some spray adhesive and made templates.

I found that just tracing the templates onto the plastic wasn’t too great because it was hard to see the clear plastic template! However, it worked great to cut out the paper shape,  spray it with adhesive on the printed side, and then put the printed-and-sprayed side on the plastic. I used crummy scissors to cut out the plastic, of course!

And naturally I had to re-design the quilt to suit myself, both in terms of the blocks used and the colors. Here are a few of my attempts on EQ (Electric Quilt 8).

And here’s the quilt so far on the design wall. Some of the blocks are overlapping so they’d all fit.


I’ll keep you posted!


Tula Update

After finishing the first 100 Tula blocks, I tried out various layouts using EQ8. There are, of course, multiple layout options in the book, but I wanted MANY options. Also, I wanted a queen sized quilt for the bed in our new house, which will be finished some time.

I searched the internet and found a number of ideas.  Here are the options I drew in EQ8, obviously with EQ’s standard blocks instead of my Tula blocks.  It’s so easy to audition various layouts with EQ that I just played for a while.

And here is a start on the layout I selected.

I love this layout, but it’s turning out to be a bear to piece!

I decided to assemble the quilt top in 4 quadrants then join them to avoid those loooong rows that would have to be assembled if I did the whole thing a row at a time.

Here’s a start on the first quadrant, shown on the makeshift design wall:

It will be done some time, maybe before the house is done and maybe not!  A race, perhaps?

A New Toy!

Photo courtesy of Electric Quilt

I’m a fan of Electric Quilt (EQ) software, having used it for many years. It allows me to design my own blocks and quilts, try out layouts and color combinations, and print yardage requirements. And star blocks of all sorts are just about my favorites, so when I saw recently that EQ has a new add-on featuring star quilts, I was sold!

The “Star Power” add-on is based on an out-of-print book by Judy Martin. I’m not sure how I missed this book, but I do not own it. (Are you hearing another excuse to buy the add-on?) The add-on includes all the blocks AND quilt designs from the book. Once the add-on is part of your own EQ you can edit the blocks and quilt designs or make your own quilt designs using Judy’s blocks.

The add-on includes many beautiful star blocks.  (In fairness, the basic EQ program has a lot of star blocks as well.)  I gravitated immediately to Judy’s collection of “simple stars” because I’ve never made stars like this!  Here’s an example, exported from EQ (with a few color changes by me, of course).

Block by Judy Martin, modified in EQ8 by me

And once I’d seen those blocks, I integrated them with a chain block that came standard with my EQ8 software, changed colors a few times, added some borders, and generally fooled around with it until I had this:

Quilt design in EQ8 by me; star blocks designed by Judy Martin; chain block is part of EQ8 block library

The add-on includes a number of stunning designs by Judy, most of them more dramatic than my simple design. Here’s an example:

Example courtesy of Electric Quilt

I’m looking forward to making more star designs in EQ8 and then some quilts from those designs! 

Do you use EQ?  Other design software?  I’d be interested to know.

Please note:  This post is NOT sponsored by EQ; I choose products to review for this blog based solely on my own opinion.


Avoiding Half Square Triangles

Half square triangles are an important design element in many quilts. The split value and diagonal line allow a variety of dynamic designs.

This is a Half Square Triangle (HST)

One of my quilt groups has been discussing HSTs because some of us love them and some have limited tolerance for them. It matters because we regularly do block exchanges.

One member recently sent a picture of a beautiful depression block quilt, and that got the discussion going again. A depression block quilt is made entirely of HSTs!

This is a typical block from a Depression Quilt


This is a traditional Depression Block Quilt made entirely with HSTs

Not being much of a rule-follower, I got to speculating about how we might make this quilt using strips instead of HSTs. (Yes, I get that the original idea was to use up small scraps, but what if you just wanted the overall effect without all those HSTs?) My friend Mary B encouraged me to develop this idea, so here we go.

I did a number of experiments with Electric Quilt 8 (EQ8), which produced all the illustrations for this post.  I learned that the most important element in the success of this quilt is contrast between the values (rather than the colors) of the fabrics. (All the illustrations use Fossil Fern fabrics from the EQ8 fabric library.)

I first tried drawing a block that used strips of lights and darks in place of the rows of triangles. This would simplify construction significantly.

Here’s the block:

Depression block effect without the HSTs

And here’s the quilt:

Then I tried a traditional Courthouse Steps block set on point to mimic the depression block effect.

Here’s the block:

And here’s the quilt:

Finally, I changed up the color arrangement in the traditional Courthouse Steps block to provide more variation.

Here’s the block:

And the quilt:

So! I’m not sure my variations are a good substitute for the traditional Depression Block quilt, but it was fun and I do like the quilts. What do you think, Mary B? 

Where Did You Wear It?

A couple of years ago I made a quilt based on the little triangle codes found on plants at my local nursery.  It sank without a trace when I entered it in a show.

But the idea stayed with me, and earlier this year, when I wanted to make a quilt with social significance, I decided on a QR code.

Since my “day job” involves a lot of treating conditions that condoms might have prevented, I wanted to make a quilt to promote condom use. It’s what we like to call “safer sex”. Now don’t get all huffy on me; sex is a fact of life.

When I went looking for a condom-related QR code, I found this one developed by Planned Parenthood of the Great Northwest and the Hawaiian Islands.

Where Did You Wear It campaign

The folks at Planned Parenthood of the Great Northwest and Hawaiian Islands were gracious enough to allow me to use their QR code

Back in 2012 they put this QR code on all their condoms in a campaign called “Where Did You Wear It?”. Those who scan the code are taken to a website where they can put a pin in a map to show their geographic location–where they wore the condom!

The site also gives some important facts about condom use. The point of their campaign, and my point in making this quilt for show, is to normalize, encourage, and promote the use of condoms when needed.

It turns out QR codes are robust little devils, so I was able to re-color it and develop a lively quilt design with the use of my trusty Electric Quilt program:

Where Did You Wear It campaign

Quilt Design from the “Where Did You Wear It?” QR code

Making this was quite a challenge!  At each step I kept scanning it to be sure it took me to the “Where Did You Wear It?” site.  (You can download any of several QR code scanners to your smart phone or iPad. I used QMark.)

Asheville Quilt Show

The QR Code quilt, ready for its first show. It will the in the Asheville Quilt Show soon!

When I discussed the project with my wonderful son-in-law, he helped me turn my blog address into a QR code, too!  That’s this blog address you see in the TINY QR code making up one block toward the bottom right of the quilt. Scanning it brings you to this post.

Please help me to encourage condom use when appropriate by sharing this post.