Thread Review

Note: I received no compensation for this review, either in products or payment.

I have used Superior So Fine thread for piecing and a lot of my quilting for a long time now. It comes in a wide range of colors and runs smoothly, without leaving excess lint in my machine.  I use it for hand sewing as well, on the rare occasions when I do that.soFine1

I buy a lot of thread, so I subscribe to the Superior Threads newsletter in order to get bargains when they come along.  They recently ran a special to encourage folks to try out new threads: You could get spools of several threads for half price if you let them choose the colors.

I’m all about trying new things, so I bought several.  I sewed a little sample of each and stapled it in my Superior Threads catalog so I can refer to it when I order in future.

The first thread I tried was Fantastico, a 40-weight trilobal polyester.

trilobal polyester thread

Fantastico thread sample–I didn’t balance the tension, as you can see. I just wanted to see the thread.

I’ve been interested in trilobal thread since my friend Melanie over at Catbird Quilts showed a nice piece she’d quilted with trilobal thread–it was shiny!  (The thread she used was Glide, and she uses a long-arm rather than a home machine for quilting.)

Next up was another 40-weight trilobal polyester, this one variegated:

Superior thread review

Sample swatch done with Superior Rainbows thread

I still didn’t balance the tension, but you can see the sheen more with the variegated thread.  I like this one, too!

Superior Razzle Dazzle is a thread developed by Ricky Tims and intended for couching or bobbin work.  I bought this years ago for a machine quilting class I took and I never got to use it.  So, since I was trying out threads anyway, I wound it on the bobbin, put Superior Bottom Line (a thin polyester) thread in the needle, and gave it a try:

thread review

Superior Razzle Dazzle sample

I think bigger stitches would be better, but I like this! Razzle Dazzle indeed!  I’ve never used bobbin work for quilting, but I think I can feel it coming soon.

Superior Magnifico is another decorative trilobal polyester thread, again 40 weight.  I don’t know how many colors it comes in, but there are EIGHT pages of color charts in my catalog!

Superior Threads review

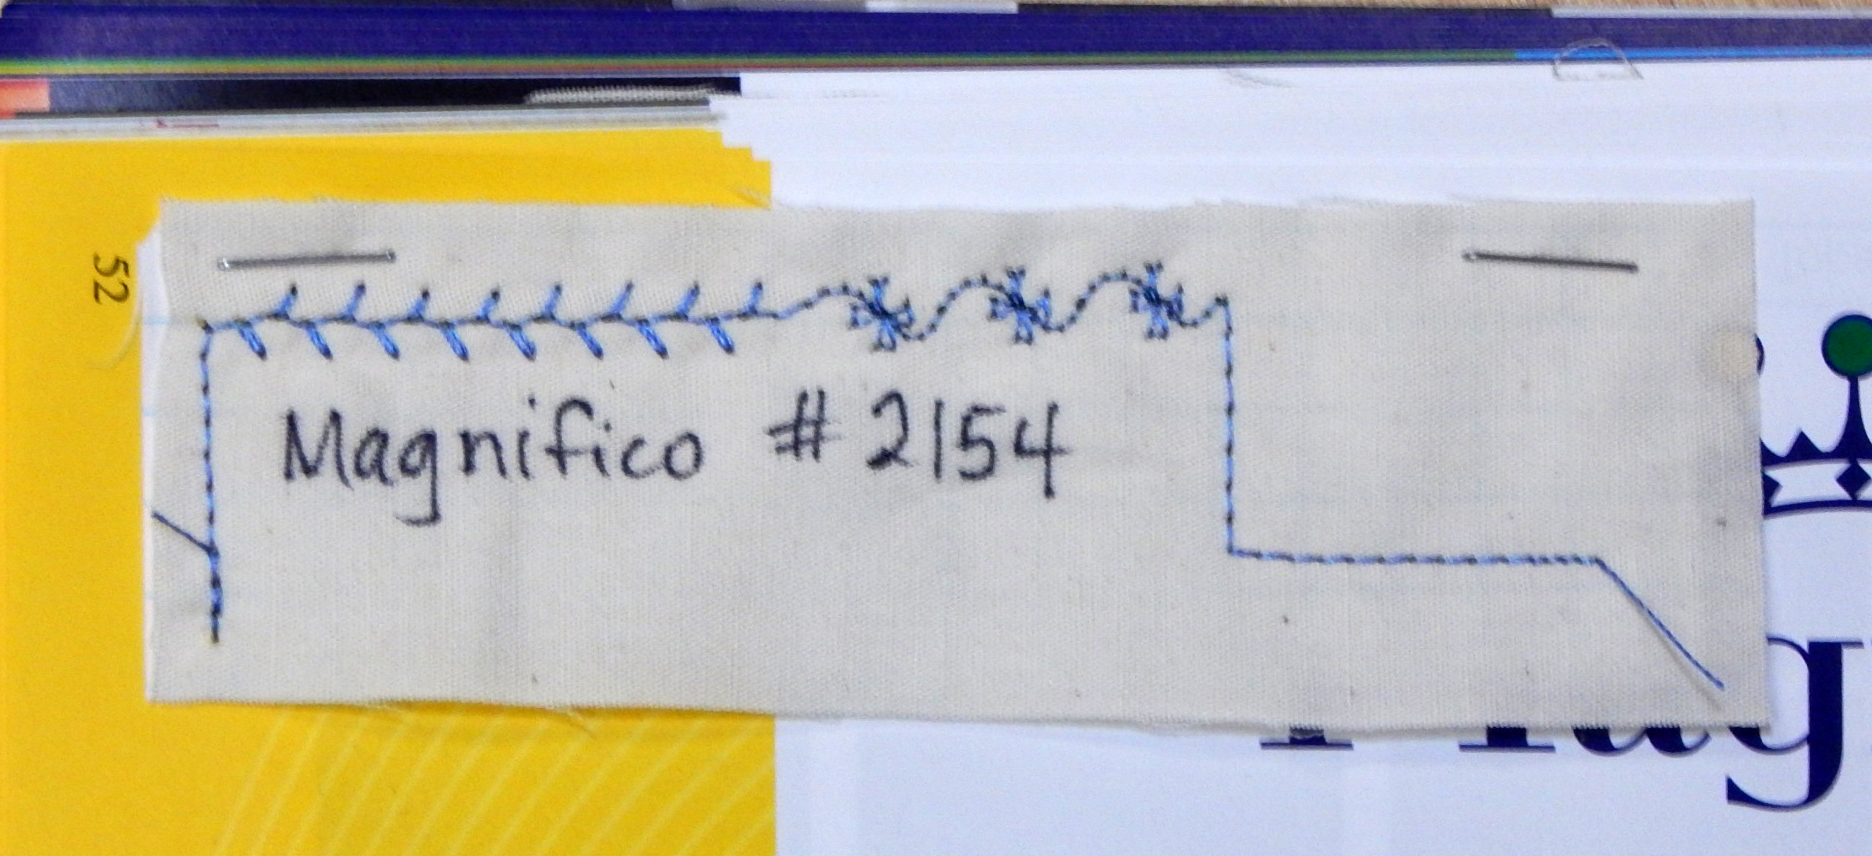
Sample using Superior Magnifico

Finally, my FAVORITE, a metallic thread.  I’ve tried several metallic thread and usually had trouble with them, even in my Bernina.

metallic thread for quilting

Superior Metallic thread

Ad you can see, this one gave me no trouble.  And I did take time to balance the tension 🙂

All these threads ran smoothly with no problems. The recommended needle (#90) was printed on the end of each spool, which was very handy.  I’m happy to have tried these and expect I’ll use them soon in my home-machine quilting.


More Inspiration

I bought two of Gwen Marston’s books some time ago…

and have been channeling her in my designs for over a year (you can click on the pictures below to see their captions):

Recently I saw that the (relatively) new iQuilt platform had two video classes taught by Gwen Marston.  The class I chose was quite short–a little over 2 hours–and I decided to watch the class over a weekend and make several little quilts using her techniques.

I’d already made a refrigerator quilt in Gwen’s style for an upcoming guild challenge,

art quilt, gwen marston

Refrigerator quilt inspired by Gwen Marston. Bev Manus came up with the idea for refrigerator quilts.

so I decided to make the new quilts 12″ x 12″ as well.  This is a great size for trying new things because there isn’t too much commitment of time or materials.

The first quilt was composed of half square triangle blocks, so I was able to try out the (fairly expensive) Loc Bloc ruler I recently bought to make trimming these blocks to size easier.  The ruler worked great with just a little practice, and I got to practice my machine quilting on the finished quilt.

refrigerator quilt

Quilt Front

Gwen’s instruction was to pair the triangles up into squares just as you picked them up, with the caveat that the pairs should have contrast between the fabrics.  Then the squares were to be sewn together into rows just as they were picked up.  She did allow that it would be OK to lay the rows out and look at them before sewing them together, but advised against spending a lot of time fussing over the exact layout.

Refrigerator Quilt

Quilt Back

I was pleased with this result.  The class doesn’t really cover anything that isn’t in her books, but I was happier watching a little and sewing a little than I am to just sit down and read a book.  I made a couple of other quilts, too, and I’ll show them next week.


KonMari in the Studio

Because I had seen so many reviews of it, I recently read The Life-Changing Magic of Tidying Up. It is very Japanese in character: there is a right way to do everything, and KonMarifollowing the rules brings good fortune. I’m a little surprised at how much it has caught on in the West. The author, Marie Kondo, calls her method for “tidying” KonMari, a combination of her names.

I was unexpectedly convinced by reading her book that I can, indeed, get rid of a lot of my “stuff” and be happier for it!  And I thought I’d start in my studio, since that won’t involve anybody but myself.

My studio is pretty neat, with almost everything stored away.  And when I see pictures of other people’s studios, I realize that my stash is minimal by many standards!

KonMari recommends dealing with things by category, and in a strict order. There are no categories for a quilt studio, so I made my own categories and ordered them like this:
1. Fabric
2. Tools, such as rulers and scissors
3. Notions, such as thread and ric-rac
4. Published materials, such as books and patterns
5. Sewing and serging machines
6. Everything else

The method requires gathering all items of a particular category in one place. ALL must come out of their drawers, boxes, etc. Ms. Kondo says to pile it all on the floor, but you know THAT’s not happening!

studio organization, stash

Some of the stash laid out on tables–and some bins on the floor, too

The next step is to handle each piece and decide whether it gives me joy. If it does, it stays. If not, it GOES!

studio organization, stash managemengt

The stash from another angle

This may, at first, seem like a waste. After all, I paid for that fabric, washed, ironed, and stored it. But after reading the book, I believe the true waste is being weighed down by things I’m hoarding because I “might need them” or “intend to use them” in the mythical “some day”.  And really, do I want to work for hours on a quilt made with fabric I don’t love?

I’ll let you know how this first step turns out 🙂  How are you managing your stash?

Good News, Bad News!

First, the bad news: I sliced a good-sized hunk out of my finger with the (nice, sharp) rotary cutter. When I couldn’t get the bleeding stopped after an hour, I went to Urgent Care. A nice Physician Assistant there got it all fixed up.rotary cutter accident

Quilting with 9 fingers is a challenge 😉  Another learning experience…

In better news, I made Lora Douglas’s Roxie bag this week, and it is as cute as expected! This project is part of Quilted Adventure, an online retreat I’m taking part in throughout 2016.  As always, I learned several things from making this bag.  And unlike the learning experience mentioned above, this was fun:

Roxie Bag, Quilted Adventure

Roxie Bag, Designed by Lora Douglas

Lora’s instructions requested foam batting, a product I had never heard of!  Luckily, my “local” quilt shop had it. It did give the bag really nice structure without making it stiff, and I probably will use foam batting for future bags.  A nice find!

I purchased the hardware for the bag from Lora’s Etsy shop,  I had no idea a flex frame could be so sturdy.  Most bags I’ve seen were made with lengths of metal measuring tape as the closure.  That works just fine (if your husband isn’t very vigilant about his tools) but the closure isn’t very tight.  The flex frame that came with the kit holds that bag closed with certainty!  And unlike the measuring tape closure, this one can hold itself open when needed.

Lora Douglas

Roxie Bag with the top snapped open

Lora’s instructions also called for glue-basting the binding, which I had never done.  It actually worked great!  I’ll probably do that again.

If you’re interested in the year-long Quilted Adventure, all classes are online for the whole year, so you can sign up any time.  Just use the link above to go to Lora’s site and click the button in her margin.  If your main interest is the bag rather than the whole retreat, she’ll release the single pattern some time in 2017.

So the good learning experiences certainly outweighed the bad this week!


My Modern Sampler: Using Linen in Quilts

After finishing the blocks for my modern sampler, I ordered several shades of Essex linen/cotton blend to consider for the background. I know I said I’d never use linen again after the last struggle, but I’ve learned several things since. So, if you’re thinking of using linen in your quilts for its nice texture, read my tips at the end of this post.

Here I’m trying various layouts on two different potential background fabrics.  I hung the ironed fabric and pinned the blocks to it, trying out various layouts and different colors of background fabric.

essex linen

Here is the Pewter background

modern sampler

Here is the Natural background, with a different attempt at layout

I decided I liked the natural background better than they gray.  Then I took it all down and made a rectangle on my design “wall”, outlining the approximate finished size with blue painter’s tape.

modern sampler

Here is the layout I decided to use, with some of the sashing in place

And here are my thoughts on using linen in quilts:
–The linen I used the first time was “real”, 100% linen. Remember that from your childhood, when summer clothes were supposed to be linen? Think wrinkles! And avoid 100% linen for your quilts
–The “linen” of the Essex brand actually is a linen/cotton blend, so it has a nice texture but is less wrinkle-prone and tighter woven than the linen I used previously.
–Pre-wash the linen blend, even if you don’t pre-wash anything else. Wash in warm water and dry on warm so it will get its shrinking done and be more dense and stable.
–Before you pre-wash, serge or zig-zag the raw edges together to prevent fraying! This worked great and “wasted” only about 1/4″ on each raw edge, much less than would have frayed. And there was no mess of threads in the washing machine.

How have you done with using fabrics other than quilting cotton in quilts?


My Modern Sampler: Improv Block I

Sherri Lynn Wood’s book finally arrived,Improv Handbook, Sherri Lynn Wood and I’ve been enjoying it.  I have NO intention of making a full-size quilt for every exercise in the book!  However, an improv block for my sampler quilt seemed just right.

The first exercise in the book involves cutting fabric into squares, then using background fabric as needed to join them improvisationally.  I’ll mostly let the pictures speak for themselves here.

Improv quilt block

I chose  2 fabrics and a background to start–my notes are lying on the background fabric

Improv block

Then I cut a bunch of squares

About half way through, the design looked too static to me, so I cut a triangle of background fabric to set in the middle and throw the whole thing onto diagonal lines.

Improv block

I joined some of the pieces, but then…I decided to add a triangle!

The finished block:

improv quilt block

The finished block, which will be 12-1/2 inches square

This ended up resembling my previous work much more than it resembles Sherri Lynn’s quilts.  I think that may be sort of the point 🙂  Here are some of my previous improv blocks:

I’ll probably go on to Improv Block II, etc, as I go through the book.  Stay tuned!

The other posts in my modern sampler series can be found here:

My Own Modern Sampler–It May Take A Year!

The Modern Sampler Continues


FMQ on a DSM*

*Free Motion Quilting on a Domestic Sewing Machine, that is!

free motion quilting

I started out quilting placemats, because they are a manageable size and not much was lost if I goofed!

I’ve been working on this for years. Here are some things that have helped me, and some that haven’t:

Very Helpful: Taking an in-person class on quilting with a domestic machine. The first class introduced me to the walking foot for relatively straight lines, and to the darning foot for free motion quilting all sorts of shapes. It was helpful to have in-person instruction and feedback.

My most helpful hint: Take some cheater cloth to practice on! That placemat above is one of my original practice pieces.

Very Helpful: After practicing the basics for several years, I took Michele Scott’s advanced machine quilting class at an AQS show.(She teaches elsewhere, too). This covered different types of thread, couching, and bobbin work. She also has a good book and DVD from which one could learn this, but she’s lots of fun in person. And again, the personal feedback was helpful while I was learning. Free motion quilting
Helpful: I got a couple of books on machine quilting and worked through the exercises on my own. After learning the basic skills, it’s mostly practice, practice, practice.

Helpful: Just do it! I found a few free-motion patterns I was comfortable with and quilted whole quilts with them. It went just fine! They turned out waaay better than I expected, so I was encouraged.

Free Motion Quilting domestic sewing machine

Stars and Loops is one of my favorite free motion designs

Helpful: Jacquie Gering’s machine quilting class on Craftsy. It boosted my confidence that what I was doing was just fine.

walking foot quilting

Multi-stitch zigzag stitch is a great way to make interesting quilting lines with the walking foot

Less Helpful: A friend and I spent a lot of money to take a machine quilting class at a well-known craft school. We did not get our money’s worth, but we had a good time because we got to be together.  We should have checked more carefully on the level of the class before we plunked down our money.free motion quilting

Less Helpful: Another class on Craftsy that went through many different free-motion patterns. I got bored with that many slight variations. However, the class itself was just fine and probably would work well for some people.free motion quilting

And finally, I am undecided about the real value of my BSR, the very expensive Bernina Stitch Regulator. I do feel more confident using it because it decreases the problem of toe-catchers, those extra-BIG stitches that are all-too-easy to make when doing FMQ. However, it IS still possible to make uneven stitches if you don’t use the BSR just right.

The BSR’s main value to me is more confidence doing FMQ on things that are really important, when I don’t want to make a mistake.  I continue to use it in preference to going back to quilting without it, so obviously I find it useful.  The leaf designs in this post were quilted with it, and I like the stitching.  The BSR is just not a miracle worker, which I sort of think it should be for the price.

What do you think helps with FMQ on the DSM?

One Quilt, Two Lessons

Check out these fabrics!

Fat quarter bundle

Alison Glass Handprint fabric and neutral linen

A friend gave me the FQ (fat quarter) bundle of lovely Alison Glass handprint fabric and I combined it with a neutral linen fabric I’d been saving for something special. I started with Karla Alexander’s instructions for a quilt, but (as my friends all know) I never really follow instructions so it diverged…improvised modern quilt blocks

The blocks were lots of fun to make.  I followed the instructions for a while, then started cutting the blocks up and inserting strips.  Then decided NOT to trim all the blocks to one size.  I adjusted the sizes of the linen sashing so that all the rows came out the same length, and made the rows of different heights to allow for the different block sizes.

And I slashed the sashing and inserted some strips in that, too.

When I had the top all made, I basted it with spray basting as usual.  BUT I didn’t have enough of the first can.  Then the SECOND can was a different brand and almost empty as well!

Determined to get the doggone thing basted, I resorted to some spray-on stuff that was supposed to bond the fabric to the batting when I ironed it.  This last stuff left SPOTS on the handprint fabric, which is light weight (almost like voile).  YIKES!

Lesson 1:  Be patient until you can get to the store for a can of basting spray.

Finally (after buying basting spray) it was basted and I started quilting.  Enter Lesson 2: this linen is a loose weave of large fibers and doesn’t play well with a tight weave of small fibers. YIKES AGAIN!  No matter how I changed the pressure on the quilting foot or otherwise fiddled with it, the quilting distorted the top and the backing.

improvised modern quilt

The finished quilt

Now it’s finished and I like it.  I appreciate the texture of the linen, but I’m not sure I’ll use it again.  I took this to my last modern guild meeting and people were positive about it, but one of the more experience sewists told me linen is usually stretchy, so at least it’s not just me!

improvisational quilting

Here’s the quilt back–that column was straight when I started!

Well, I try to learn something new every day, so I’m calling this a SUCCESS! 😉


Review: Kraft-Tex for Bags

I’ve had my eye on Kraft-Tex for some time. It’s a paper product made by C&T

Kraft-Tex review

Kraft-Tex, made by C&T but sold many places

and advertised to sew and wash like fabric but look like leather.  As I’ve probably said before, I’ll try almost anything once 🙂  (And just for the record, I purchased the material used for this project and this review is entirely my own opinion.)

I decided to use Kraft-Tex as the bottom of a tote bag.  There was a helpful video on You Tube (of course!) showing how to use it and showing what it looked like both washed and unwashed.  Because I didn’t want to wash the drapery fabric I was using for the bag, I didn’t wash the Kraft-Tex.

The Kraft-Tex was very stiff right out of the package, so I wadded it up hoping to soften it a little before folding it to make the bag bottom.  I didn’t really need to do that; it folded and sewed very nicely.  It remained extremely stiff but was not at all difficult to stitch with my Bernina, even when it came to sewing through 4 layers as I boxed the bottom of the bag.

Kraft-Tex review

Tote bag made with Kraft-Tex for the bottom section

When I got it all put together it provided a nice substantial bottom for the bag, as I had hoped.  It did not even THINK about tearing like paper when I was working with it. However, I really think it LOOKS like a brown paper bag rather than “like leather” as advertised.  Maybe that’s just because I used it to make a bag.  As you can see from this detail, it did stitch very nicely.

Kraft-Tex bag

Detail of Kraft-Tex and Drapery Fabric Bag

However, the claim that Kraft-Tex “handles like fabric” was absolutely untrue!  It was so stiff that I decided to wash what remained along with the rest of the drapery fabric.  Both washed and dried well on gentle cycle, and the Kraft-Tex was slightly softer after washing. It didn’t handle any more like fabric, though–turning that stiff outer bag through the opening left in the lining for that purpose was “challenging”!

Here’s the second bag, made with washed Kraft-Tex.  Sure enough, it looks the same after washing.  I quilted the upper part of the bag, which gave it more substance than the previous one, so it went better with the stiff Kraft-Tex bottom.

Kraft-Tex review

Bag made after washing the Kraft-Tex and fabric

The pattern I used for this bag was free at Bijou Lovely and was very well written and illustrated.  I’ll probably make the bag again, but I’ll find another use for the Kraft-Tex!


First Finish

Metro Hoops Quilt

Metro Hoops quilt made by Allison at Cluck, Cluck, Sew

Inspired by the beautiful Metro Hoops quilt Allison showed over at Cluck, Cluck, Sew, I mentioned the Quick Curve Ruler as something I wanted to try in a recent post.  Here’s a picture of her quilt so you can see what inspired me.

My clever son-in-law gave me the ruler for Christmas, and as soon as we got home I tried it out.  As always, I learned a lot. Certainly the Metro Hoops pattern is a nice modern alternative to the traditional wedding ring quilt.  What I wasn’t prepared for was the fudge factor required to make it work.

modern quilt block

My first Metro Hoops block

It made a really cute block, but then my inner perfectionist kicked in 😦   The block required a lot of “easing in” along the seams to make the points match up. *(You can skip to the reason why at the end of this post, if you like.)

Luckily, I almost never cut out a new quilt completely before making a test block.  After making one block for this quilt, I decided 5 hoop blocks was my limit.  The blocks really are quicker and easier to make than they look, so I got the 5 done in a few hours. They are nice big blocks (finish 15″) so I had a good start on a baby quilt.

I drew an approximation of the block with my EQ7 program and came up with this layout:

My EQ7 layout for the Metro Hoops blocks

My EQ7 layout for the Metro Hoops blocks

Another half day to make the alternate blocks, then a day to put it together, make a back, and quilt it–and voila!  The first finish of 2015!Metrol Hoops baby quilt

About the Quick Curve ruler:  the women who designed it have lots of cute quilt patterns on their site, so it’s worth checking out.

*BUT, if I make metro hoops again, I’ll modify the directions to make it more to my liking.  I think the basic issue here is that the single curve provided by this ruler is used for both the concave and convex curves in the quilt.  That means there is no seam allowance to make the curves match nicely.  The project is “saved” by the fact that the curve is less than a quarter circle, so it’s possible to fudge the sewing to make it go together without adding seam allowances.  It does work, but don’t think it’s going to fit the way pieces cut from most curved templates do.  If you decide to do it, be forewarned to relax and get rid of the inner perfectionist!

Quick Curve Ruler quilt

Happy new year!