Beads on Quilts

I was waaaay into beads before I got waaaay into quilts, so there are lots of beads in the studio.  Thank goodness they take up less room than fabric 😉

beads for quilts

A few of the bead drawers

I’ve read a bit about using beads in quilts, and I took a class with Mary Stori a few years ago.books about beads in quilts

Here are a few of my uses of beads so far.  Most recently, I added a row of tiny silver-lined glass beads around the edge of a star in my quilt for the Michael Miller challenge.  It took most of a day to get this done!  YIKES!

beads on quilt

I outlined the focal point of my Michael Miller challenge quilt with beads

A while back I made this little wall hanging as a shop sample for a friend, and put beads both on it and hanging from it.Wall-hanging

There are beads on the sun, and that’s how I learned that sewing on beads can distort the quilt!  I used techniques from jewelry making to create a beaded fringe for the bottom of the piece with larger beads.

And beads were used to give Overall Sam a fish in one block and a toy airplane to fly in another block when I made this wall hanging from a few years ago.  The blocks are based on a pattern from Eleanor Burns.Sam

SueFinally, I used beads to make fancy zipper pulls for some of my pouches.Whale-pouch

Give beads a try!  And if you don’t have enough beads, let me know…

A Puzzling Legacy

My Grandmother’s quilts are among my treasured possessions.  I remember her sitting by the window and piecing them by hand.  I remember the quilt frame hanging from the ceiling in the “front room”.  My sister and I played under it while she quilted.

sunbonnet sue

Sunbonnet Sue quilt by my Grandmother, Mary Lee Ownbey Kimsey

And then there are the unfinished bits and pieces I inherited.  Granny had a series of little strokes and gradually lost the ability to sit still and concentrate on her quilts.  I have some pieced sections that I’ve been carrying around for years. My Mother wasn’t a quilter, so she carried them around for years before leaving them to me. 

They’re old.  And they’re lonely, because somewhere along the way somebody threw out the uncut fabric that must have gone with them.

vintage quilt

Some of the pieces I inherited

What should I do with these?  I’ve come up with a variety of ideas for making them into a finished quilt, but I haven’t quite found one I like.  Because there are several pieced strips that appear to be done for diagonal set, I wonder if she was doing something similar to this:

Another of Granny's quilts

Another of Granny’s quilts

This piece may have been intended as one side of a square set on point?

This piece may have been intended as one side of a square set on point?

And then there’s the question of the seams!  She pieced all this by hand with seams that are barely 1/16″!!!  Will that hold up?  Or should I re-work it all???Granny6

I’ve about decided the solution to the seams is to press as best I can (Granny finger-pressed!) and the back the pieces I have with batiste.  From there I can add strips of muslin, which she always used for “background”, and see what I can come up with.

Any other ideas?  Anybody dealt with a similar situation?  All suggestions welcome!


Holiday Hints–Just a few!

If you’re thinking of gifts for quilters, or for yourself, here are a few hints based on either things I’ve found useful or would like to try. (Please note: these are my personal opinions for which I received no compensation of any kind.)

1. Very large square ruler. A friend recommended this, especially for Large squaresquaring up quilts. It’s great! You can buy it here or here, and you can see a tutorial on how to square up a quilt here.  The big square ruler is a great help.  The largest I’ve found is 20-1/2″ square.

2. Curved ruler. I don’t have one of these yet, but I’m intrigued by Allison’s post showing a ring quilt made using this ruler. Looks like lots more fun than the usual way of making ring quilts! And of course there are many other possibilities for new designs with these curves.

Quick Curves ruler

The Quick Curve ruler is available at Connecting Threads, among other places.

And here’s a picture of Allison’s quilt.

Metro Hoops Quilt

This quilt was made by Allison at Cluck Cluck Sew

The pattern is Metro Hoops, by Sew Kind of Wonderful, the company that also makes the Quick Curve Ruler.  Allison’s review of the quilt pattern and ruler is here.

3. Batting tape. I use this stuff a lot to join scraps of batting. Sometimes I have the piece I need for a quilt, IF ONLY it were a few inches longer. Just use this to add a few inches and you’re good to go. I’ve also joined two fair-sized scraps near the center to make a piece big enough for a quilt. I’ve had absolutely no trouble quilting through this stuff, and it doesn’t feel or look different once the quilt is finished. You can find it here or in many local stores.

4. Finally, no quilt can be made without CHOCOLATE!  So be sure to ask for chocolate for the holidays to keep your quilting efforts fueled 😉

P.S.:  Here are a couple of things I’ve tried that didn’t work for me.  Maybe you’ll have better luck, but I say borrow from somebody else and try before you buy:

This looked like a good idea but it was no better than just holding the rulers together while I cut.

This looked like a good idea but it was no better than just holding the rulers together while I cut.

Kwik Klip

This does help with pin basting, but probably is no better than the spoon I used for years

Out With the Plaid!

Several of the blogs I read have been focused lately on purging unwanted fabrics from the stash.  It sounds like a good idea. Mind you, I still think it’s important to have a good stash. But at this point it should be a little more curated than it is!

fabric stash

Lots of stash–how much fits my current needs?

We’ve all got fabric we don’t want. Maybe it was a gift, maybe we’ve just moved past the aesthetic phase in which we bought it, maybe we ordered online and it wasn’t quite what we expected. Whatever. It’s taking up space and heaping on guilt: maybe we’ll need it some day: waste not, want not and all that 😦

There are several things to do with unwanted fabric, including:

  • Donate the fabric
  • Make donation quilts
  • Cut it up small enough to use for its color only
  • Add some fabrics you like better to make another quilt
  • Make something like wrapped clothesline bowls where the fabric will look different
  • Use it for quilt backs
  • One woman even tore her unwanted fabric into strips and made rag rugs.  Yikes!

So here’s my first de-stash: Fabrics that don’t have a nice “hand”, or feel. Maybe they’re cheaply made, but maybe not. Anyway they don’t feel good so I don’t want to work with them.

fabric

My first de-stash pile

And here’s my second de-stash: Plaids. I’ve made multiple plaid quilts and enjoyed them, but enough is enough already!  The plaids will go to my sewing buddies if they want them; otherwise I’ll donate them.

fabric

These plaids have to GO!

So now I’ve put the fabric that doesn’t feel good, and some of the plaids, into my “bad fabric” box to use for tearing strips to tie up my tomatoes, cut into “bridges” for continuous piecing, etc

The discard bin

The discard bin

And what about you? Any plans to de-stash? How?

Tidbits: One may be for you

1.  Here is some beautiful fabric that just arrived from the Michael Miller company!  It’s for my next magazine project (for Modern Quilts Unlimited).  I love to use batiks for the “solids” in my quilts because of the texture and highlights they give to the design.

Michael Miller batiks

Michael Miller Batiks

2. Who wants these selvages I’ve been saving? I know the author of one of the blogs I read commented that there is a selvage quilt in her future, and I’m pretty sure there’s none in mine.  Comment or e-mail me if you want them.Selvages

Melanie, whose blog is

Melanie, whose blog is Catbirdquilts.wordpress.com

3.  For those who may want  more traditional lessons on color than the ones I’ve provided in my design series, my friend Melanie in Iowa has some nice posts.  You can find them here and here.  I think you’ll like them!

Zippy Star quilt by Mary J Puckett

Zippy Star I, which was sold at the Asheville Quilt Show

4. Woo!  I recently sold a quilt at the Asheville Quilt show!  And it’s a good thing, because–

5. My digital camera somehow got a little piece of lint inside (at a quilt show, of course) and I can’t get it out!  Any recommendations for a good replacement?

6.  I aim for a blog length of around 350 words.  I figure my attention span is short, so yours may be too 😀

7. And the more pictures in the blog, the better. So here’s my October finish, another quilt for Ronald McDonald House.  I quilted it on my new Bernina 530QE. There’s definitely a learning curve to that BSR, but I’m pleased with the result.

free motion quilting

Free motion quilting with my new Bernina


Meet Jo Glover–The BigStitch Quilter

big stitch quilting

BigStitch Quilting by Jo Glover

Big Stitch quilting has gotten to be a big deal in the past few years, so I was thrilled when Jo Glover, who published the original directions for BigStitch Quilting, spoke to our guild last year.  She agreed to be interviewed for this blog.  Here’s what she said about her development of the technique:

Jo Glover photo

Jo Glover

“In 1988, when I started quilting, I was more interested in the line designs of the quilting, rather than the patchwork.  It frustrated me that my fine hand quilting–natural thread on muslin background–didn’t show.”

“In 1991, I went to Japan and saw their sashiko with its strong visual impact.  Thick light thread on solid dark fabric.”

big stitch quilting

Another sample of Jo’s BigStitch Quilting

 “Upon my return to the US, I started using a high contrast #8 pearl cotton, longer stitches, with the traditional rocker motion of hand quilting with a hoop and thimble.
I was pleased to find that larger scale designs looked good with the longer, thicker stitches.  The new needlepunched cotton battings permitted a longer distance between quilting lines.”

BigStitch quilting

Jo Demonstrates BigStitch Quilting

“BigStitch was coined in the booklet I wrote and copywrited in 1993 (under my name at the time, Jo Walters).  It still sells.”   [You can get a copy of Jo’s booklet directly from her for $7.50; just e-mail her at GloverGirl52 at gmail dot com for her mailing address, and of course give her your address.]
 “To reach a wider audience, I uploaded a series of BigStitch lessons.  They are available at no cost on YouTube; just search “BigStitch Jo Glover” for the 5 lessons and Gallery.  I’m for the preservation of hand quilting.” [Here is the link to Jo’s YouTube lessons.  I am so impressed that she did this!]
BigStitch quilting

Matisse’s Goldfish, by Jo Glover

 “Right now, I’m stitching straight lines about 1/3 inch apart, using crochet thread AND NO HOOP OR THIMBLE, ssshhhh.  My friend Jane Cole brought this style, called chiku-chiku, to my attention.  (Chiku-chiku is the sound a sewing machine makes when stitching) Jane got it from Quiltmania magazine, issue # 100, in an article featuring the originator, Akiko Ike.”

Jo Glover quilting

Pillow with close lines of BigStitch quilting by Jo Glover

 “Mixing fine hand quilting, BigStitch, and machine quilting (and now, chiku-chiku) in the same quilt is fantastic.  I do prefer solids or hand dyed fabrics to showcase the hand stitching.  I see many Modern quilters featuring their machine quilting on solids, and that’s great.”
Quilt by Jo Glover

Amerika Blooms by Jo Glover

 “Quilters I have known and loved include Gwen Marston, Jonathan Shannon, my friend Jane Cole, the Gee’s Bend quilters, Fran Skiles, Jacquie Gering and Katie Pedersen, and Yoshiko Jinzenji.”

5 Things I’m Grateful for in Quilt-World

Gratitude is always a good exercise, as I was reminded when I met with an old friend the other day. So, here are 5 of the things I’m most thankful for in my quilt life:

1. Good friends! Some of my best buddies are people I’ve met through quilting, and, as I’ve mentioned before, joining a quilt group is a great way to make friends.

quilt group

Some Quilty Friends

2. New challenges. I count any day in which I learn something new as a success.

Amish design quilt

I made this quilt when we lived in Pennsylvania.  The biggest challenge was to design and produce the stencils for the quilting.

3. A creative outlet. Like many quilters, I’ve had careers with a scientific focus. It’s nice to have the opportunity to do something that engages my creative side.

applique art quilt

This leaf, made in class with Laura Wasilowski, was a fun way to be more creative than I am when I make bed quilts

4. The opportunity to help. Giving a quilt, whether through a charity or through a personal contact, gives me the opportunity to do something for someone. Often it’s a situation in which there’s no other way to express my concern.

modern quilt

One of my quilt groups makes quilts for Ronald McDonald House

5. The circle is unbroken. When I quilt, I feel connected to my ancestors who made quilts, to friends who use my quilts, and to people all over the world engaged in similar activities. I don’t think about this very often, but it is definitely part of my quilting experience.

wheel of mystery quilt

I made this quilt to learn curved piecing.

So, what are you thankful for?

Your Inner Designer: 3 Formulas for Modern Quilts

It seems to me that, when learning a new skill, there is often a “formula” or basic idea that, once mastered, provides a way into successful practice of the new skill.  So here are 3 ideas for you to try.  See if one of them helps you create designs that you like.

1. Use lots of “negative space”, and start by making this background space in a shade of gray.  (The person who brought my attention to this “rule” of modern quilting has asked to remain anonymous 😉 )  Here are some examples, but I’m sure you know of lots of others:

modern quilt

Shades of Gray by Terry Aske. 2nd place award in the Modern category, Quilts Canada 2014

modern quilt

Found on lilysquilts.blogspot.com

2. Another common way to “design” a modern quilt is to make it an obvious take-off from a piece of 20th Century art (or occasionally more recent art).  My design below is by no means an exact copy of any of Piet Mondrian’s work, but it certainly is an imitation of him:

modern quilt design

Thanks, Piet! by Mary  J. Puckett

Sometimes I do see modern quilts that are a direct imitation of an artwork.  However, my preference is to look at a lot of work by one artist, or by a group of similar artists, then close the book and draw something original that “references” the works I’ve studied.

For example, here’s a print I found at an Etsy shop called “Handz”.  Compare it to the quilt just below it.  It’s not a copy, but it could have been based on the print.  Or they could have both been inspired by another source altogether.

modern art print

Mid Century Modern Art print found at Handz on Etsy

modern quiilt

finished – modern drunkard’s path by m_soto on Flickr

3. Just start with modern fabric.  One of my favorite “modern” quilters is Rita at Red Pepper Quilts.  Many of her quilts are traditional designs, but she uses bright, modern, fabrics and her quilts always look fresh and modern to me.

modern quilt

Spools and Nine Patch Quilt by Rita at Red Pepper Quilts

Here’s a detail of another of Rita’s quilts:

modern quilt

Detail of a quilt by Rita at Red Pepper Quilts

Give some of these ideas a try, and let me know what you come up with!

3 Favorite Quilts from 1 Quilter!

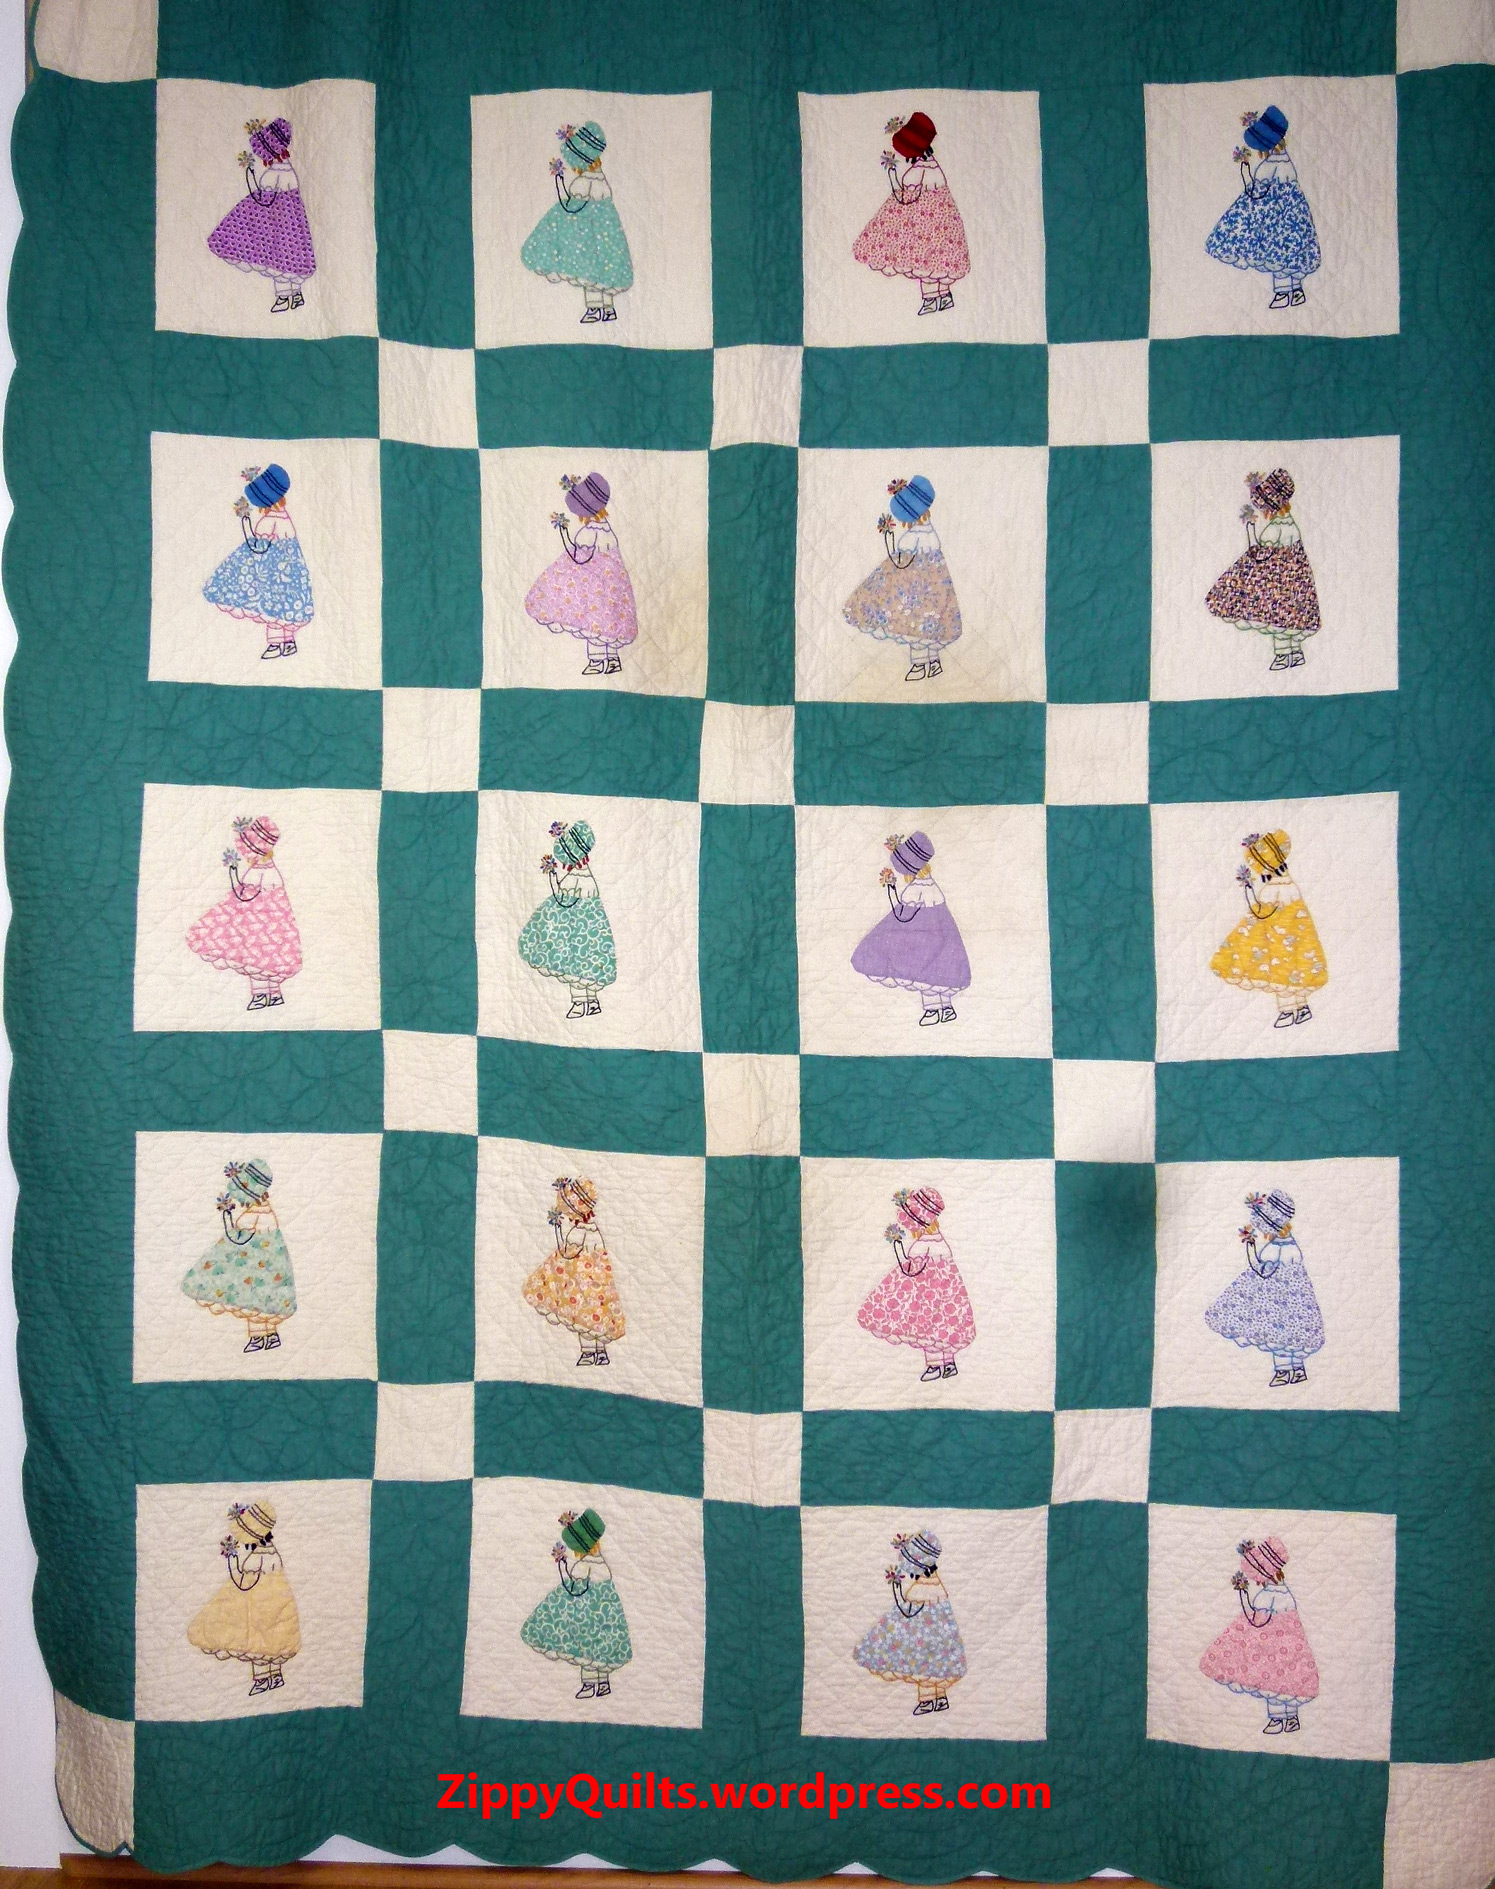
When I noticed that 2 of my favorite 11 quilts at AQS-Charlotte were by Jean Larson, I knew I had to meet her. Luckily, while I was trying to figure out how to contact her, she contacted me! Jean has lived in Chattanooga since the early 1970s, so we met at AQS-Chattanooga.

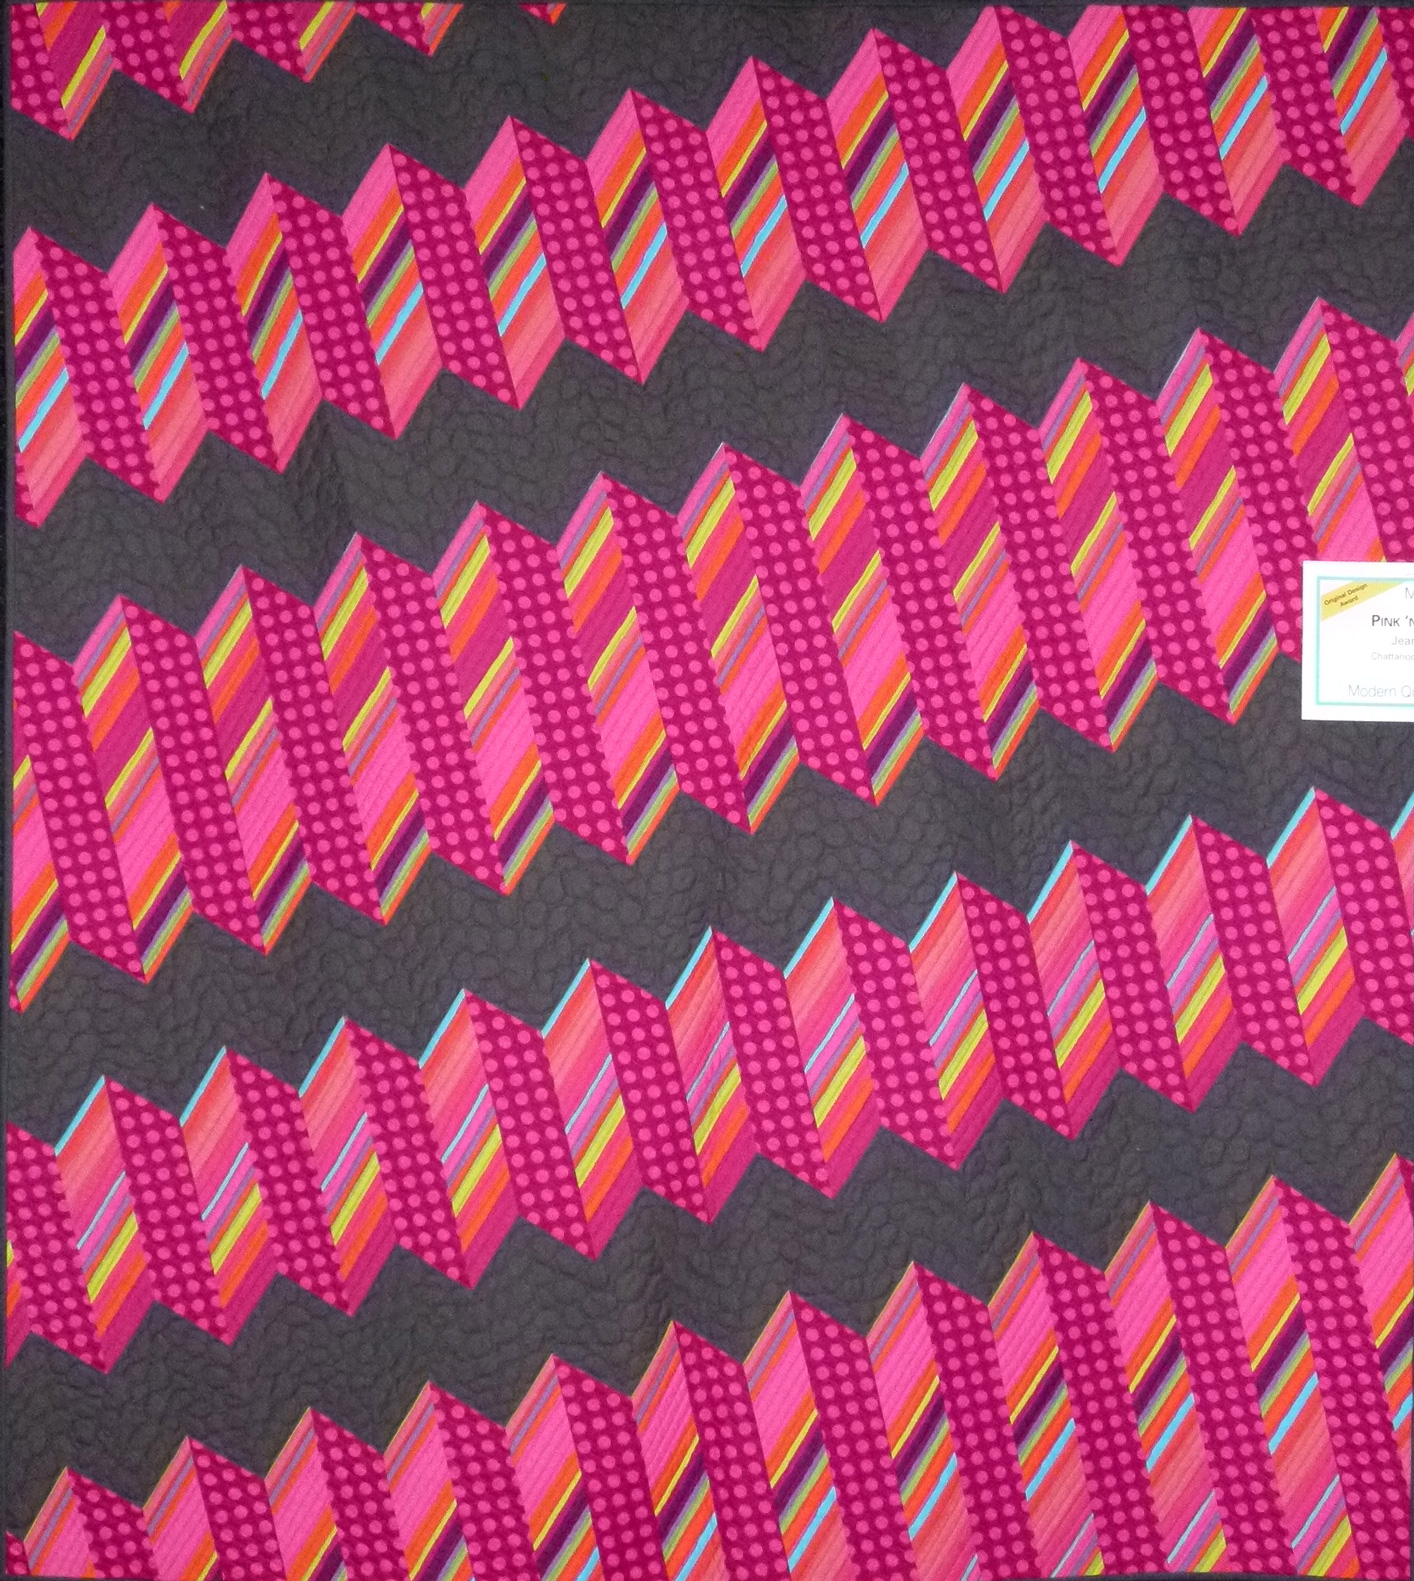
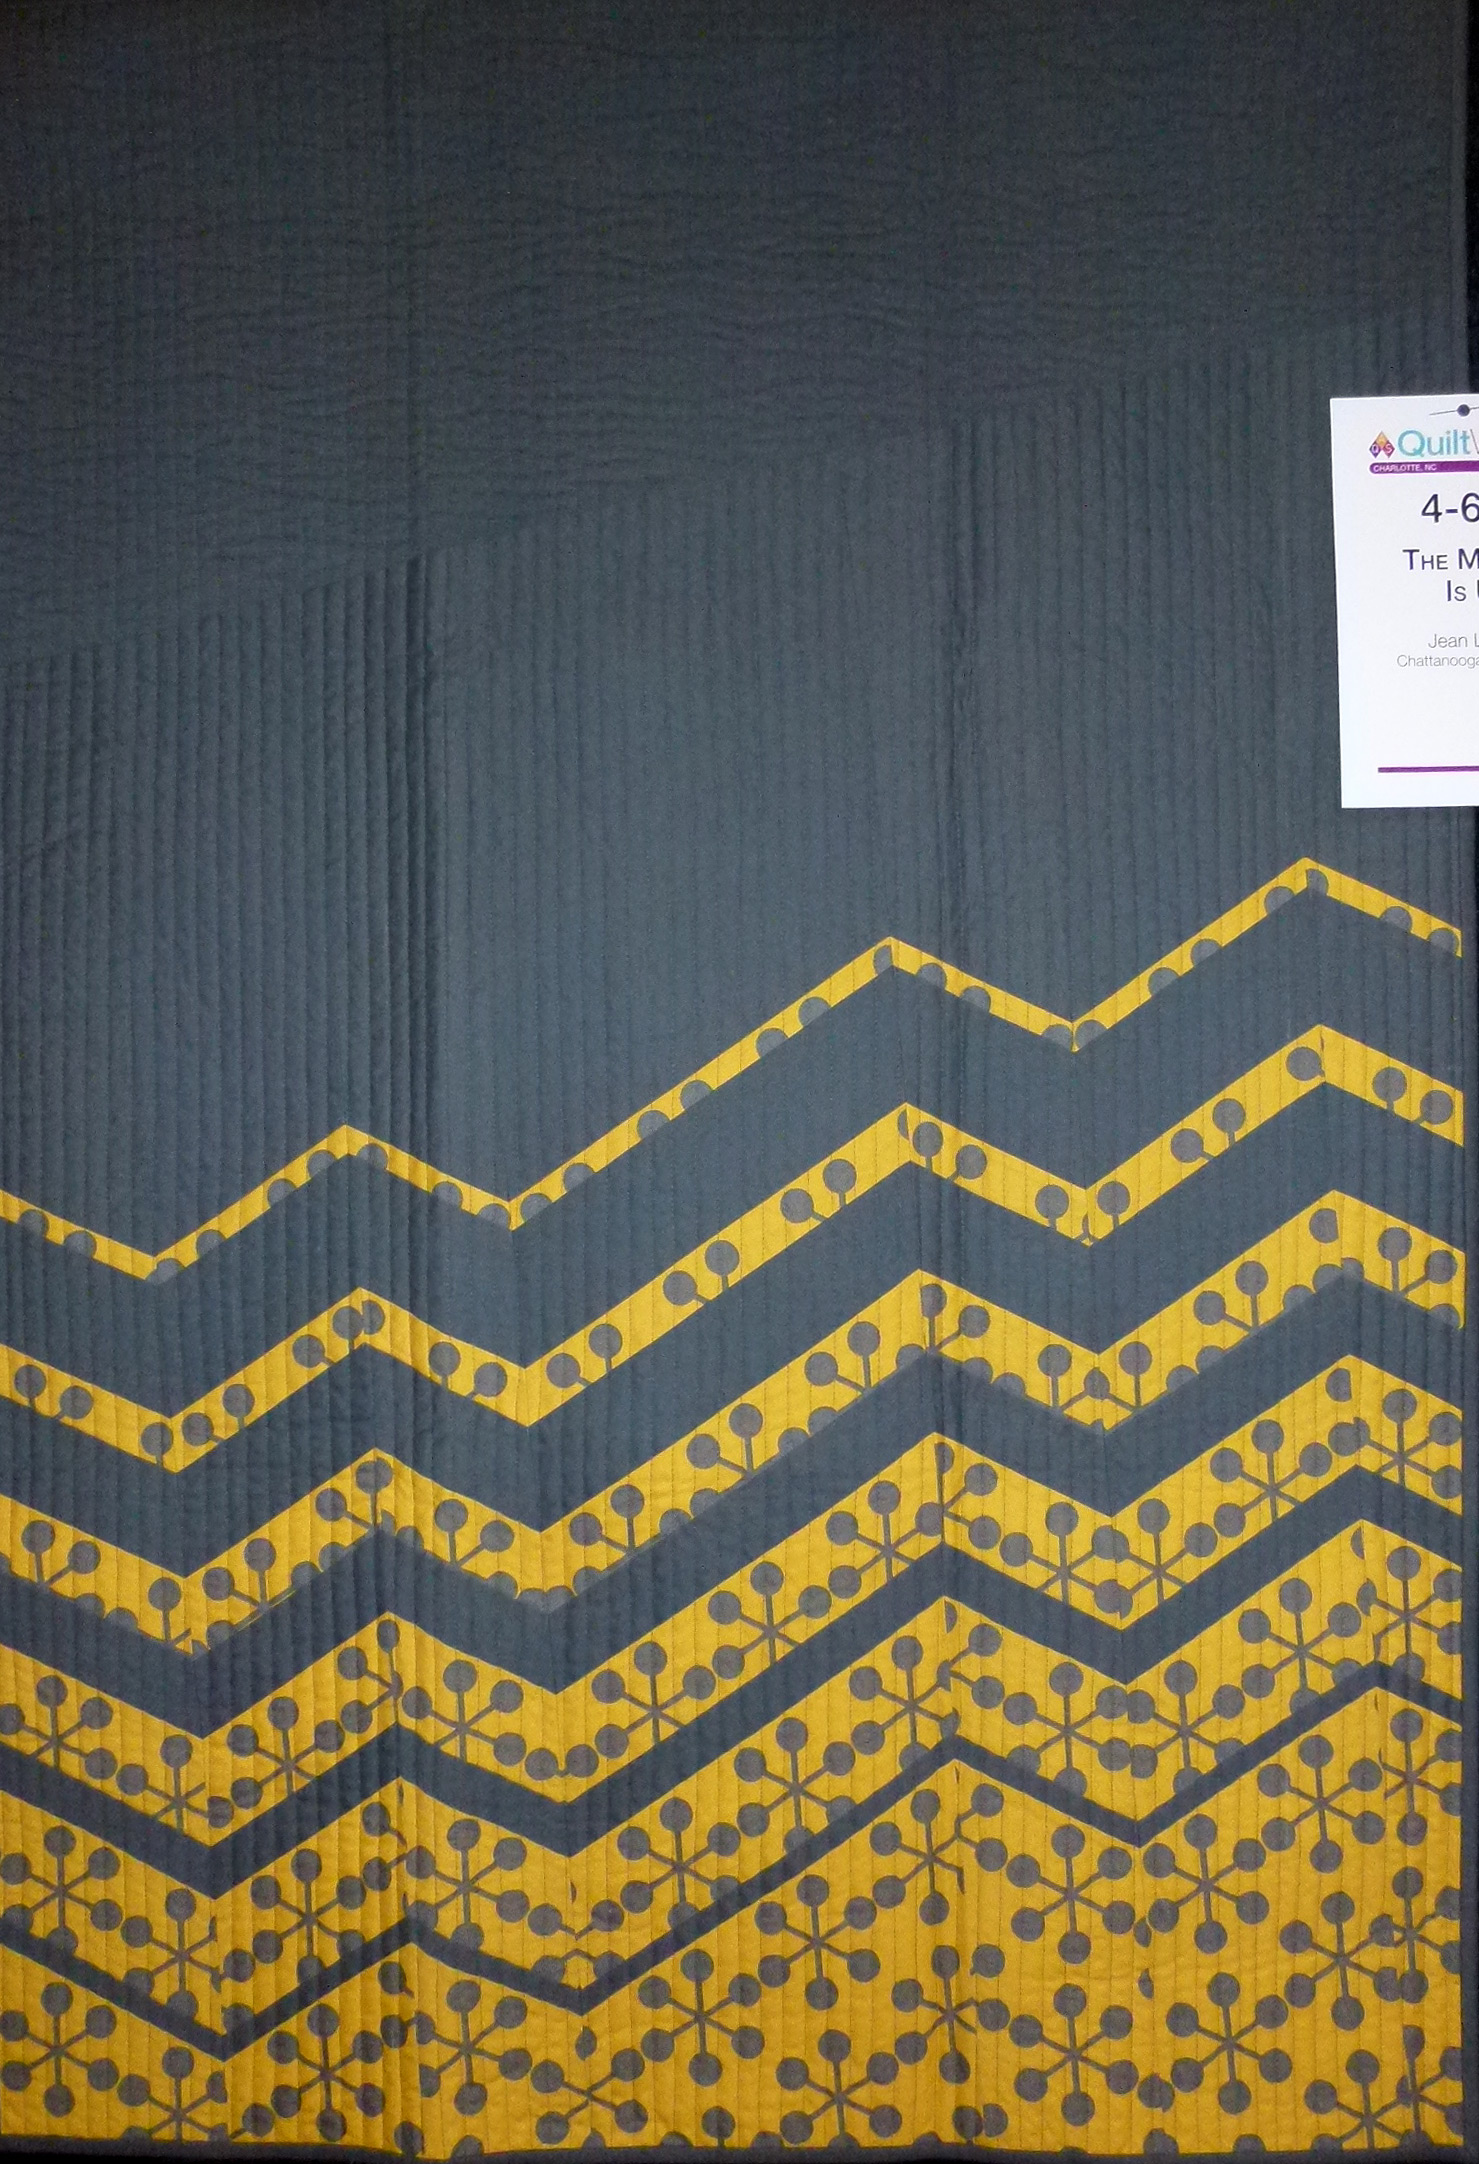
First, as a refresher, here are the two quilts that attracted my attention at AQS-Charlotte:

modern quilt AQS

This quilt by Jean Larson won the Original Design award in the Modern Quilt Challenge!  The Modern Quilt Challenge exhibit was on display at AQS Charlotte as well as other shows during the year.

modern quilt, AQS Charlotte

The Market is Up, another quilt by Jean Larson

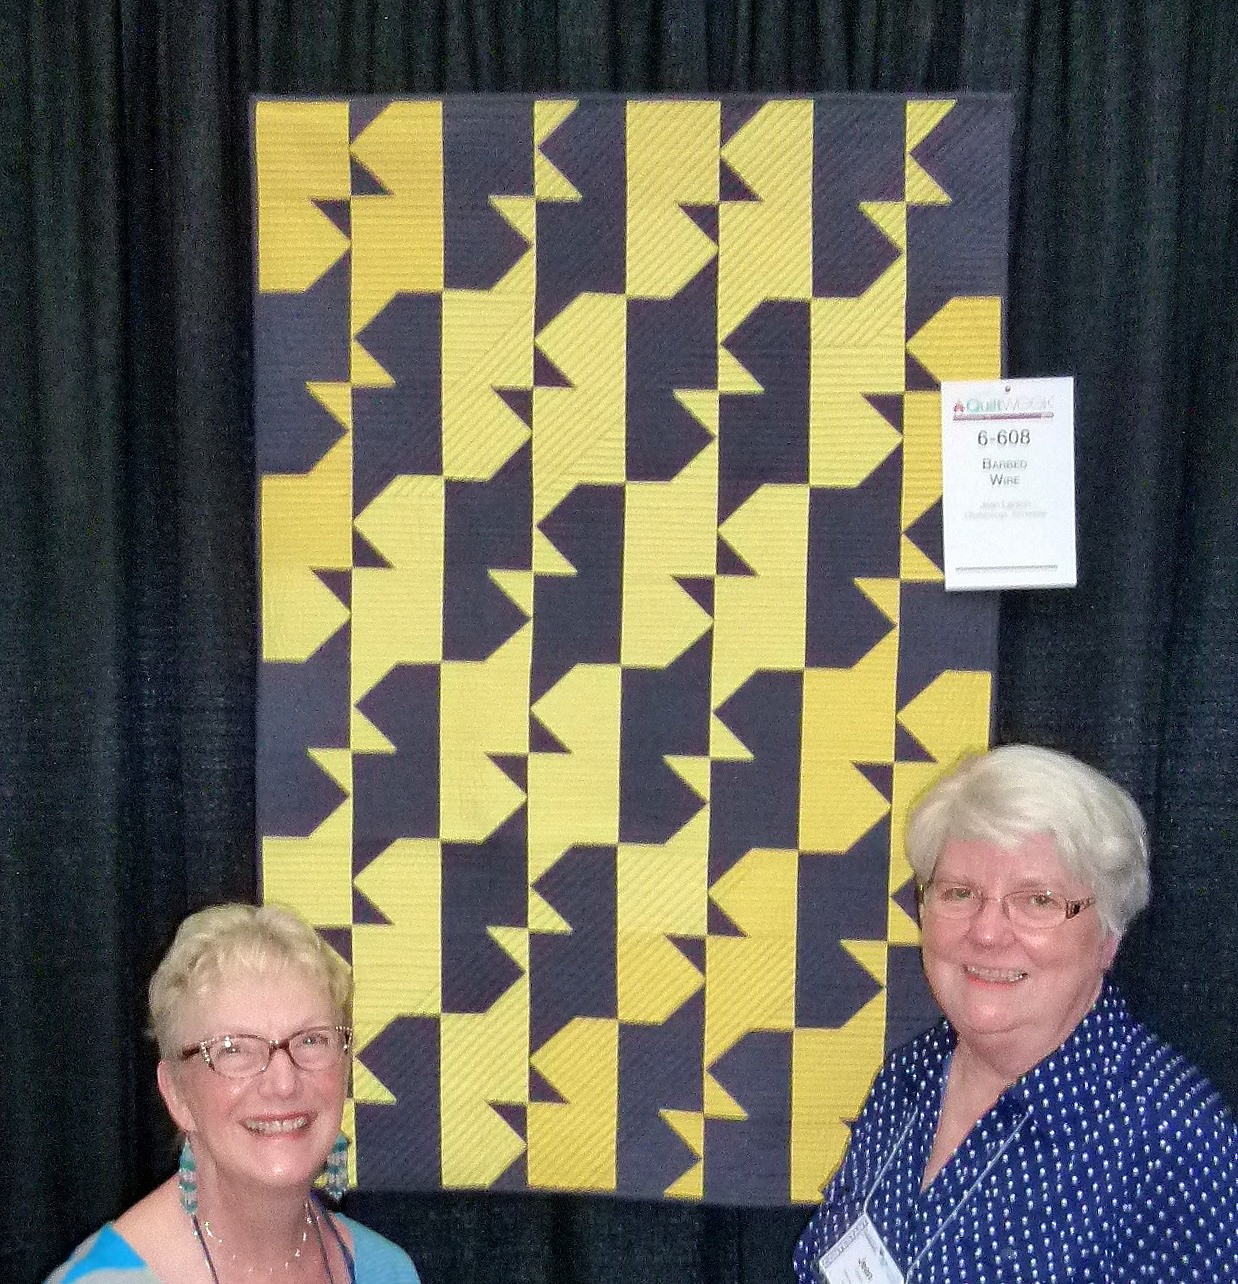
Jean entered a different, and maybe even more interesting, quilt in AQS-Chattanooga:

quilt AQS Chattanooga

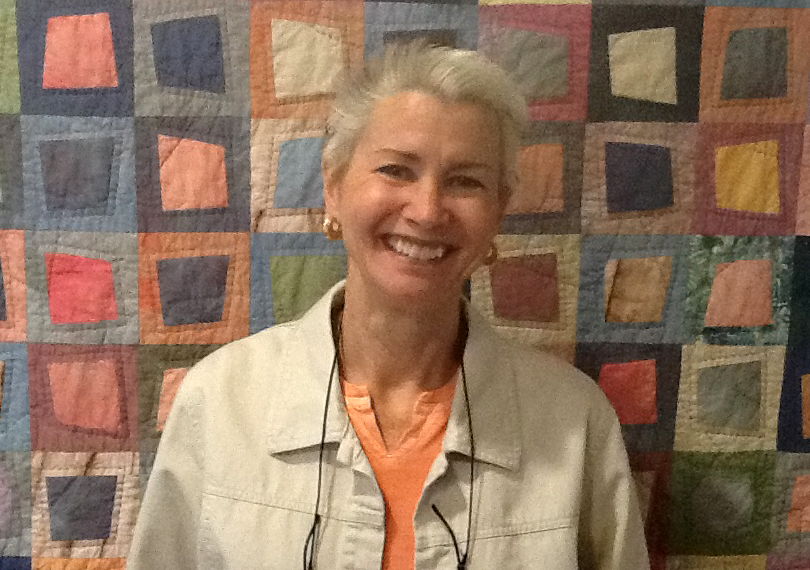
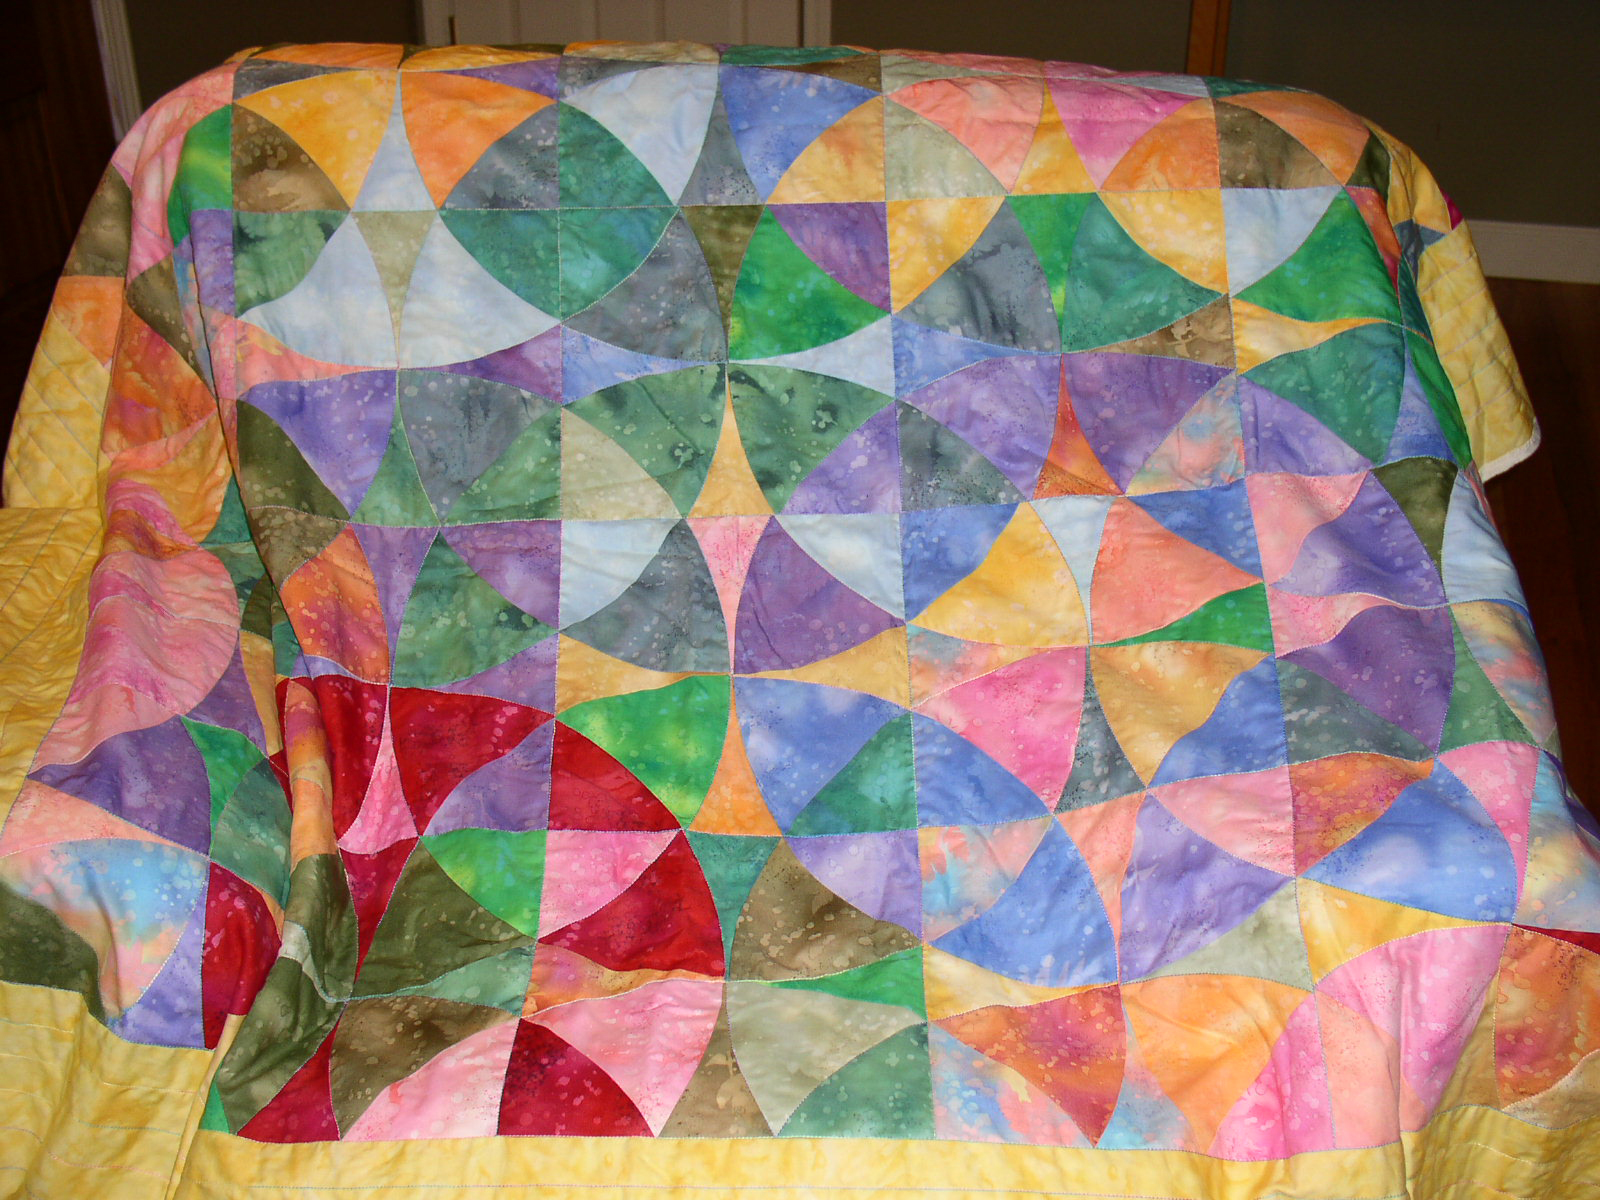
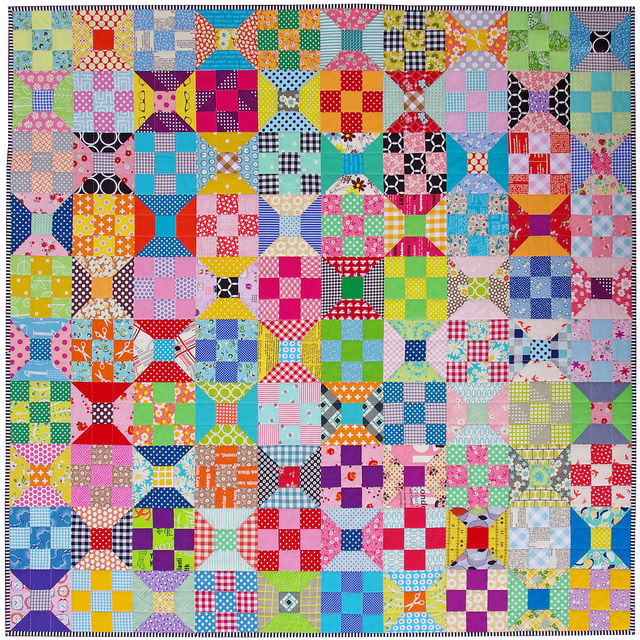
Jean (right) and I pose in front of her quilt, “Barbed Wire” at AQS-Chattanooga

There are so many things to see in this simple quilt!  First, the design is tessellated!  Jean is a mathematician by training, so she explained it to me, but I’m going to have to ask her to write a guest post to explain it to you.  More on that later.

Second, those variations in yellow are for real, not just trouble with exposure on my camera 😉  The two yellows add complexity to the quilt.  And finally, although I couldn’t see it until she pointed it out, this quilt is actually a grid of squares in alternating colors:

Look at the quilting, too!

So, here’s a little bit about Jean:

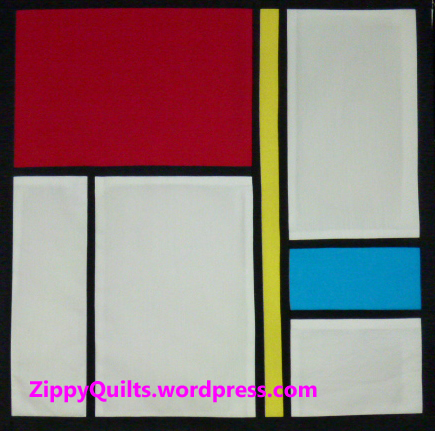
She’s had several starts at quilting.  Her first quilt, in 1976, was a traditional log cabin made with the quilt-as-you-go method and using poly-cotton fabrics, which were about all that was available at the time.  Her second, in 1984, was an orange and turquoise quilt that she worked on while potty training her two adopted boys!  She began quilting seriously in the late ’90s.  In 2012 she discovered modern quilting through a neighbor, and she hasn’t looked back since.  She’s an active member of the Chattanooga Modern Quilt Guild and apparently knows everybody–numerous people stopped to chat with her while we were talking about quilts at the AQS show.  She had a quilt accepted for the first QuiltCon in 2013, and it has been published several places as an example of good use of negative space.  Here it is:

modern quilt

Lanterns, by Jean Larson, was accepted for Quilt Con 2013

Jean says she likes simplicity and alternative grid work in quilts.  She is inspired by geometric shapes and by fabrics–especially stripes.  She loves the mathematics of tessellations and plans to make more tessellated quilts.  I look forward to seeing them!

And I’m going to beg her to write a guest article on tessellations for my next design-your-own-quilt post.  If you know Jean, encourage her to do it!

24-Step Dying to Quilt

Have you ever admired the rainbow of subtle colors offered in hand-dyed fabrics?

Cindy Lohbeck

Cindy Lohbeck

But they are expensive, so, while at AQS in Chattanooga, I took a 24-step hand dye class with Cindy Lohbeck.

Cindy is an excellent teacher.  She has her process down to very precise steps, well explained, that make it difficult for students to make a mistake.

I had NO IDEA how much was involved in fiber-reactive dying!  After 3-1/2 hours in class, we had 24 bins of fat quarters (FQs) in dye to take home and finish.

fabric dying

Part of the fat quarter bins, now at home in my laundry room

It took another 6 hours of work at home, though part of that time was spent waiting for the fixative to work, or waiting for the washer and dryer.  There was a LOT of rinsing by hand in HOT water to get all the extra dye out before the fabric was put in the washer and dryer.

fabric dying

Thank goodness for a deep sink for rinsing!

Cindy’s instructions continued to be thorough and complete, so I had no trouble.  (I think she should write a book and call it “Dying to Quilt” 🙂 )  She provided all the materials needed for the project, including 24 fat quarters of PFD (prepared for dying) cotton fabric, dyes and reagents, measuring equipment, and even the special detergent for washing the final product!

Finally, after drying and ironing the fat quarters, I had a glorious array of colors!

hand dyed fabric

24 steps of color, plus 2 extras

There are 2 multi-color FQs made with fabric I brought to class to use up the “extra” dye produced in each step.  Can you see them?

Now what in the world am I going to do with this fabric?  Suggestions?