I’ve been making landscape quilts for years and have collected several books on the subject. Since I’m going to be teaching landscape quilting again soon, I thought I’d list the books I am familiar with as a resource for anyone interested in the subject. This absolutely is not an exhaustive list of all the books available; it’s just brief reviews of the books in my own collection.
Create Landscape Quilts by Meri Henriques Vahl, C&T, 2021. This is by far the best of the bunch if you want to put people in your quilts. She covers all the basics but particularly excels at detailed directions for including realistic people. Since I have a “hang-up” about drawing people, this was especially helpful for me. Of course, she has a number of examples of art quilts that do not include people, as well. Her technique is basically collage with a tulle layer on top. Look at the amazing detail in this sample of her work! Book available here.

Photo courtesy of C&T
Happy Villages by Karen Eckmeier, 2nd Edition, The Quilted Lizard, 2014. This book presents step-by-step instructions for making a number of landscape quilts. It is easier to jump right in here because of the specific instructions, but some of the pieces she uses are tiny. I used tweezers. This is another collage technique with a tulle layer on top. Connecting Threads had it here for less than the used book site I generally go to.

I made this little landscape based on the ideas in Happy Villages
Mickey Lawler’s Skyquilts by Mickey Lawler, C&T, 2011. This is a fabric painting book, entirely different from the previous two. It does address some basic principles, and if you enjoy fabric painting this is a good place to start. The author uses several different dyes and paints, which are explained in the book. I did not invest in most of them, but did enjoy using my Setacolor dyes and her ideas. I particularly like her suggestion to use tracing paper over your finished quilt to decide where/how to quilt it, since quilting lines can make all the difference in any type of quilt. It is available from C&T as an e-book here, or I found a good price on a used copy at Abe Books (use their search feature to find what is available).

This pine tree has green flannel for foliage and lots of free motion quilting for texture

I “painted” the sunset here with markers, and attached a little charm I found in my stash
Easy Batik Landscape Quilts by Patricia L. Brown, AQS Publishing, 2011. The technique here takes advantage of the natural variability in batik fabrics to make more realistic looking landscape quilts without having to apply paint or other media. Ms. Brown makes paper patterns and uses piecing and applique to assemble her quilts, so a tulle layer is not necessary. There are examples of both realistic and abstract designs with specific instructions for making a number of them. I have found that batiks are, indeed, excellent for landscape quilts, but I don’t have the patience to make paper patterns the way she does. (I made one landscape quilt using patterns I designed in a workshop with Georgia Bonesteel years ago, so I did try!) At the time of this writing, Connecting threads had a good price on it here.

The mountain in the background is made from a batik so did not need to be painted to have the right appearance. The commercial prints in the foreground were altered with markers.
Accidental Landscapes by Karen Eckmeier, The Quilted LIzard, 2008.This book has an excellent discussion of the elements and techniques that make a successful landscape quilt without resorting to technical language or going into too much detail. The sample projects she uses to teach techniques are easy and helpful. Her examples are much less elaborate than those in most of the other books, which is especially nice if you’re just getting started. The publisher sells it through Amazon.
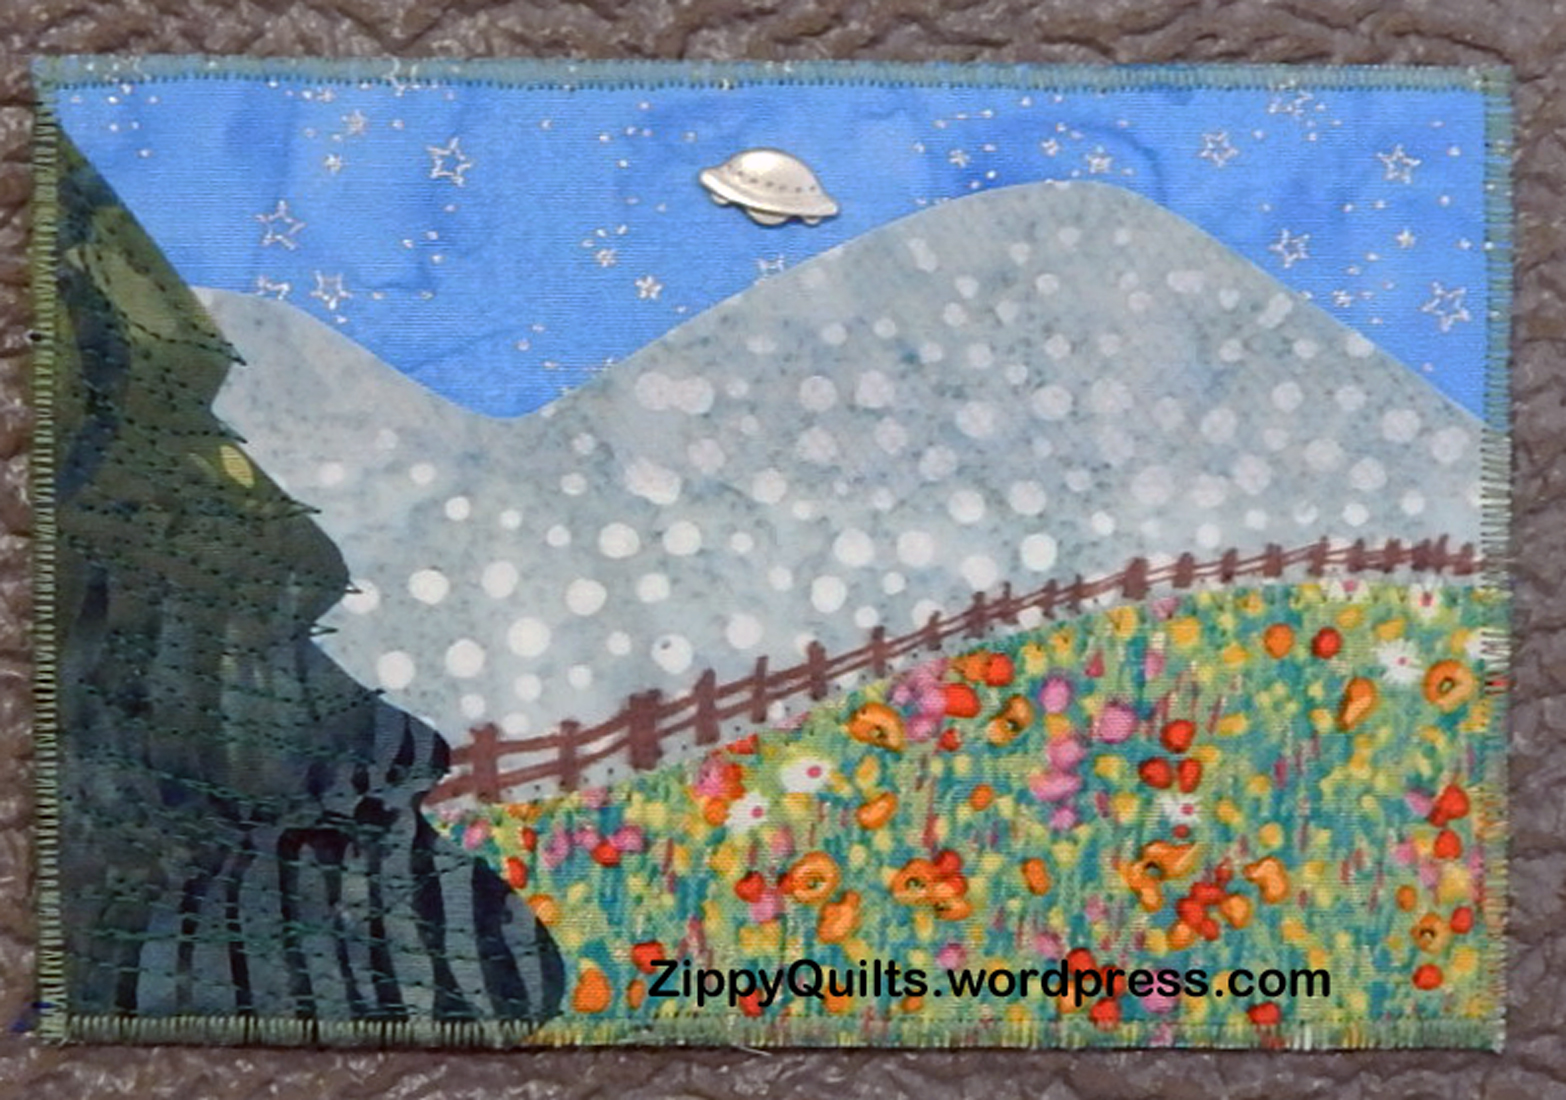
Batiks and markers were used in this little quilt, and I put a UFO in the sky 🙂
Points of View by Valerie Hearder, Martingale, 2007. This book covers a variety of media that can be used in landscape quilts, from commercial prints to fabric crayons, paint sticks, and embroidery. She constructs the quilt on a muslin base, which I have found helpful. She shows how to use tulle and batiks as well. If you want just one book that covers a variety of techniques, this is a good one. I particularly like the way she plays with scale to add interest to some of her designs. This was available through Thrift Books at the time of this writing–use the search feature to find available copies.

This one was made with fused fabric, using techniques I learned several years ago from Laura Wasilowski
The Art of Landscape Quilting by Nancy Zieman and Natalie Sewell, Krause, 2007. I love Nancy Zieman’s practical approach to sewing and quilting, and this book starts with how to generate ideas and goes right through to finishing the quilt. There are no instructions for making specific quilts. Instead, the authors use many pictures of landscape quilts they have made to explain a variety of techniques for making your own designs. At the time of this writing, the book was unavailable through Thrift Books and available but not cheap at Abe Books. It was $71 on Amazon, so better check your library!

I think I made this one so I could use those round red buttons!
Landscape Quilts for Kids by Nancy Zieman and Natalie Sewell, Krause, 2004. This is a fun book that covers all the basics. I especially enjoyed her idea of cutting out people and animals and applying them broderie perse style to the quilts. She gives tips on how to print pictures of your own kids on fabric for use in landscape quilts. Amazon had one left at a reasonable price as of this writing, but Abe Books had a better price for a used copy; use the search boxes to see what they have available.

I found pre-printed fabrics for everything I needed to build my husband his ideal woodshop 🙂
There are many more landscape quilts waiting to be made from the pictures I’ve taken at beautiful places we have visited.

One of these days I’ll use this as inspiration for a landscape quilt
Please note: the links are for your convenience; they are not affiliate links for which I get paid. I do receive books from C&T for review, but I only review the ones I like!