I Took Another Class

I love taking classes, even though, after 40 years of quilting, I often know most of what’s being taught. Most teachers have a technique or perspective that adds something to my skills, and sometimes a class is an opportunity to make a quilt I wouldn’t make otherwise.

Therefore, I signed up for David Sirota‘s Zoom class on paper piecing, in which we made the storm at sea quilt. Or rather, I made some blocks and perhaps others made the whole quilt. Whatever.

That being said, I DID make a whole Storm at Sea quilt back in 2019. I used Deb Tucker’s tools and it came out just fine with no hassle.

Love at Sea was made in 2019 using Deb Tucker’s tools.

The heart design in the quilt is a modification of Storm at Sea done by Marti Michel years and years ago; I just copied it. Eventually I gave the quilt to a friend for her new baby.

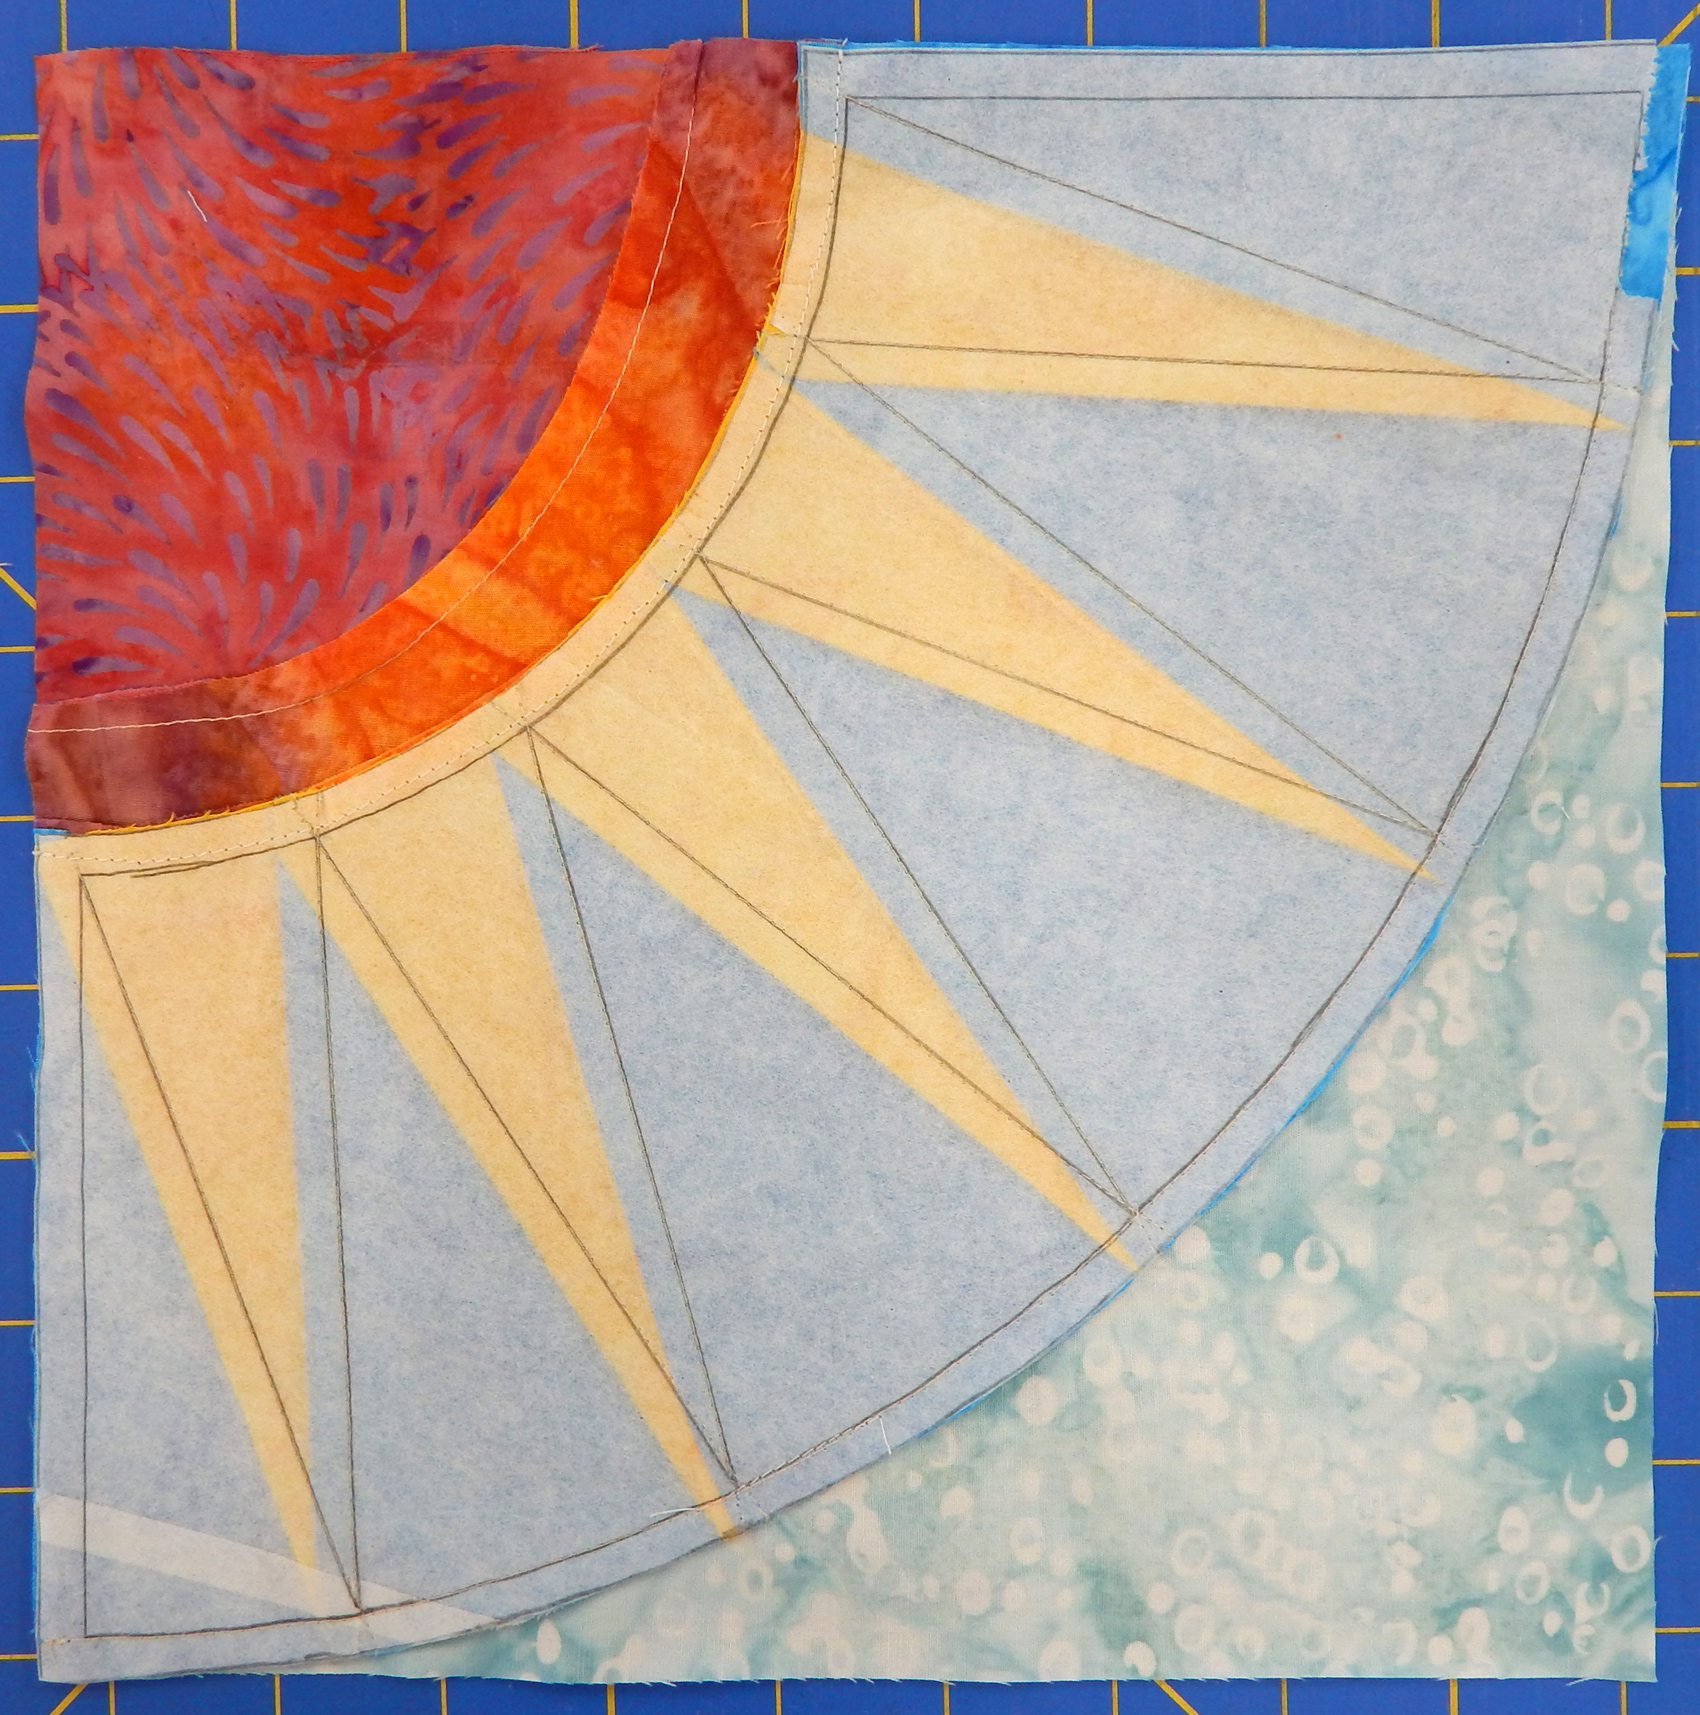
Anyway, David Sirota’s class. I took it because he’s a master paper piecer, and I’ve been doing a lot of New York Beauty blocks, which surely require paper piecing. I thought I might learn something, and I did!

David has some excellent advice on “the paper” for paper piecing and some nice techniques for accomplishing the piecing as well. Much of it is available as videos through his website. (Are they even called videos these days, or are they now called YouTubes?)

The class was well run and David is an interesting teacher. His techniques worked quite well.

So why did I make only one block? I simply lost interest in the project after I’d learned what I could from it. The block joins a number of other “orphan blocks” set aside for future projects.

The good news is that one of my guilds recently set out a call for orphan blocks. I’m going to look that up and see how many I have that meet their requirements!

Class With Cindy Grisdela

When attending the Mid-Atlantic Quilt Festival this spring I took a class with Cindy Grisdela and attended her lecture about color. Both were worthwhile.

Cindy’s class was based on her Full Wild quilt, which she entered in QuiltCon. Here’s a picture of her with the quilt, taken from her blog:

When I got home I wanted to let most of the blocks I made in class rest for a while, but I did make a small wall hanging with one of them. It’s called Drip, and I’m not crazy about it but I just had to do something with one of those blocks!

The rest of the blocks I put away because I want to consider what other colors to add. My usual problem is using TOO MANY colors, so I tried to restrain myself. Now I want to add more colors. Here’s a picture of some of the blocks just before the blocks were put away–they aren’t joined yet.

To be continued.

In her color lecture, Cindy suggested making a color wheel, saying it would be interesting to see what you had in your stash. Here’s my snapshot of her color wheel.

When I recovered from the recent quilt show (Heart of the Triad, blog is here), I decided to make a more elaborate color wheel. I drew it in EQ8 and printed templates from my drawing.

This was a fun project, AND I had all of those fabrics right here in my stash! I couldn’t resist using the light grey Tula Pink fabric with all the fun colors as background. The color wheel finished about 18″ square.

Anyway, I enjoyed Cindy’s lecture and her class, and I recommend both if you have the opportunity to attend.


Pattern Review: Strip Search

I found this pattern at Five Little Monkeys and it turned out to be as much fun as it appeared to be! The pattern said that, if you followed the instructions exactly, none of the strips would try to line up, and that was right! This means the only thing to “match” is the corners where the blocks come together, but really, the blocks are big so that was easy. Easy and fun–that’s what we like!

Here’s the first quilt I made from the pattern. I thought at first that the blocks needed sashing. However, that was not an improvement, so I removed the sashing and just added a border. The blocks are about 15″ square, so this was a good size quilt.

The second quilt is for Quilts of Valor and will be just the right size without a border. This is just a picture of part of it so the pattern of the strips shows. It isn’t finished yet.

And finally, here is a quilt I made to be used on one of our twin beds with a pillow sham.

This is an excellent pattern for using 2.5″ strips, either from scraps or a jelly roll. The instructions are clear and work well if they’re followed carefully. I recommend it!  

These folks developed the Stripology ruler so they recommend it, but it isn’t necessary for this pattern. Here’s a source for the pattern if you can’t get it at your LQS.


What Was I Thinking?!?

I found this unusual pattern at Five Little Monkeys and liked the look of it.

The pattern wanted me to buy a 120 degree triangle ruler, but after discussion with a math-loving friend I decided to try cutting those 120 degree angles using the 60 degree line on my long ruler.

It worked, sort of. After making a few blocks that way I concluded that the price of the recommended triangle ruler was less than the price of the fabric and time I wasted trying to get the triangles right.

The result was that some of the triangles for the quilt were cut with one method, some with the other. However, the real oversight on my part was failure to notice that there are places in this quilt where TWELVE points come together! Or don’t actually come together, in my case. Yikes!

I do love this quilt. It is a striking design that works well with these bright fabrics.  So I’ll make do with these points that don’t match and use my own little trite saying for this situation: “A good quilt is a done quilt!” (Thanks, Diana, for this insight years ago in another context!)

Quilt stats

Name: Oops

Finished size: 54″ x 63″

Pattern: Henry’s Humongous Hexagons by Carl Hentsch

Made by: me

Quilted by: Linda Nichols

Electric Quilt, and Why I Use It

I’ve been using the quilt design software Electric Quilt (EQ) since the EQ5 version. I’m now using EQ8, so it’s been a few years. OK, quite a few.

All the drawings in this post were done with various versions of EQ.

I love EQ for several reasons:

  • I like to design my own quilts. At first I didn’t have many ideas, so I just combined the blocks provided by EQ in various ways. There are almost endless possibilities. Here’s where I re-drew Arkansas Crossroads to see how it would look with a scrap slab center.
  • Once a quilt is designed, it can be exported as a JPEG to share with friends! That’s how I got the pictures in this post from EQ to the blog 😀 Here’s one from 2007:
  • I can fiddle endlessly with various layouts, block sizes, colors, etc, etc. before deciding how I want to do a quilt. Here are a few options I considered for a doll quilt for a friend.
  • When the instructions in a pattern don’t work out, or the size of the quilt doesn’t suit me, I can draw the quilt in EQ and try out various solutions. Here’s a block I re-drafted after the instructions in the pattern didn’t really work. And by the way, I was able to print templates straight from EQ in the desired size once I got it re-drafted.
  • AND on top of all that: the block above was colored with my actual fabric because I was able to scan the fabric into EQ, scale it, and then fussy cut the block center from it!
  • It’s possible to make everything from simple to elaborate designs.
  • EQ gives me an estimate of the yardage needed for a quilt. It does over-estimate a bit, but of course that’s waaaay better than underestimating! So, for example, I drew this quilt and then decided what size I could make it based on how much fabric I have. I can change the size of the blocks until the quilt fits my yardage!
  • I just like to draw things in EQ for fun. Here’s a tile floor I photographed in a restaurant and then drew in EQ. No way would I make this, but it was fun to draw. The asymmetry shown was indeed in the floor from which I copied the design.

There are sooo many other things I love about EQ! I’ve just taken the on-line classes to learn to use it better and they were very helpful.

And finally, the folks at EQ provide wonderful customer service. A friend and I both failed to figure out how to draw the quilt below in EQ. I emailed tech support about it and Heidi drew it for me! She also sent a link to a lesson on how it was done 😀 That’s great customer service!

I get so much use out of this program! Have you tried it?

PS: No, this is NOT a sponsored post! But here’s the link if you want to learn more about EQ8: ElectricQuilt.com  

The EQ folks have a video program for guilds, too. Don’t know about you, but we’re always looking for program ideas.

An Excellent Quilt Shop

We recently went to Western North Carolina for several craft-related events and I fit in a visit to Five Little Monkeys, a quilt shop in Weaverville just north of Asheville. (Who can resist a visit to a quilt shop while travelling?)

One of the greeters at Five Little Monkeys

Five Little Monkeys turned out to be a wonderful quilt shop, well worth the side trip!

They had multiple bolts of some of my favorite fabric lines.

I love these large-scale novelty prints from Alexander Henry!

There was a huge selection of patterns! It’s conveniently located on the stairs leading up to the sale area 😀

I never saw so many patterns in one shop!

And they had a better selection of quilting books than any store I’ve visited in the past couple of years. Just look at this!

The owner designed this quilt for the wedding of friends and she does sell the pattern through her shop.

Wedding quilt designed by Angie, who calls herself the “Queen Monkey” at Five Little Monkeys

There were multiple other lovely quilts on display, including this one that I thought was especially fun.

Not a great picture, but the quilt was up high. Fun to look at anyway!

There were many attractive displays throughout the store. I had to walk through several times to decide what I “needed”. I’m not showing everything I bought because some items were gifts for folks who probably read this blog. But you get the idea.

I did get some half yards for my low volume stash.

The fabric on the far right has silver metallic speckles, but my camera doesn’t like metallic

And I found a couple of patterns I just have to try.

Stay tuned for quilts made from these patterns. And if you get to Asheville, it’s well worth a trip to Weaverville to visit Five Little Monkeys!


Classes With David Owen Hastings

I read something about David Owen Hastings, a graphic designer who also quilts, and wanted to take a class with him. Luckily within a few months I saw that Mancuso Show Management was having him teach over Zoom as part of their Quiltfest Virtual Schoolhouse, and I quickly signed up.

I should mention that I didn’t just randomly find the Mancuso organization; I was familiar with Quiltfest from when we lived in Eastern Pennsylvania. They’ve produced top-notch quilt shows, so I trusted them enough to try their (sort of pricey) Zoom classes.

The classes did not disappoint. Communication with the Manucso organization was seamless from registration right through the classes. (Like most folks I’ve had some Zoom experience in the past few years, which helped.) Classes started on time and, surprisingly, there were no technical difficulties! Woo!

The first class I took was Indi-Go Modern, which focused on designs in blue and white. I had planned to use my indigo-dyed fabric from a class with Debbie Maddy, but my motifs were too big for the designs David was using. I enjoyed the exercise of designing with two colors and plan to continue the exploration. Here’s my design so far, obviously unfinished:

David’s comment was, “Wow! Really minimal!” or something similar…

The nice surprise at the end of this class was that David talked about how to work out the quilting design for a piece. He even suggested possible quilting designs for some of the student works. I’ve never had a teacher take the design process that far and it was quite helpful.

The second class I took was sewn paper collage, and it was fun, too. In fact, it was far easier to have immediate success. I pasted each collage onto a blank greeting card and put them away for when someone needs a unique card.

My husband’s comment when he saw them was something like, “That would be nice if you’d trim the threads!”

And after the class I decided to weave some of my remaining paper into a collage, so here it is, too.

I recommend classes with David Owen Hastings, as his approach is different and therefore extra useful. He managed to be encouraging to everyone.

I also recommend the Mancuso Schoolhouse platform. Yes, the classes were a little expensive, but still far less than if I’d had to travel for them, and the platform worked well.


The Mountain Thread Company

While at the quilt show in Hickory I came across a new company and product I’d like to share with you.

I’ve made some of those rope baskets that have been popular off-and-on for several years now.

I used clothesline as advised in the instructions and lined the baskets, also as instructed.

However, The Mountain Thread Company folks have developed a new type of cord for this process and they have it manufactured right here in North Carolina. Katherine Lile, the owner, explained to me that the rope is 100% cotton and is a solid braid rather than the wrapped cord of clothesline. She emphasized that, because the new braided cord is sturdy, it’s important to use a denim needle with it.

Katherine holding her book. The headband in her hair is made with the company’s cord.

Indeed, I could feel the difference both in the cord and in the baskets made from it. The cord is about the size of clothesline, but both the cord and the baskets made from it are sturdier.

Katherine has written a book with projects using the cord. The surface of the cord is nicer than the clothesline I was using, so the baskets don’t need to be lined (thank you!).

A variety of small baskets made with the special cord. Notice that only part of the cord is wrapped. The spools in the background are a way to buy the cord in bulk.

Photo credit: The Mountain Thread Company

The cord also takes dye well. Look at the basket on the front of Katherine’s book, shown above. It appears that half the basket was dipped in dye! I love that idea since it reminds me of the way we used to glaze pots (in a former lifetime, I guess).

And look at this interesting basket made with a wide zigzag and no cloth wrap for the cord.

Naturally I had to buy some of Katherine’s cord to try. I came right home and made this little bowl.

My first bowl made with The Mountain Thread Company cord

I found the cord very easy to work with. Because it is solid, it looks good unwrapped, so I followed Katherine’s example of intermittent wrapping for interest rather than wrapping the whole thing as I had done with previous projects. I also used her idea of making a cute little loop at the top of the bowl.

If you’re interested, you can visit The Mountain Thread Company here. If you’ve never made a rope basket, check out the video tutorials, which can be accessed from the main menu at the top of The Mountain Thread Company’s home page. I watched all of them before I made my little bowl and found them useful.

Here are some of the kits

And if you want a little extra help, they sell kits with everything you need (even a denim needle) so you don’t have to guess how much cord to buy or hunt for supplies.

The Mountain Thread Company link

Let me know what you think!

As always, these opinions are my own and I received no incentive or compensation for this review. However, I am always happy to write about products I use, especially if they are local, so let me know if you have something that might interest my readers and me.


Some Favorite Tools

In the past year I’ve tried a number of new-to-me tools for my quilting, so I thought I’d share a few of my favorites. As always, these are not affiliate links; they are just for your convenience.

A New Table for My Sewing Machine

I’ve had in mind for years (literally) to get a table I can “drop” my machine into, but goodness! Have you looked at the prices of sewing furniture?!? Not in the budget!

However, I’ve seen a couple of people use the SewEzi portable table and both recommended it. It still isn’t cheap by any means, but it’s a lot less than “sewing furniture” and I’m very pleased with it. I got the portable version rather than the Grande because I have every intention of taking it to retreats with me. I positioned it perpendicular to my usual sewing table so I now have all the large table to the left to support the quilt when I’m attaching binding. The only drawback is that I had to wait several weeks for delivery, but of course we’ve come to expect that these days.

A New Seam Guide

I’ve had the Angler 2 seam guide so long it has turned yellow! I learned that it’s no longer made, so I’m trying Clearly Perfect Angles from New Leaf Stitches. It’s getting a good workout because my current project has about a zillion flying geese.This tool has, as advertised, eliminated the need to draw a diagonal line on the back of my squares. There’s even an auxiliary line that is used to sew the second seam needed to make those scrap HSTs that are a byproduct of the “waste triangle method”. So now I have 2 zillion HSTs….

New Non-Slip Stuff

I’ve tried multiple products, at multiple price points, to keep my rulers and templates from slipping while cutting. Most recently I found Grippy, and after trying it on one template I just lined up all the templates and rulers and sprayed the backs of all of them! On a per-use basis I think it’s the least expensive of the products, and it doesn’t leave a gummy mess on the back of the template like some of the stick-ons did. It’s my fave.

So tell me, what are your favorite tools? I’m always looking for something new to try 🙂

More Foundation Paper Piecing (Even Fewer Tears)!

There’s another alternative to real paper in addition to the dissolving paper I reviewed last week. Linda Hahn introduced me to a thin polyester sheet that works just like paper but can be left in the quilt! So here’s the scoop on it.

First, a view of the back of one of my blocks made with the polyester “paper”.

You probably can see that I’ve torn off a tiny bit of the non-paper in the upper right corner. I did that just to prove I could. So if you really, really want to, you can remove the foundation. (But why?)

I found a similar non-woven foundation sold by June Tailor. Linda’s are available through her website at 25 sheets for $10–considerably less expensive than the dissolving paper I reviewed last week. I found the June Tailor on Amazon at 50 sheets for about $17, an even better value.

Both these products are just a little stiff. It makes them run through the printer well and they are see-through enough to be easy to trace on.

I washed scraps of each. They didn’t appear to absorb water, and there was no change in texture, no loss of either ink from my printer or from the Pigma pen. The material came out exactly as it went in, with the exception that the washer wadded it up a bit, resulting in wrinkles.

I washed the pieces with the 1″ test squares on them so I could verify no shrinkage, and it’s good on that score as well.

I searched to see if I could find a similar product in larger sheets, but the only candidate, Pellon 911, seemed heavier and stiffer.

The only potential problem with these polyester sheets is that they do crackle a little if you crunch them. I don’t think they’ll do that when they’re sewn inside a quilt, but eventually I’ll find out. I’ll let you know.

And what of the original alternative, paper for paper piecing? There are lots of opinions out there. You can buy Carol Doak’s foundation paper, which seems to me to be the same as newsprint paper, which is cheaper by the ream.

Some people swear that ordinary printer paper tears off more cleanly.

And Elizabeth (OPQuilt.com) uses 17 lb Vellum. I didn’t know what Vellum is, so I asked Ms. Google. It’s “parchment” made from calf skin. I have seen it, and it’s lovely in texture and certainly transparent enough for tracing. I expect it tears out well, since Elizabeth goes to the trouble to find it. Her only complaint is that it’s difficult to find in quantity. Well, Elizabeth, I found I could order larger quantities from one of the big box office supply stores–for just under $100 a ream!!!

If you’re interested in the New York Beauty block, Elizabeth is continuing her series of free blocks, one each Wednesday in June. You can start at her blog or go directly to her Payhip store. But go now if you want the blocks, because I expect they’ll be combined into a paid pattern eventually.

I modified her latest block, but here’s my version: