A Little House Quilt

One of my guilds provides little wall quilts, featuring houses, to Habitat for Humanity. They give one of these quilts to each new homeowner, and have asked us to provide a few more.

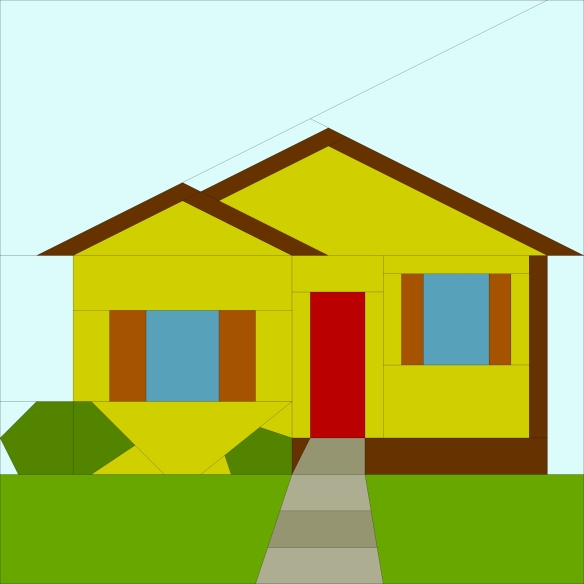
To make this one, I used a pre-drawn block from EQ8 and printed a line drawing of it at 12″ x 12″. Then all I had to do was measure the components and make the fusible applique quilt. This is the block as it was shown in EQ8:

Block design taken directly from EQ8

And here is the line drawing I printed from the program (along with my notes!):
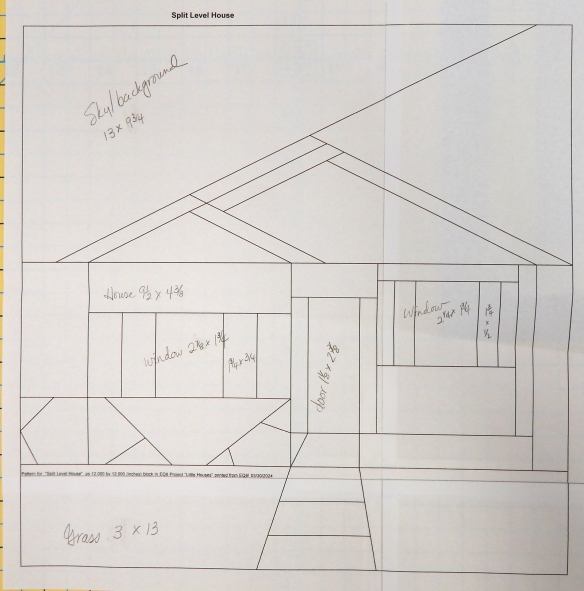
EQ8 drew this as if I were going to piece it. There was the option to print sections for paper piecing as well.

Finally, here is the finished house. It is all fused applique.
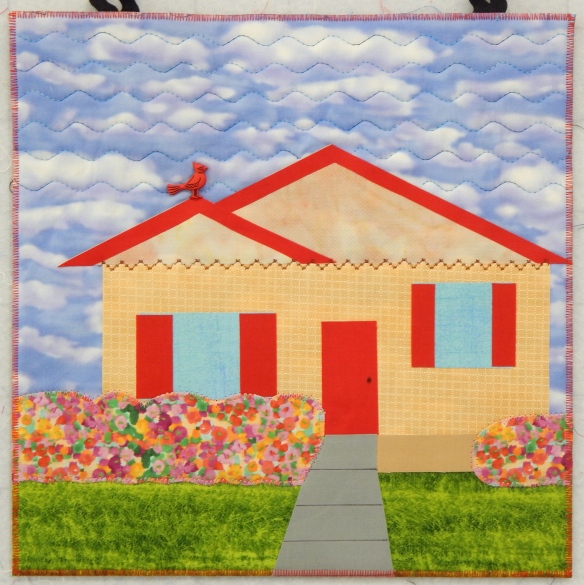
I use wool felt as the “batting” for wall quilts now, having learned from one of the many books I read that it is more stable for that purpose. It does, indeed, produce a nice firm quilt and this small one won’t sag even though it is to be hung with two loops at the top instead of a sleeve and rod.

I did a little decorative quilting and zig-zagging along the edges of some of the pieces, but this won’t be washed so I didn’t worry too much about it.

The redbird on the roof is a button! I collect them for things such as this 😀  As is often the case with decorative buttons, this one has a shank, so I poked a hole in the quilt and pushed the shank through so the button would lie flat. The back is secured with a pin.

Finally, after debating about what to do, I zig-zagged the edge to finish the quilt. I hope it will enhance someone’s new home.
Changing the Artwork

I’ve been in my “new” studio a couple of years now, so I decided to change out the art quilts I have on the walls. Some of the newly-hung items are from years ago, but I found them in the closet, so here they are.

I had forgotten about this little leaf-pounding piece that I quilted by hand.

I made Atomic Sunflower only two years ago, but I’d forgotten about it, too.

I did make this one self-portrait quilt in a class years ago, but that’s it for people in my quilts.

I designed and made this little neighborhood after seeing similar projects online. Isn’t the internet a great source of inspiration?

I made this many years ago from a pattern designed with tiny pieces. I don’t think that designer is still publishing patterns.

I made this when I was first experimenting with stripes and curves. I still love the colors.

There isn’t room for all the small quilts to be up at one time, so I probably need to change things up more than every couple of years!

Dreamlines: A Year-Long Project Finished

I learned of Brenda Gael Smith’s Dreamlines project from a fellow blogger and signed up early in 2023.  It’s a free monthly art project that has had international participation, and I’ve enjoyed it. Here are my pieces from all the months sitting on the design wall so I could think about what to do with them.

I accidentally made one month’s project in the larger size, but I figured that would be OK.

The plan for November was to finish the piece, and here’s mine.

I left out some of the pieces I’d done, cut one of the big pieces in half, and added some solid strips. I quilted it with horizontal lines in threads to match the various pieces.

You can go to the Dreamlines Gallery on Brenda’s site and look at the variety of finished pieces from around the world. It’s really fun to see the variety of compositions and all the different places where people participated.

I’ll be watching to see if Brenda offers a project for next year, because I enjoyed this one. She also offers some online classes and a friend who took them says they are good.

Asheville Quilt Show 2023

I always enjoy the Asheville Quilt Show. There are so many excellent quilters in the Asheville guild, and I always find inspiration at the show. Here are a few of my favorites from 2023.

Sizzle by Kathryn Zimmerman won an award for Outstanding Machine Workmanship

Detail of Tiny Houses by Janet L. Ervin. There were many of these little houses, hand appliquéd and embroidered!

Stripes Rule by Diana Ramsay caught my eye

I thought Lightning, by Tricia Vinson, was a clever use of an ombre fabric. Please note my photo is crooked; the quilt isn’t!

Tierra Nirvana, by Stephanie Wilds, particularly appealed to me because I’m making map quilts this year and have a similar one in mind

Sedona Spectrum by Judy Grebe had an appealing mix of vibrant colors

I loved the geometric shapes in Orange Sherbert by Sana R. Moulder

Our Song, Your Reflection by Audrey Pantas was a gorgeous variation on a traditional design

It Was A Puzzle, by Jane Butckovitz, interested me because I’ve been struggling with how to use this beautiful Wild Blossoms fabric from Moda.

The fabrics chosen for Haze Kilim by Mary Ellen Simmons positively glowed

Tropic of Capricorn, an original design by Catherine S. Beemer, was spectacular in both design and workmanship

There are so many wonderful quilts at the show that I’m sure it’s difficult for the judges to select the winners. As usual, it’s hard for me to see why some won and others didn’t, but I enjoyed them all.

Hello, Holly!

Holly Alloway’s work first came to my attention when Studio Stitch featured this quilt as the 2022-2023 Block of the Month (BOM).

Quilt (c) Holly Alloway, designed and made by her

You can see why I took notice! Holly recently agreed to talk with me and show me some of her quilts.

Holly designed this BOM several years ago using Deb Tucker’s rulers and techniques. Quilt design (c) Holly Alloway

Like many of us, Holly has been sewing all her life, though she started making quilts “only” about 40 years ago. She has lived various places around the country and has found both guilds and classes useful in her development as a quilter.

Another BOM using Deb Tucker rulers. Quilt design (c) Holly Alloway

Holly has a particular affinity for specialty rulers and a significant talent for designing with them.

This crate contains part of Holly’s collection of specialty rulers

She loves Deb Tucker’s rulers and has done several previous BOM designs using them.

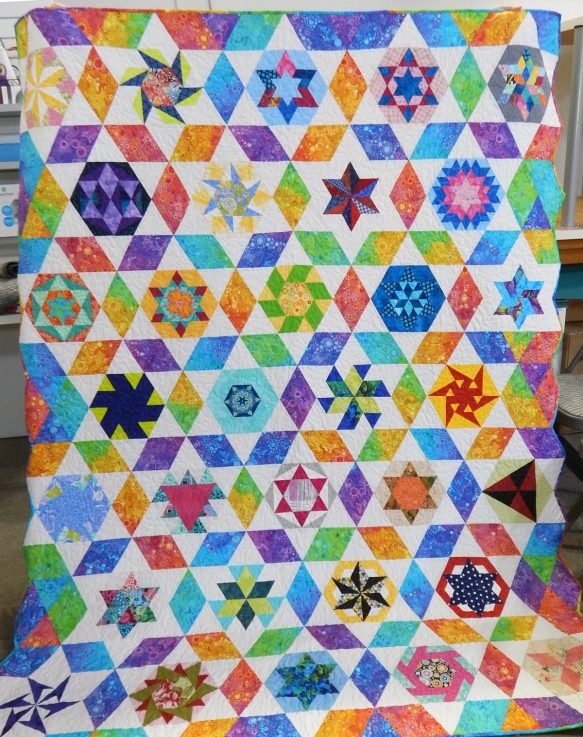
When I asked how she came to design the elaborate quilt shown at the top of this post, Holly said, “Well, Jaybird Quilts came out with those rulers.” She had already designed some modifications of English Paper Pieced (EPP) quilts so she could machine piece them.

Using the Jaybird Quilts rulers, Holly set about making many more EPP designs by machine.

Eventually she had re-designed enough EPP blocks for three quilts! The first is at the top of this post; here are two more.

And that’s not all! Holly is also a fan of strip piecing. I especially enjoyed seeing these two quilts.

And here’s the most unique thing: I originally asked to interview Holly because of her UFO management strategy. She allows herself only as many ongoing projects as she has years of life left! She has asked her family to give her a set of papier mache numbers each year representing how many projects she’s allowed to have!

I won’t tell you how many that is right now–I didn’t ask and she didn’t tell 😀  She does admit to being “over budget” presently due to several projects she has going. I just love this idea! We all need to get realistic with our quilting plans.

This bag is a current UFO for Holly.

Holly has made many more beautiful quilts than I could include here. I’m sorry to say she doesn’t publish her patterns, but we have enjoyed having her daughter teach some of her blocks in the BOM program at Studio Stitch.

Please note that all original blocks or quilts in this post are (c) Holly Alloway, various years.


City Park: A Panel Quilt

This quilt started when I saw the central panel at Studio Stitch and it was just too pretty to leave there. It’s actually yardage, not sold as a panel, but of course can be used as a panel.

The fabric is Robert Kaufman “Happy Place”, so I consulted the website of the manufacturer for design ideas. One of their designers had made a wall hanging from this fabric, so that was a good starting place. The trees and balloons were inspired by Jen Kingwell’s “The Avenue” pattern, though I used my own templates rather than hers.

I love the way the print fades from vibrant at the bottom to ethereal toward the sky, so I added additional striped sky. I then put balloons in the sky, with their silver tape strings hanging down into the house area.

Finally, I put a strip of coordinating fabric from the collection on the left side of the panel to balance the design.

Hopefully you can see the lovely bubbles used to quilt the piece. Quilting was done by Linda Nichols. I love this cheerful quilt.

There are a lot of beautiful panels out there now, so I’ll offer a class to “design your own quilt using a panel” at Studio Stitch in June.

Quilt Stats

Name: City Park

Finished size: 56″ x 58″

Designed and made by me, with inspiration from the Robert Kaufman website

Materials: Happy Place fabric by Robert Kaufman, except a leftover scrap for the upper sky and Kaffe fabrics for the balloons and trees. Balloon strings are YLI metallic braid, couched onto the fabric.

Quilted by: Linda Nichols

Classes With David Owen Hastings

I read something about David Owen Hastings, a graphic designer who also quilts, and wanted to take a class with him. Luckily within a few months I saw that Mancuso Show Management was having him teach over Zoom as part of their Quiltfest Virtual Schoolhouse, and I quickly signed up.

I should mention that I didn’t just randomly find the Mancuso organization; I was familiar with Quiltfest from when we lived in Eastern Pennsylvania. They’ve produced top-notch quilt shows, so I trusted them enough to try their (sort of pricey) Zoom classes.

The classes did not disappoint. Communication with the Manucso organization was seamless from registration right through the classes. (Like most folks I’ve had some Zoom experience in the past few years, which helped.) Classes started on time and, surprisingly, there were no technical difficulties! Woo!

The first class I took was Indi-Go Modern, which focused on designs in blue and white. I had planned to use my indigo-dyed fabric from a class with Debbie Maddy, but my motifs were too big for the designs David was using. I enjoyed the exercise of designing with two colors and plan to continue the exploration. Here’s my design so far, obviously unfinished:

David’s comment was, “Wow! Really minimal!” or something similar…

The nice surprise at the end of this class was that David talked about how to work out the quilting design for a piece. He even suggested possible quilting designs for some of the student works. I’ve never had a teacher take the design process that far and it was quite helpful.

The second class I took was sewn paper collage, and it was fun, too. In fact, it was far easier to have immediate success. I pasted each collage onto a blank greeting card and put them away for when someone needs a unique card.

My husband’s comment when he saw them was something like, “That would be nice if you’d trim the threads!”

And after the class I decided to weave some of my remaining paper into a collage, so here it is, too.

I recommend classes with David Owen Hastings, as his approach is different and therefore extra useful. He managed to be encouraging to everyone.

I also recommend the Mancuso Schoolhouse platform. Yes, the classes were a little expensive, but still far less than if I’d had to travel for them, and the platform worked well.


About Those Improv Blocks…

Back in 2019 I made up my own improvisational block challenge. When the blocks were done, though, I decided it was going to be difficult to put them all together in one quilt. I had chosen coordinated fabrics but used all the colors from the collection, among other problems.  Of course it was intended as a learning experience, and I learned that I should restrict my color options when I experiment with just a few blocks!

Here are all the blocks together:

And just for comparison, here is a more recent series of improvisational blocks in which I did limit the colors:

So I learned, which is good, but then those 2019 blocks have been sitting around for a while. OK, almost 4 years.

I’ve decided to use the 2019 blocks in a series of small pieces that I quilt by hand. This not only gives the blocks something to do but also gives me something to do with my hands during meetings.

Here’s the first piece so far.

The funny thing is that many people at meetings have asked, “What is it? A table runner?” And when I say, “Art” they just look puzzled.

And a lot of times art is puzzling, so I’m good with that 😀

I do need to find a local art quilt group to join, though. Any suggestions?

2023 In Quilts

I’ve finished 32 quilts so far this year, and 8 additional non-quilt sewing projects. The good news is that I’m not going to show you all of that here. Rather, here are my 10 favorites in no particular order.

Dynamic Dresdens, made in class with Susan Cleveland

Bright Scraps, one of many scrap quilts made this year. And no, the scrap pile has NOT diminished!

It Takes A Village to Can Watermelon, started during the pandemic and finished this year. If only the pandemic were finished, too!

Wild Geese, from a pattern by Beyond the Reef

Arkansas Crossroads, a traditional pattern made from scraps 

Superfans, made from many scraps. Inspired by several quilts I saw on Pinterest, but no pattern

A Girl’s Best Friend–another scrap quilt!

I liked this pattern by Brigitte Heitland of Zen Chic so much that I made it twice

“Susan’s Head Explodes”, 12″ x 12″, a tribute to Susan Cleveland, made for the SAQA auction

My first bowl made with The Mountain Thread Company cord

What’s your favorite?

Dynamic Dresdens with Susan Cleveland

While in Paducah last spring I was able to take Susan Cleveland’s “intermediate to advanced” class called Dynamic Dresdens, and it did not disappoint.

I took a binding class with Susan several years ago and have greatly benefitted from what I learned, so when I heard she was teaching even more techniques I signed up. Not to mention that the class project is really really cute.

This was a two-day class prior to the AQS show. The first day covered Susan’s methods of layering, basting, quilting, binding, and making prairie points–whew! She had warned before class that students should have their materials ready as there would be no time in class for cutting, etc. That was no joke!

Here’s the corner of my project showing the binding and the prairie points done the first day

And speaking of being ready, after reading the materials list I decided to buy her prepared kit instead. It was SO worth it! She had starched the fabric that needed it, pre-shrunk the cording, and even cut the strips for the Dresdens! Score!

Here’s my final piece, which has some variation from Susan’s original design.

First, she did some fancy stitching inside the center circle. I pinned on a vintage button of Swarovski crystal. I think I’ll go back and make a hole for the shank so the button can lie flat, but anyway…

You can see some fancy stitching and wool felt balls in the detail view. Susan did the stitching by hand with Eleganza thread and a shashiko needle. I did it by machine. The wool felt balls are cut in half and the halves anchored with tiny buttons, another technique of Susan’s.

This was a wonderful class with a tremendous amount of information about how to do each technique accurately. I recommend Susan’s classes if you ever have a chance to take one!

Here’s a link to Susan’s website if you want more information.