Wrapping Fun!

Ruby Star Wrapping BookI recently found this book and thought it was perfect for using up stash.  It’s about how to make recyclable wrapping for gifts, whether holiday, birthday, or whatever. So I bought it, and I love it!

Of course, the first thing you need to know is that the cute wrap on the front is very dependent on a cute printed fabric (or paper, I’m not sure)–nothing in the book is as complicated as painting a little face on a package.

My favorite project so far is a gift bag made from a discarded man’s shirt.  This idea was very welcome to me because my stash includes a

large box of discarded clothing to be made into quilts “some day”. Shirt-bag 
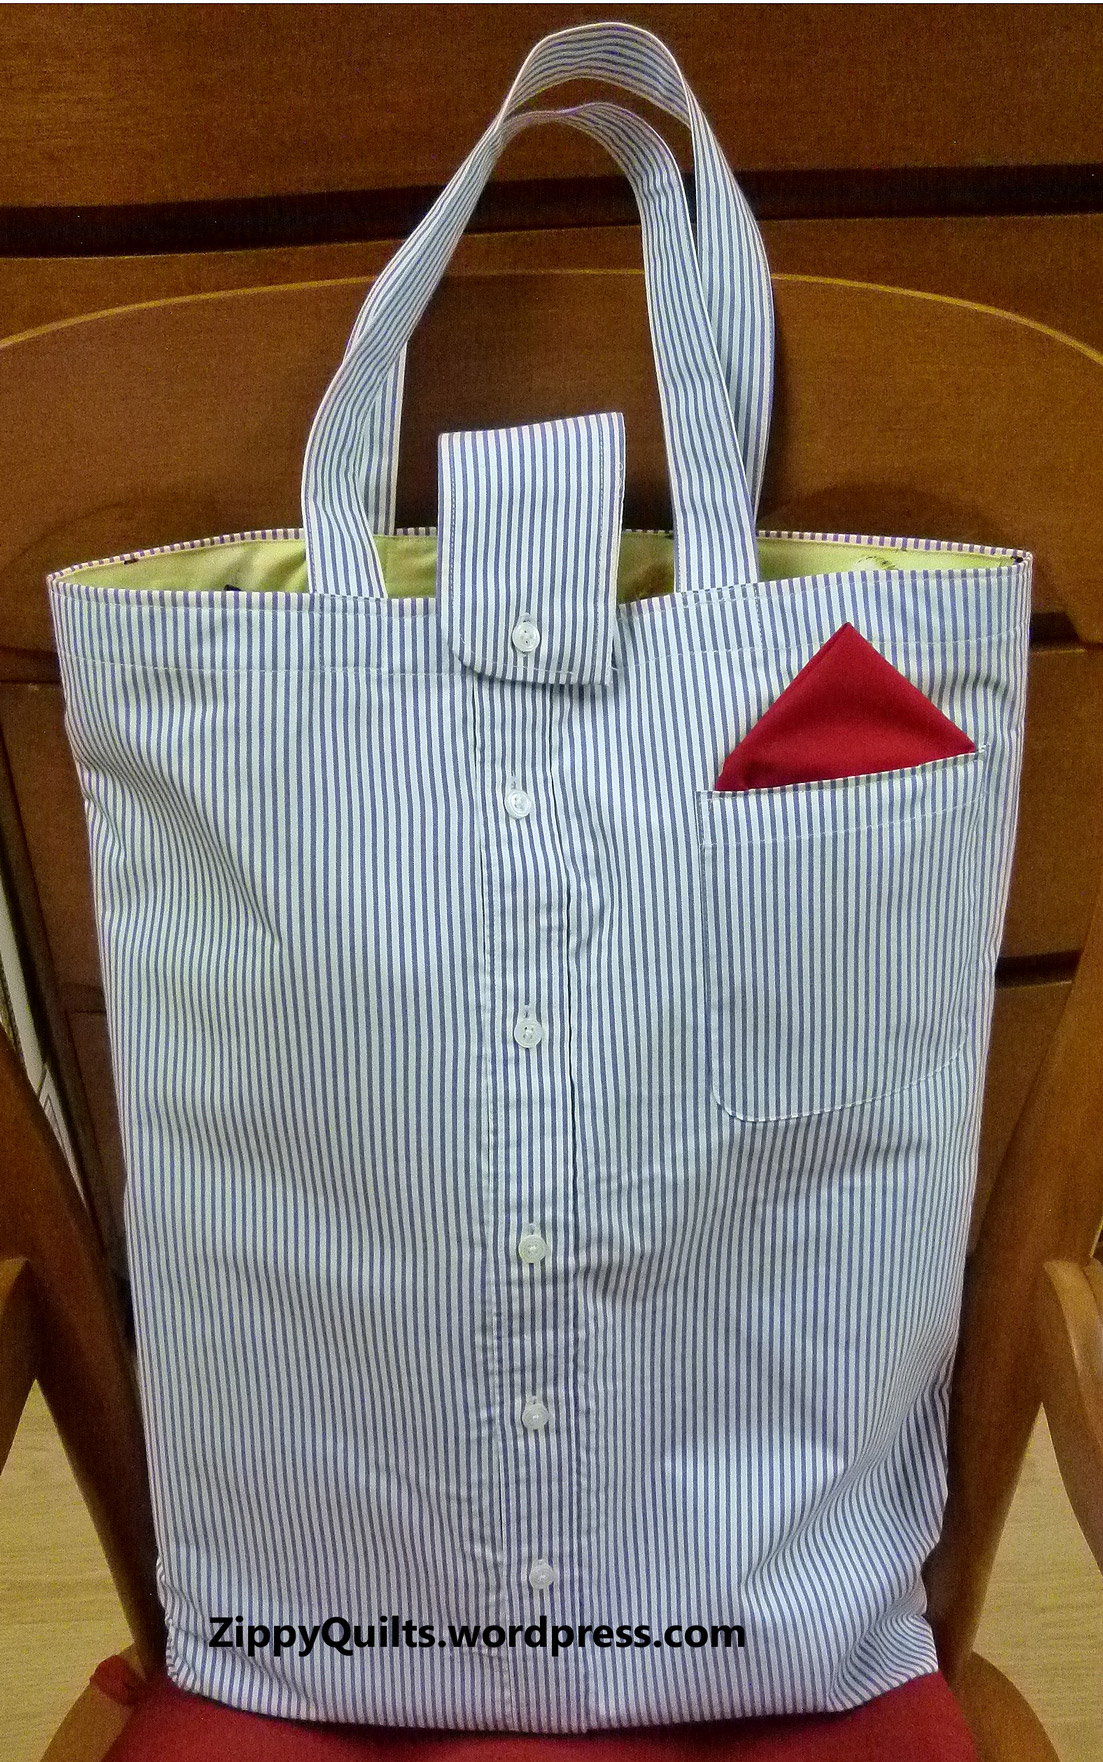
The book has instructions for a simple envelope bag.  I made it with a flat bottom so a wider gift would fit in more smoothly, added a red “hanky” in the pocket, and used the cuff of the shirt to fix the bag so it buttons closed.  My husband swears he wore this shirt last Tuesday and I stole it, but scout’s honor, I didn’t!

The book has lots of ideas about using materials you already have around the house to Paper-flowermake unique wrapping for presents.  I “wrapped” a box for a baby shower by gluing on pages from a baby catalog that came in the mail and making a cute paper flower for the top, following instructions from the book.  I took her suggestion to wrap (or cover with glued pictures in this case) just the top of the box.  That way it can be used over again, since opening it doesn’t require any tearing of the wrap–just lift off the lid, like on TV.

plaid-bagAnother project in the book is for a drawstring bag with a round bottom.  I made this one to use up a couple of yards of fabric from my stash, since I got “a few” yards of fabric for Christmas!  This is big enough to use to give someone a quilt, so I’ll probably make more of them.

I recommend this book!  It has tons of inspiring ideas for wrapping all sorts of things.  I figure if I get started now, I may never have to use wrapping paper again!  And, of course, it uses up lots of stash 🙂

Book page

Here’s another page from the book for you to preview

3 Great Holiday Hints

 Feel free to share this post with anyone who may want to give you a gift! 😉

Here are my Top 3 Gadgets of the moment.  You may need them, too!

  1. Oil pen.
    oil pen

    Oil pen

    This handy little oiler has a long, thin tip at one end and a pushbutton at the other, making it possible to dispense just one drop of machine oil in the tight recesses of your machine!  It comes with a secure screw-on cap so you can even carry it around in your pocket like a pen if you want to.  So far mine has never leaked when I’ve thrown it in my gadget bag for workshops and retreats.  My sweetie got mine on Amazon HERE, though there certainly there may be other sources.

  2. Mini vacuum attachments.
    miniature attachments

    Miniature attachments allow use of a standard vacuum cleaner to clean your machine

    My husband got these for me at a big box home and hardware store, but I’ve seen them at quilt shows, too.  The price varies wildly for what appears to be the same set of attachments, so I say shop around and pay less than $10.  These are especially useful for cleaning a serger because a serger gets so messy so fast, but I use them happily on my regular sewing machine, too.  Just attach the adapter to your regular vacuum cleaner and the little attachments clean those hard-to-reach areas of either machine.  I could still use an even smaller tip, but it’s a big improvement over using only a cleaning brush with no suction.

  3. Fray checkFray-Chek Well, it isn’t exactly a tool, but it has many uses this time of year 🙂   I apply it to ribbon ends so they won’t fray and outline my iron-on applique with it before I sew around the edge.  I don’t do a lot of iron-on applique on things that will be washed, but this makes me feel a little more secure when I do. And shown below IS the latest iron-on applique, which I’m showing just for fun.  I made the onesie tie with a tutorial from a blog called Crap I’ve Made. I love it!  Then I made a pattern from one of my husband’s ties and made a grownup-size T shirt for the Father of the child, so they can match!onesie and t shirt with iron-on ties

So:  go drop a few hints!

Scrappy Strippy Placemats

Here’s a QUICK, EASY way to use up scraps while making some gifts.  Could be gifts for you, of course 😉  I like to make them ahead of time to have as hostess gifts, housewarming surprises, etc.

A bin of scraps being made into a long strip

A bin of scraps being made into a long strip

Start by cutting scraps into strips of set widths.  (I cut and sort all my scraps, so I have bins of strips ready to go.) 1st-strip In this project, I used strips in widths of 1.5”, 2”, 2.5”, and 3”.  Sometimes I just use whatever color comes next, but for this project I selected yellow/gold, orange/red, and brown/tan scraps.  I joined the strips end-to-end to make long strips of a given width.  So, for example, a strip may be 1-1/2 inches wide and be made up of scraps of various lengths from 1-1/2 inches to about 8 inches.

add another strip, then fold them right sides together and sew the seam through all layers

add another strip, then fold them right sides together and sew the seam through all layers

After piecing my long strips, I started a placemat as follows.  I cut a piece of backing 14 x 20 inches, layered a piece of batting 13 x 19 inches on top (batting scraps, yes!), and placed a strip in the middle of the batting. [picture] I used the flip and sew method to add strips on each side, sewing through all layers as I went so that I was quilting while assembling the placemat top.

Strips can be oriented horizontally, vertically, or at any angle you choose!  You can mark your first line to be sure it’s straight if you want, but I just eyeballed it.consecutive-strips-web

I pressed after adding each strip, and every few strips I turned it over and ironed the back of the mat, too.

.

.

.

.

When the mat was finished, I trimmed it to 12 x 18 inches.  Note that it helps to make the last strip added a wide one so the mat can be trimmed to size without leaving a really skinny strip on one edge.

Last strips added are wide to allow for trimming to size

Last strips added are wide to allow for trimming to size

I bound the edges with scraps of bias binding left over from various quilts as well as scraps from my bins.  I got four mats done easily in a day, so this would work as a last minute gift—we all need those!finished-mat-web